01.Nginx基础Http原理
1.Http协议概述
HTTP全称HyperText Transfer Protocol中文名为超文本传输协议
1.什么是超文本?
包含有超链接(Link)和各种多媒体元素标记的文本。这些超文本文件彼此链接,形成网状(Web),因此又被称为网页(Web Page)。这些链接使用URL表示。最常见的超文本格式是超文本标记语言HTML。
html文件->包含各种各样的元素(URL链接)->形成web page简称web页面。
2.那什么是URL,URL简称统一资源定位符。那URL的组成部分是由协议, 域名:端口, 路径和文件名

3.那超文本传输http协议是什么?
是一种按照URL指示,将超文本文档从一台主机(Web服务器)传输到另一台主机(浏览器)的应用层协议,以实现超链接的功能。
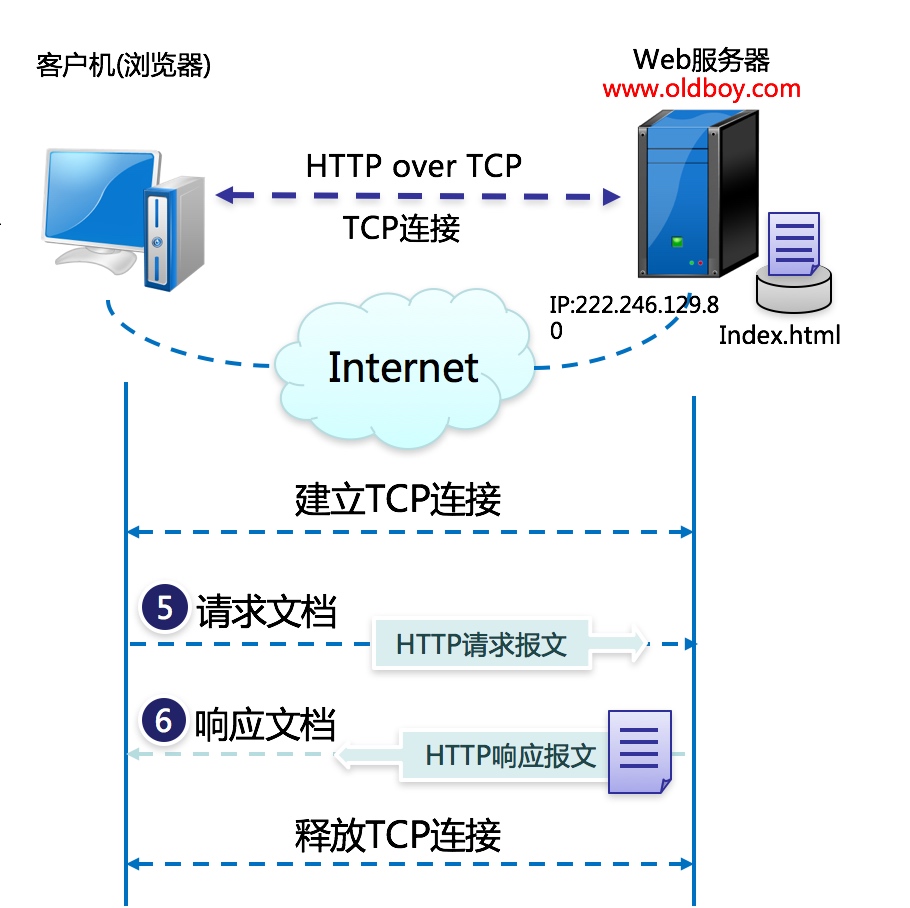
2.Http工作原理
3.Http协议版本
http1.0协议使用的是短连接:建立一次tcp的连接,发起一次http的请求,结束,tcp断开。http1.1协议使用的是长连接:建立一次tcp的连接,发起多次http的请求,结束,tcp端口。
3.Http请求响应
1.http请求报文的方法
1 | get # 获得请求文件信息的数据内容(下载) |
2.http返回状态码(Status-Code), 以3位数字组成
1 | 200 # 成功请求 |
3.用户访问网站携带的参数,以及服务端返回的参数
1 | #1.概况 |
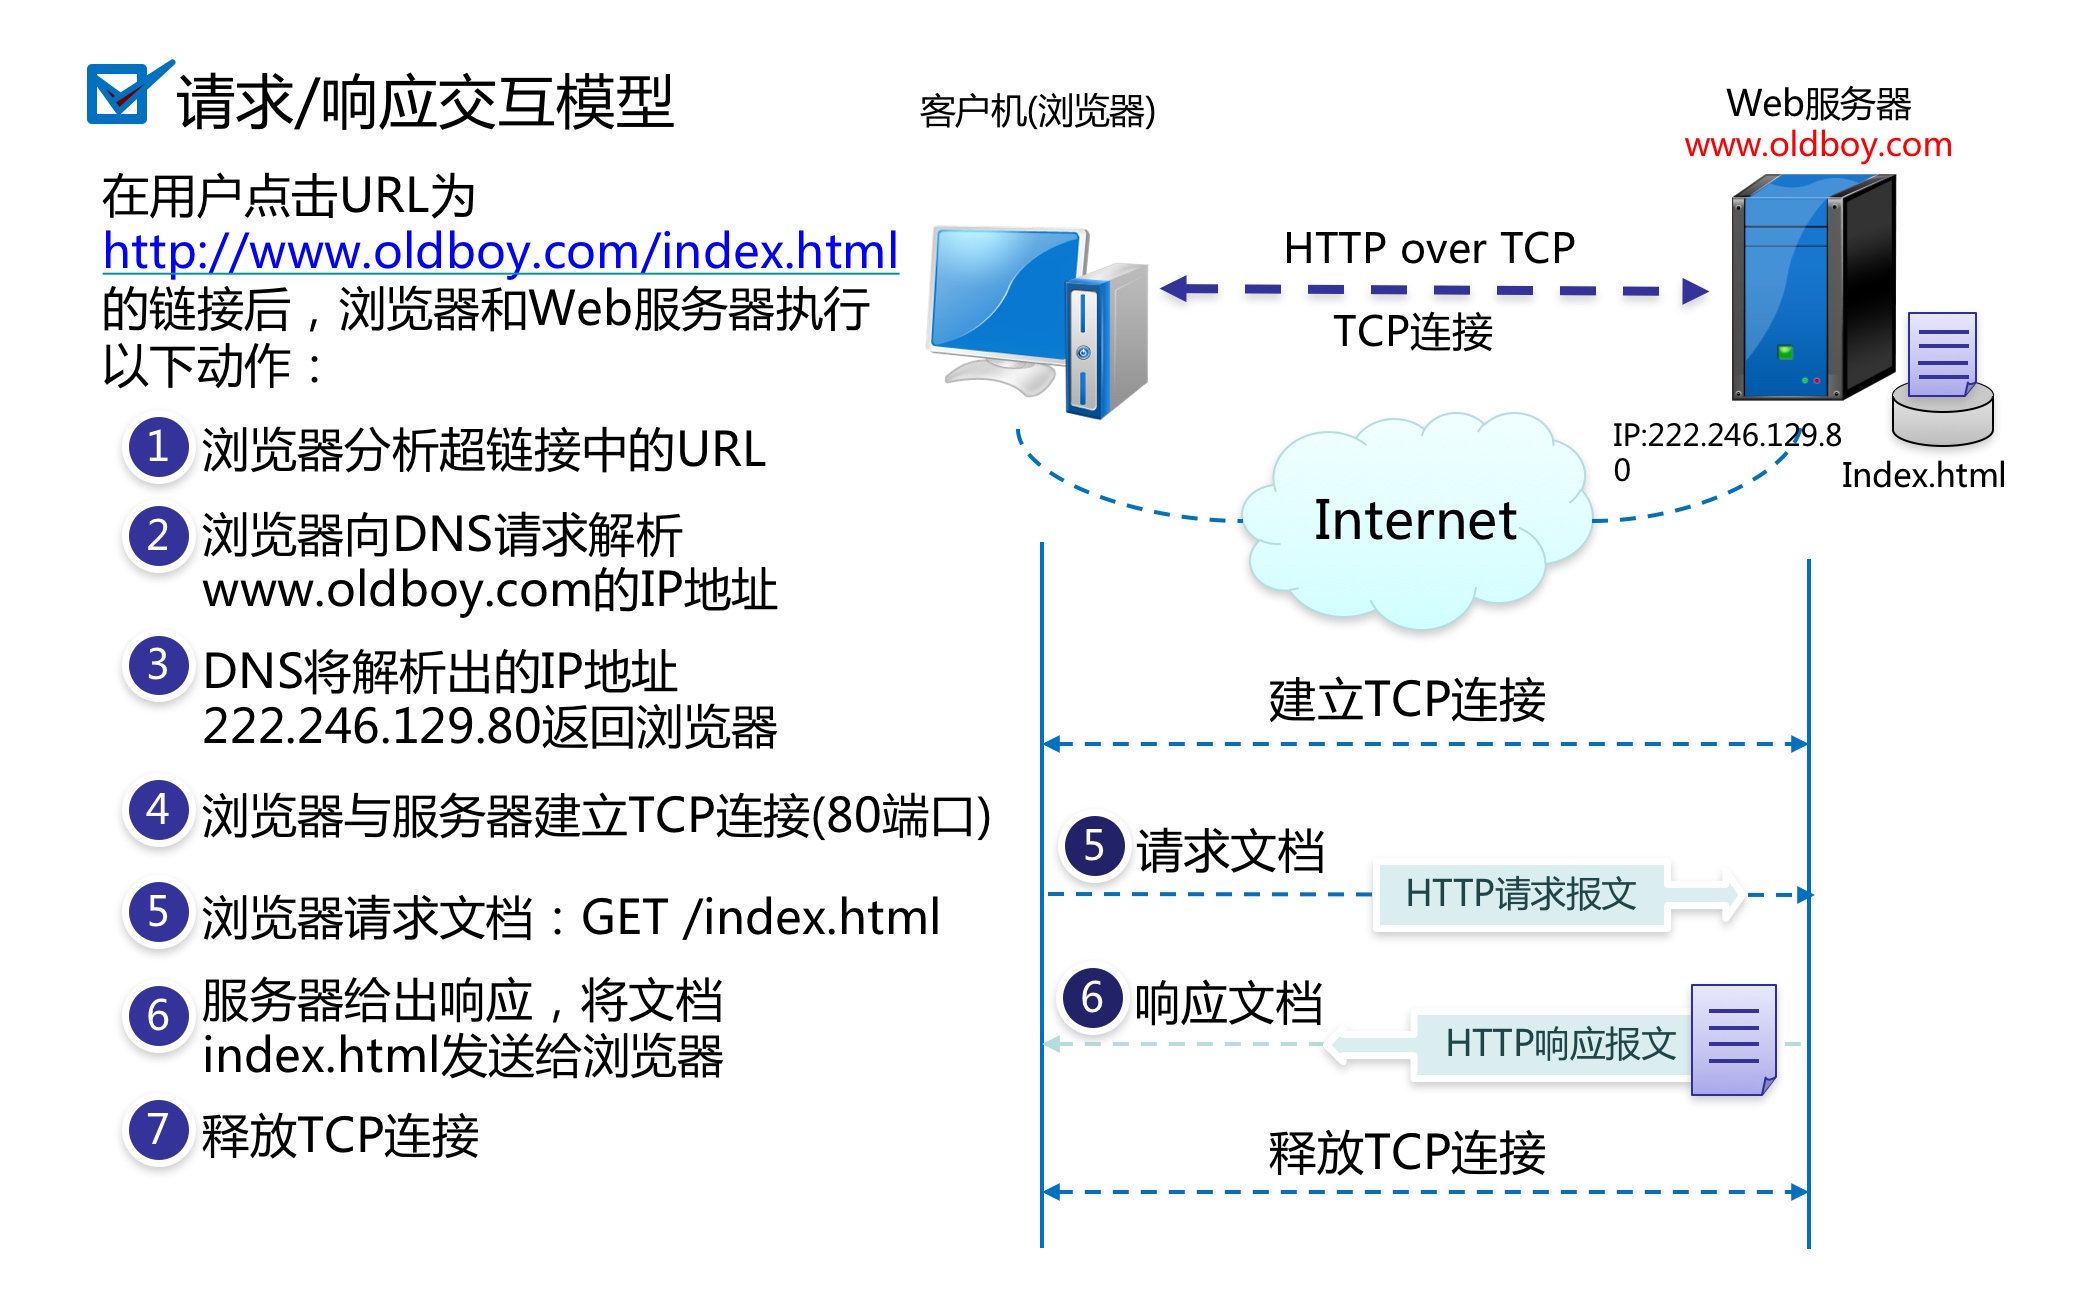
4.Http相关术语pv、ip、uv 假设公司有一座大厦,大厦有100人,每个人有一台电脑和一部手机,上网都是通过nat转换出口,每个人点击网站2次, 请问对应的pv,uv,ip分别是多少
PV:页面浏览量, 400
uv:独立的客户, 200
ip:独立IP, 1个
6.Http访问流程
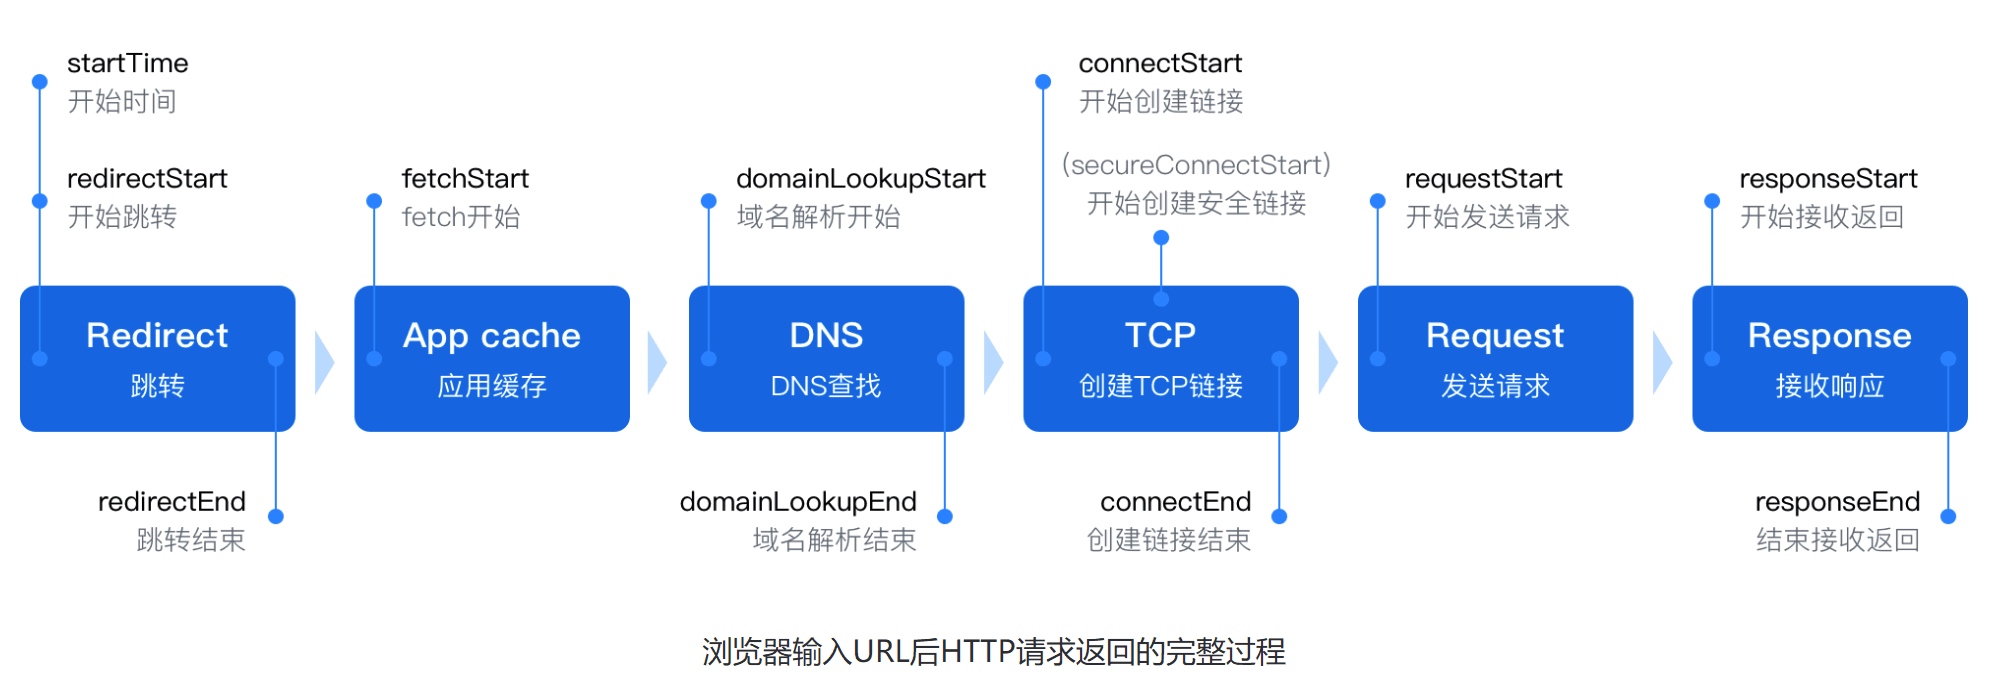
1.http协议原理总结
1 | 1.用户输入域名->浏览器跳转->浏览器缓存->Hosts文件->DNS解析( 递归查询 | 迭代查询 ) |
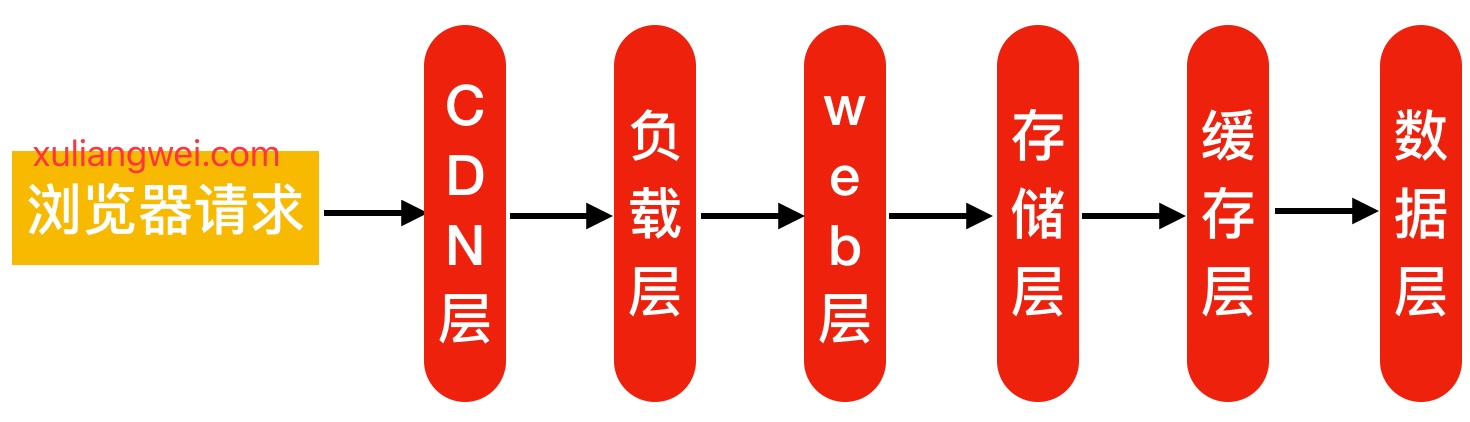
2.用户访问网站集群架构流程
1 | 1.客户端发起http请求,请求会先抵达前端的防火墙 |
3.面试时建议按照如下五层,进行分层讲解给面试官。
02.Nginx Web快速入门
1.Nginx基本简述
Nginx是一个开源且高性能、可靠的Http Web服务、代理服务。
开源: 直接获取源代码高性能: 支持海量并发可靠: 服务稳定
我们为什么选择 Nginx服务
Nginx非常轻量
功能模块少 (源代码仅保留http与核心模块代码,其余不够核心代码会作为插件来安装)代码模块化 (易读,便于二次开发,对于开发人员非常友好)
互联网公司都选择Nginx
1.Nginx技术成熟,具备的功能是企业最常使用而且最需要的2.适合当前主流架构趋势, 微服务、云架构、中间层3.统一技术栈, 降低维护成本, 降低技术更新成本。
Nginx采用Epool网络模型,Apache采用Select模型
Select: 当用户发起一次请求,select模型就会进行一次遍历扫描,从而导致性能低下。Epool: 当用户发起请求,epool模型会直接进行处理,效率高效,并无连接限制。
Nginx 典型应用场景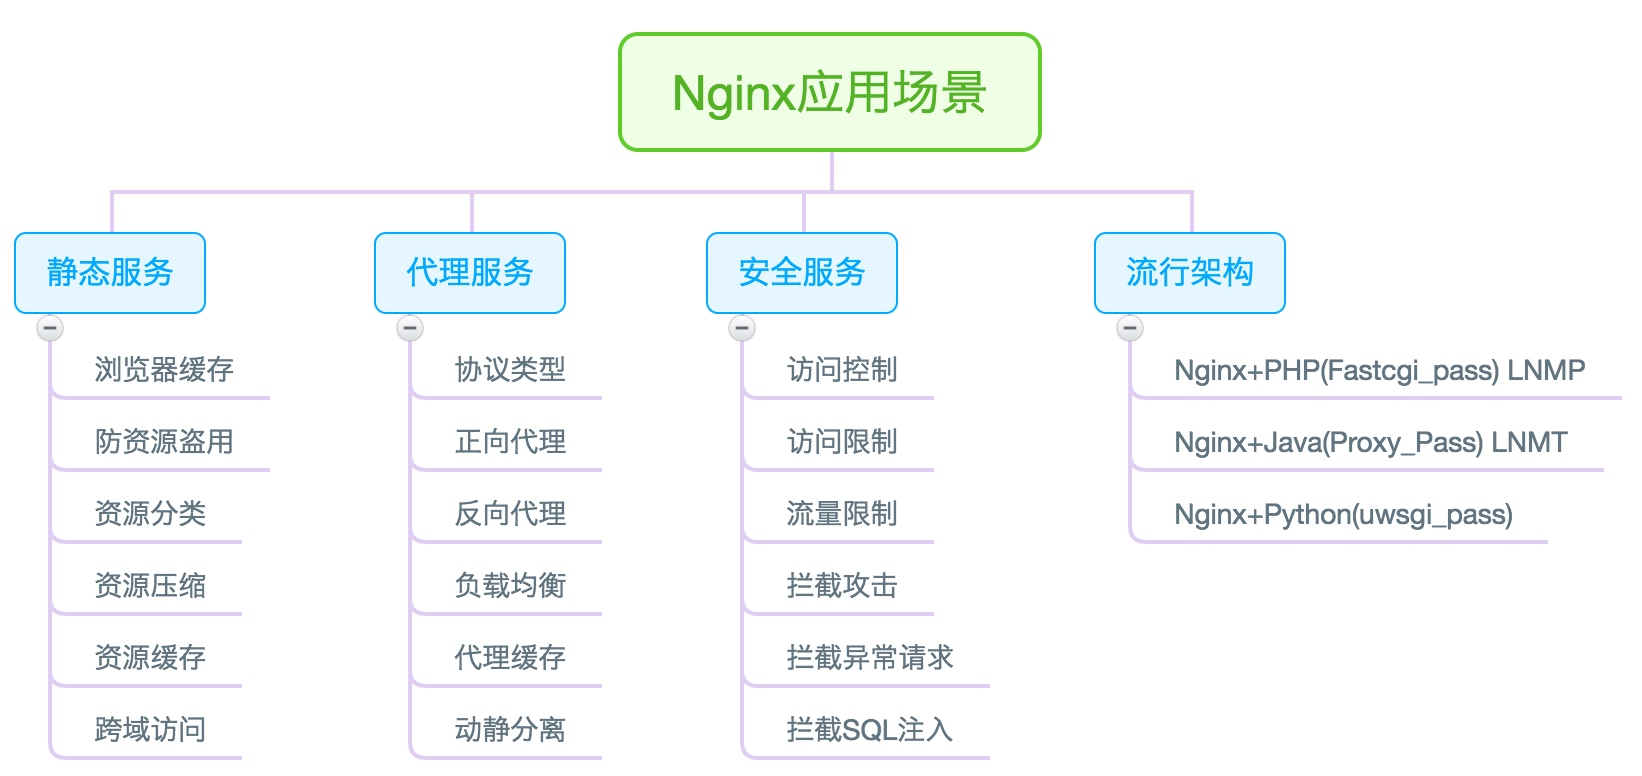
2.Nginx快速安装
Nginx软件安装的方式有很多种
1.源码编译=>Nginx (1.版本随意 2.安装复杂 3.升级繁琐)
2.epel仓库=>Nginx (1.版本较低 2.安装简单 3.配置不易读)
3.官方仓库=>Nginx (1.版本较新 2.安装简单 3.配置易读,推荐)
1.安装Nginx软件所需依赖包
1 | [root@web ~] |
2.配置nginx官方 yum源
1 | [root@web ~]# vim /etc/yum.repos.d/nginx.repo |
3.安装Nginx服务,启动并加入开机自启
1 | [root@web ~] |
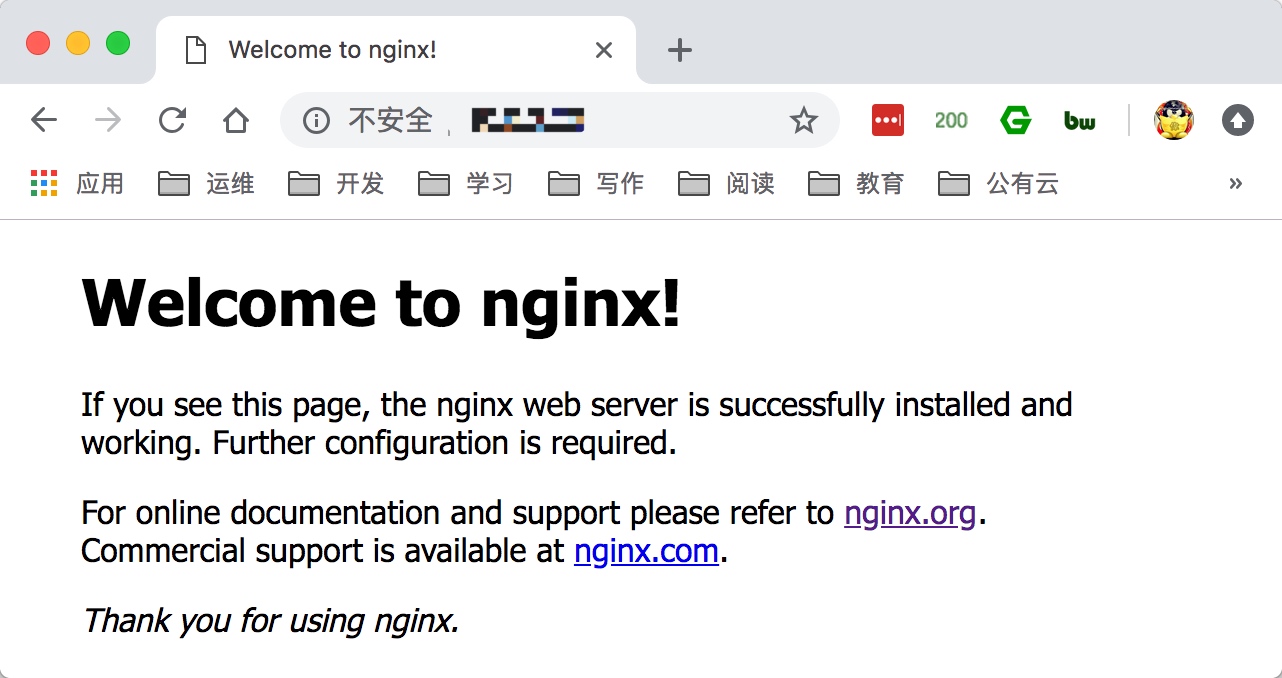
4.通过浏览器访问该服务器ip或url地址
5.检查Nginx软件版本以及编译参数
1 | [root@web ~] |
6.为了让大家更清晰的了解Nginx软件的全貌,可使用rpm -ql nginx查看整体的目录结构及对应的功能,如下表格整理了Nginx比较重要的配置文件
1.Nginx主配置文件
| 路径 | 类型 | 作用 |
|---|---|---|
| /etc/nginx/nginx.conf | 配置文件 | nginx主配置文件 |
| /etc/nginx/conf.d/default.conf | 配置文件 | 默认网站配置文件 |
2.Nginx代理相关参数文件
| 路径 | 类型 | 作用 |
|---|---|---|
| /etc/nginx/fastcgi_params | 配置文件 | Fastcgi代理配置文件 |
| /etc/nginx/scgi_params | 配置文件 | scgi代理配置文件 |
| /etc/nginx/uwsgi_params | 配置文件 | uwsgi代理配置文件 |
3.Nginx编码相关配置文件
| 路径 | 类型 | 作用 |
|---|---|---|
| /etc/nginx/win-utf | 配置文件 | Nginx编码转换映射文件 |
| /etc/nginx/koi-utf | 配置文件 | Nginx编码转换映射文件 |
| /etc/nginx/koi-win | 配置文件 | Nginx编码转换映射文件 |
| /etc/nginx/mime.types | 配置文件 | Content-Type与扩展名 |
4.Nginx管理相关命令
| 路径 | 类型 | 作用 |
|---|---|---|
| /usr/sbin/nginx | 命令 | Nginx命令行管理终端工具 |
| /usr/sbin/nginx-debug | 命令 | Nginx命令行与终端调试工具 |
4.Nginx日志相关目录与文件
| 路径 | 类型 | 作用 |
|---|---|---|
| /var/log/nginx | 目录 | Nginx默认存放日志目录 |
| /etc/logrotate.d/nginx | 配置文件 | Nginx默认的日志切割 |
3.Nginx默认配置
Nginx主配置文件/etc/nginx/nginx.conf是一个纯文本类型的文件,整个配置文件是以区块的形式组织的。一般,每个区块以一对大括号{}来表示开始与结束。Nginx主配置文件整体分为三块进行学习,分别是CoreModule(核心模块),EventModule(事件驱动模块),HttpCoreModule(http内核模块)
CoreModule核心模块
1 | user www; #Nginx进程所使用的用户 |
events事件模块
1 | events { |
http内核模块
1 | http { #http层开始 |
http server location扩展了解项
http{}层下允许有多个Server{}层,一个Server{}层下又允许有多个Locationhttp{} 标签主要用来解决用户的请求与响应。server{} 标签主要用来响应具体的某一个网站。location{} 标签主要用于匹配网站具体URL路径。
4.Nginx网站配置
1.新增nginx配置文件
1 | [root@web01 conf.d]# cat /etc/nginx/conf.d/game.conf |
2.放置游戏源代码文件至nginx配置文件root指定的目录
1 | [root@web01 conf.d]# mkdir /code && cd /code |
3.检查nginx的语法是否存在错误
1 | [root@web01 code]# nginx -t |
4.重载Nginx [reload|restart]
1 | [root@web01 code] |
5.Nginx虚拟主机
通常在企业中可能会有很多业务系统,那么多套业务服务如何使用Nginx配置?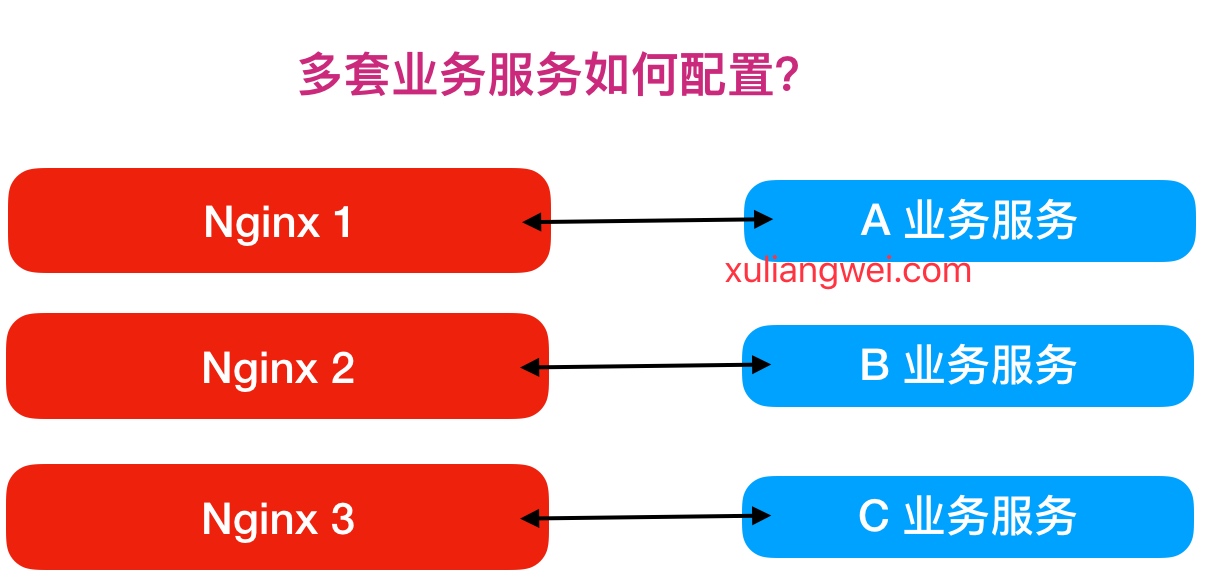
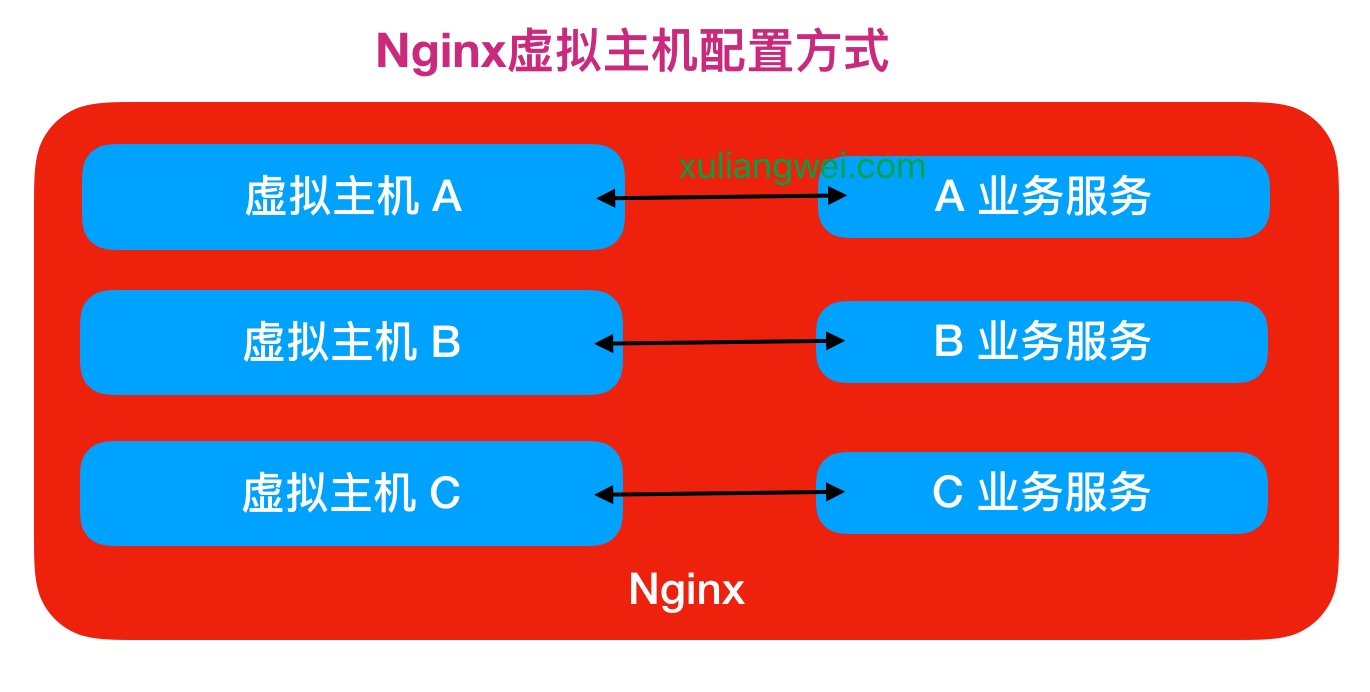
如果使用如上方式部署,则需要多台服务器配置Nginx,但如果使用虚拟主机方式,则在同一个Nginx上运行多套单独服务,这些服务是相互独立的。简单来说,看似多套业务系统,实则可以运行在一台Nginx服务上
Nginx配置虚拟主机有如下三种方式:
方式一、基于主机多IP方式方式二、基于端口的配置方式方式三、基于多个hosts名称方式(多域名方式)
1.基于多IP的虚拟主机配置实战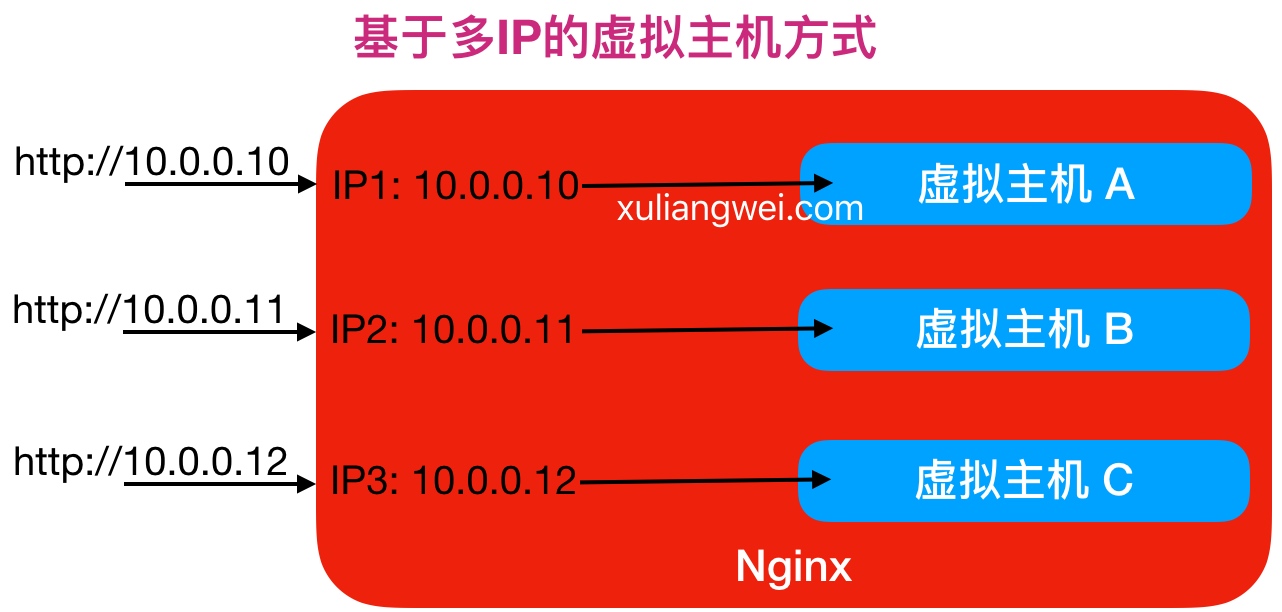
那么基于多IP的方式,有如下两种方式: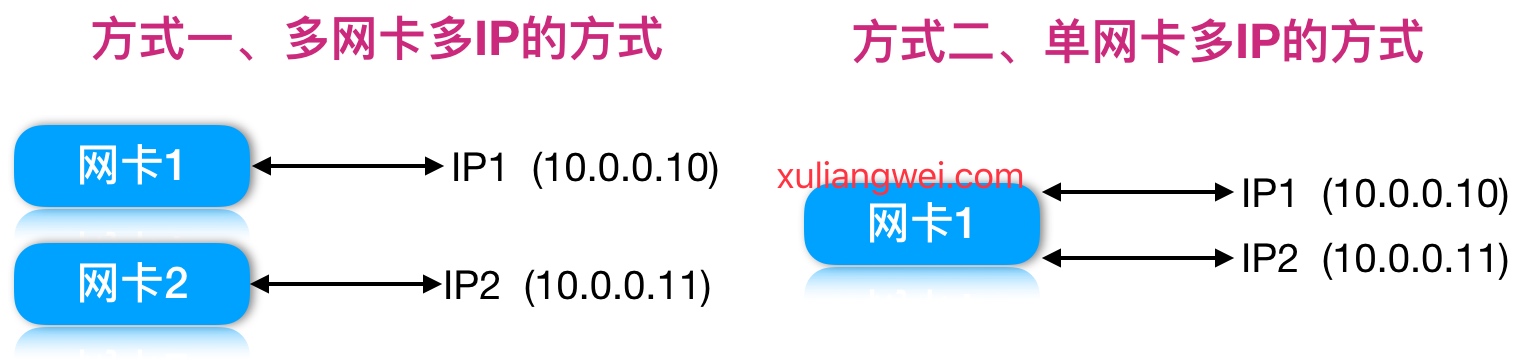
1.配置多网卡多IP的方式
1 | server { |
1.配置单网卡多IP的方式
1 | #添加一个IP |
2.基于端口虚拟主机配置实战
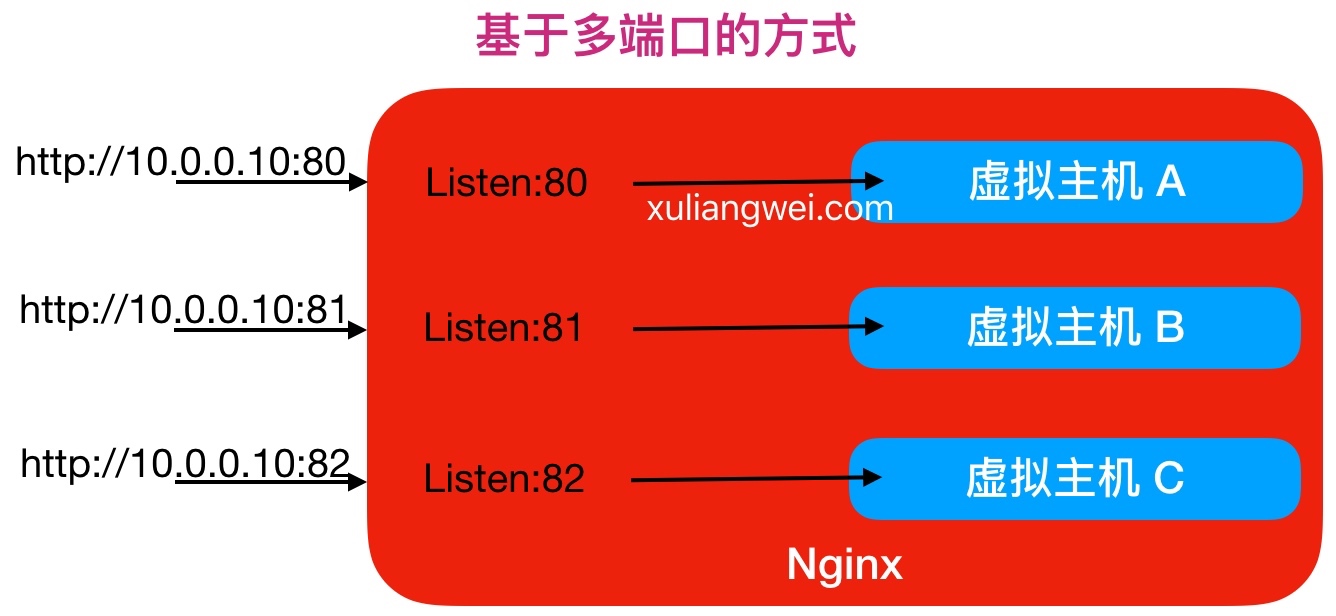
Nginx多端口虚拟主机方式,具体配置如下
1 | #仅修改listen监听端口即可, 但不能和系统端口出现冲突 |
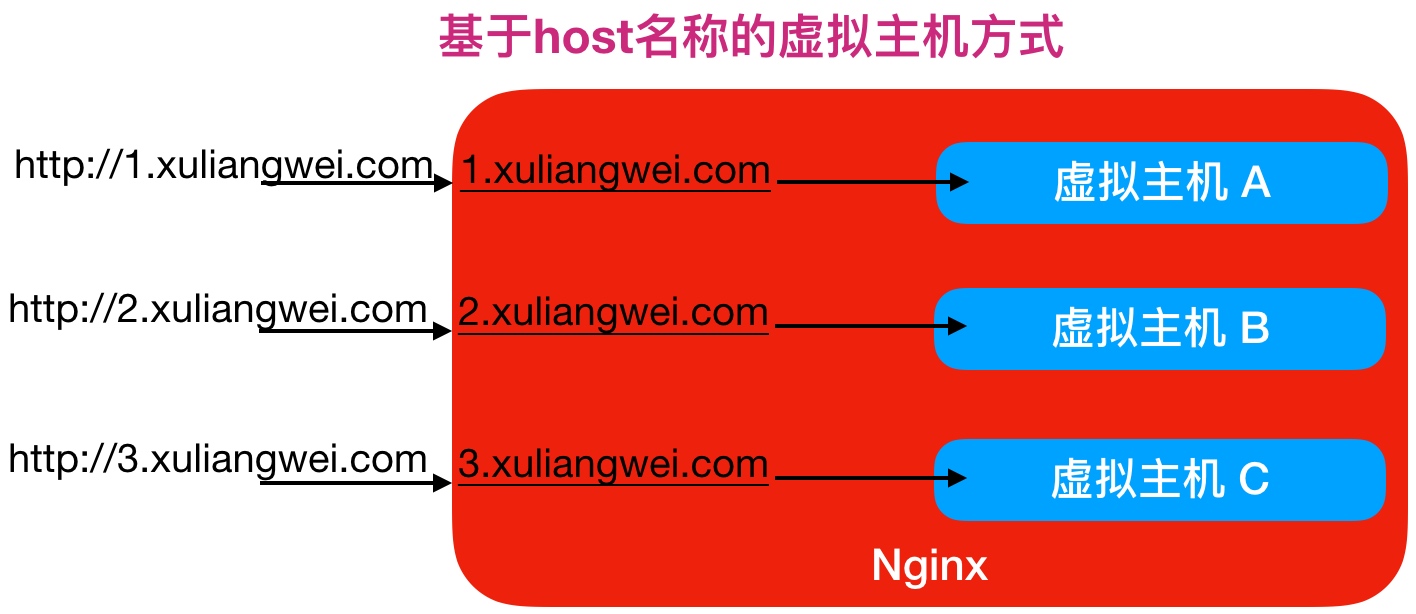
3.基于host名称的虚拟主机方式配置实战
1.创建对应的web站点目录以及程序代码
1 | [root@web01 ~] |
2.配置不同域名的虚拟主机
1 | [root@web02 ~]# cat /etc/nginx/conf.d/server1.conf |
6.Nginx日志管理
Nginx有非常灵活的日志记录模式,每个级别的配置可以有各自独立的访问日志。日志格式通过log_format命令定义格式。
1.log_format定义日志格式语法
1 | # 配置语法: 包括: error.log access.log |
2.默认Nginx定义语法格式如下
1 | log_format main '$remote_addr - $remote_user [$time_local] "$request" ' |
3.Nginx日志格式允许包含的内置变量
1 | remote_addr # 记录客户端IP地址 |
4.access_log日志配置语法
1 | Syntax: access_log path [format [buffer=size] [gzip[=level]] [flush=time] [if=condition]]; |
5.Nginx Access日志配置实践
1 | server { |
6.日志切割logrotate
1 | [root@nginx conf.d] |
7.日志切割后的效果
1 | [root@bgx ~]# ll /var/log/nginx/ |
03.Nginx常用基础模块
老男孩Linux云计算运维QQ交流群: 384467551 226199307
老男孩教育官网 http://www.oldboyedu.com
1.Nginx目录索引
ngx_http_autoindex_module模块处理以斜杠字符(‘/‘)结尾的请求,并生成目录列表。当ngx_http_index_module模块找不到索引文件时,通常会将请求传递给模块。
1.指令
1 |
|
2.示例配置
1 | [root@web ~]# cat /etc/nginx/conf.d/module.conf |
2.Nginx状态监控
ngx_http_stub_status_module模块提供对基本状态信息的访问。默认情况下不构建此模块,应使用–with-http_stub_status_module 配置参数启用它 。
1.指令
1 | Syntax: stub_status; |
2.示例配置
1 | [root@web ~]# cat /etc/nginx/conf.d/module.conf |
3.此配置创建一个简单的网页,其基本状态数据可能如下所示:
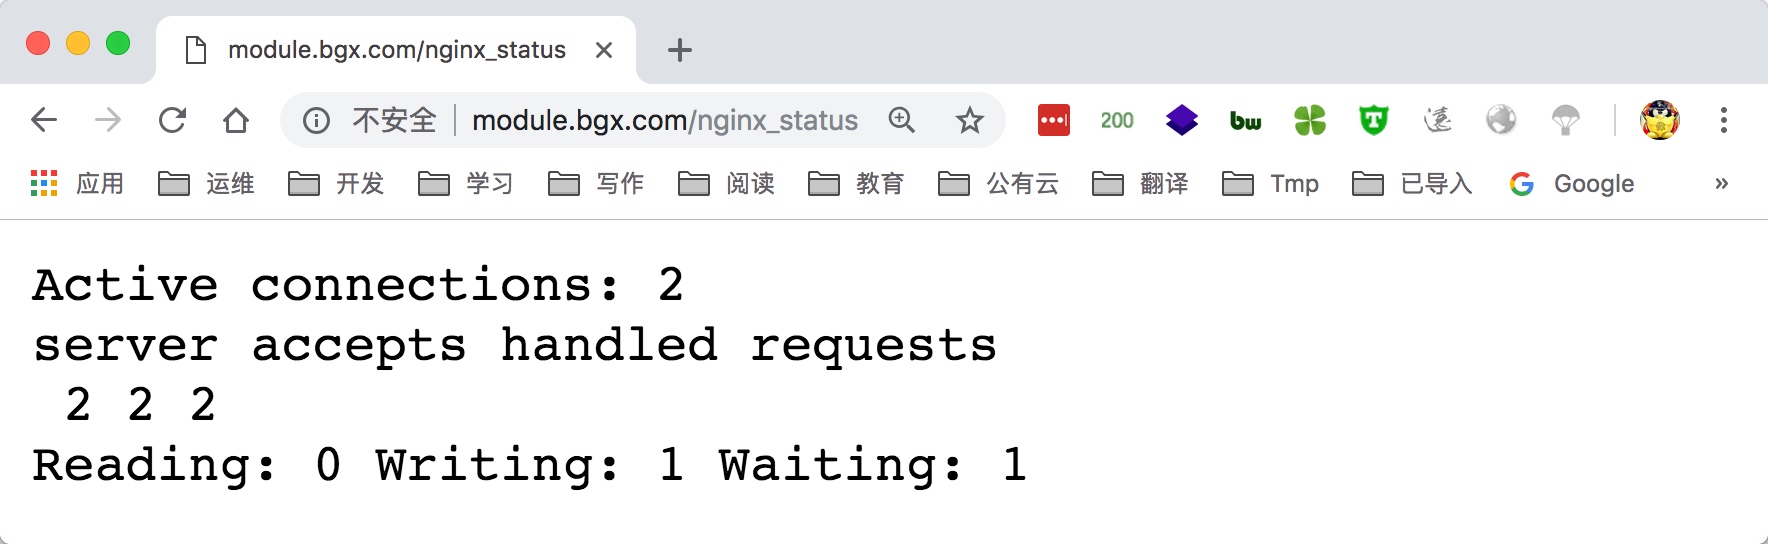
4.提供以下状态信息
1 | Active connections # 当前活动客户端连接数,包括Waiting等待连接数。 |
3.Nginx访问控制
ngx_http_access_module模块允许限制对某些客户端地址的访问。
1.指令
1 | #允许配置语法 |
2.示例配置,拒绝指定的IP访问该网站的/nginx_status, 其他IP全部允许访问
1 | [root@web ~]# cat /etc/nginx/conf.d/module.conf |
3.示例配置,只允许指定的来源IP能访问/nginx_status, 其它网段全部拒绝
1 | [root@web ~]# cat /etc/nginx/conf.d/module.conf |
注意:deny和allow的顺序是有影响的
默认情况下,从第一条规则进行匹配如果匹配成功,则不继续匹配下面的内容。如果匹配不成功,则继续往下寻找能匹配成功的内容。
4.Nginx资源限制
ngx_http_auth_basic_module模块允许使用HTTP基本身份验证,验证用户名和密码来限制对资源的访问。
1.指令
1 |
|
2.指定保存用户名和密码的文件,格式如下:
1 |
|
3.示例配置,基于用户名和密码认证实践
1 | server { |
4.Nginx访问限制
经常会遇到这种情况,服务器流量异常,负载过大等等。对于大流量恶意的攻击访问,会带来带宽的浪费,服务器压力,从而影响业务,针对这种情况我们可以考虑对同一个ip的连接数,请求数、进行限制。
ngx_http_limit_conn_module模块用于限制定义key的连接数,特别是来自单个IP地址的连接数。但并非所有连接都被计算在内,仅当连接已经读取了整个请求头时才计算连接。
1.指令
1 | Syntax: limit_conn_zone key zone=name:size; |
2.设置共享内存区域和给定键值的最大允许连接数。超过此限制时,服务器将返回错误以回复请求
1 | # http标签段定义连接限制 |
3).使用ab工具进行压力测试
1 | [root@xuliangwei ~] |
4).nginx日志结果
1 | 2018/10/24 18:04:49 [error] 28656#28656: *1148 limiting connections by zone "conn_zone", client: 123.66.146.123, server: www.xuliangwei.com, request: "GET / HTTP/1.0", host: "www.xuliangwei.com" |
ngx_http_limit_req_module模块用于限制定义key请求的处理速率,特别单一的IP地址的请求的处理速率。
1.指令
1 |
|
2.设置共享内存区域和请求的最大突发大小。过多的请求被延迟,直到它们的数量超过最大的限制,在这种情况下请求以错误终止。
1 | # http标签段定义请求限制, rate限制速率,限制一秒钟最多一个IP请求 |
3).使用ab工具进行压力测试
1 | [root@xuliangwei ~] |
4).nginx日志结果
1 | 2018/10/24 07:38:53 [error] 81020#0: *8 limiting requests, excess: 3.998 by zone "req_zone", client: 10.0.0.10, server: module.bgx.com, request: "GET /index.html HTTP/1.0", host: "10.0.0.10" |
Nginx连接限制没有请求限制有效?
我们先来回顾一下http协议的连接与请求,首先HTTP是建立在TCP基础之上, 在完成HTTP请求需要先建立TCP三次握手(称为TCP连接),在连接的基础上在完成HTTP的请求。
所以多个HTTP请求可以建立在一次TCP连接之上, 那么我们对请求的精度限制,当然比对一个连接的限制会更加的有效,因为同一时刻只允许一个TCP连接进入, 但是同一时刻多个HTTP请求可以通过一个TCP连接进入。所以针对HTTP的请求限制才是比较优的解决方案。
6.Nginx Location
使用Nginx Location可以控制访问网站的路径, 但一个server允许出现多个location配置, 那多个location出现冲突谁的优先级会更高呢
1.Location语法示例
1 | location [=|^~|~|~*|!~|!~*|/] /uri/ { ... |
2.Location语法优先级排列
| 匹配符 | 匹配规则 | 优先级 |
|---|---|---|
| = | 精确匹配 | 1 |
| ^~ | 以某个字符串开头 | 2 |
| ~ | 区分大小写的正则匹配 | 3 |
| ~* | 不区分大小写的正则匹配 | 4 |
| !~ | 区分大小写不匹配的正则 | 5 |
| !~* | 不区分大小写不匹配的正则 | 6 |
| / | 通用匹配,任何请求都会匹配到 | 7 |
3.配置网站验证Location优先级
1 | [root@Nginx conf.d]# cat testserver.conf |
4.测试Location优先级
1 | # 优先级最高符号= |
5.Locaiton规则配置应用场景
1 | # 通用匹配,任何请求都会匹配到 |
04.Nginx搭建流行架构
1.LNMP架构概述
1.什么是LNMP
LNMP是一套技术的组合,L=Linux、N=Nginx、M~=MySQL、P~=PHP
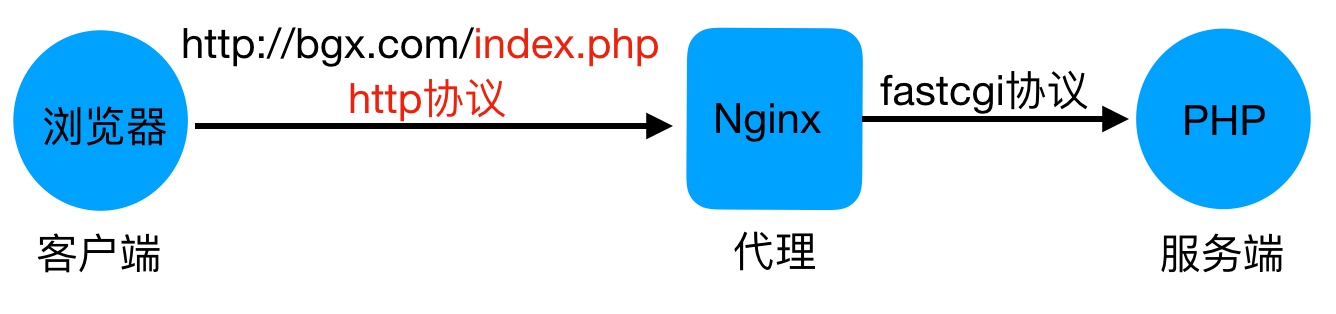
2.LNMP架构是如何工作的
首先Nginx服务是不能处理动态请求,那么当用户发起动态请求时, Nginx又是如何进行处理的。当用户发起http请求,请求会被Nginx处理,如果是静态资源请求Nginx则直接返回,如果是动态请求Nginx则通过fastcgi协议转交给后端的PHP程序处理,具体如下图所示
3.Nginx与Fast-CGI详细工作流程如下图所示
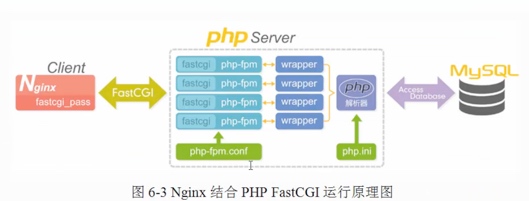
1.用户通过http协议发起请求,请求会先抵达LNMP架构中的Nginx2.Nginx会根据用户的请求进行Location规则匹配3.Location如果匹配到请求是静态,则由Nginx读取本地直接返回4.Location如果匹配到请求是动态,则由Nginx将请求转发给fastcgi协议5.fastgi收到后会将请求交给php-fpm管理进程,php-fpm管理进程接收到后会调用具体的工作进程warrap6.warrap进程会调用php程序进行解析,如果只是解析代码,php直接返回7.如果有查询数据库操作,则由php连接数据库(用户 密码 IP)发起查询的操作8.最终数据由mysql->php->php-fpm->fastcgi->nginx->http->user
2.LNMP架构环境部署
1) 使用官方仓库安装Nginx
1 | [root@nginx ~]# cat /etc/yum.repos.d/nginx.repo |
2) 配置Nginx进程运行用户
1 | [root@nginx ~] |
3) 启动Nginx,并将Nginx加入开机自启
1 | [root@nginx ~] |
4) 使用第三方扩展源安装php7.1
1 | #不要安装如下rpm会导致失败 |
5) 配置php-fpm用户与Nginx的运行用户保持一致
1 | [root@nginx ~] |
6) 启动php-fpm,并将其加入开机自启
1 | [root@nginx ~] |
7) 安装Mariadb数据库
1 | [root@nginx ~] |
8) 启动Mariadb数据库, 并加入开机自动
1 | [root@nginx ~] |
9) 给Mariadb配置登陆密码,并是新密码进行登录数据库
1 | [root@nginx ~] |
2.LNMP架构环境配置
在将Nginx与PHP集成过程中, 需要先了解 Fastcgi代理配置语法
1.设置fastcgi服务器的地址,该地址可以指定为域名或IP地址,以及端口
1 | Syntax: fastcgi_pass address; |
2.设置fastcgi默认的首页文件,需要结合fastcgi_param一起设置
1 | Syntax: fastcgi_index name; |
3.通过fastcgi_param设置变量,并将设置的变量传递到后端的fastcgi服务器
1 | Syntax: fastcgi_param parameter value [if_not_empty]; |
4.通过图形方式展示fastcgi_index与fastcgi_param作用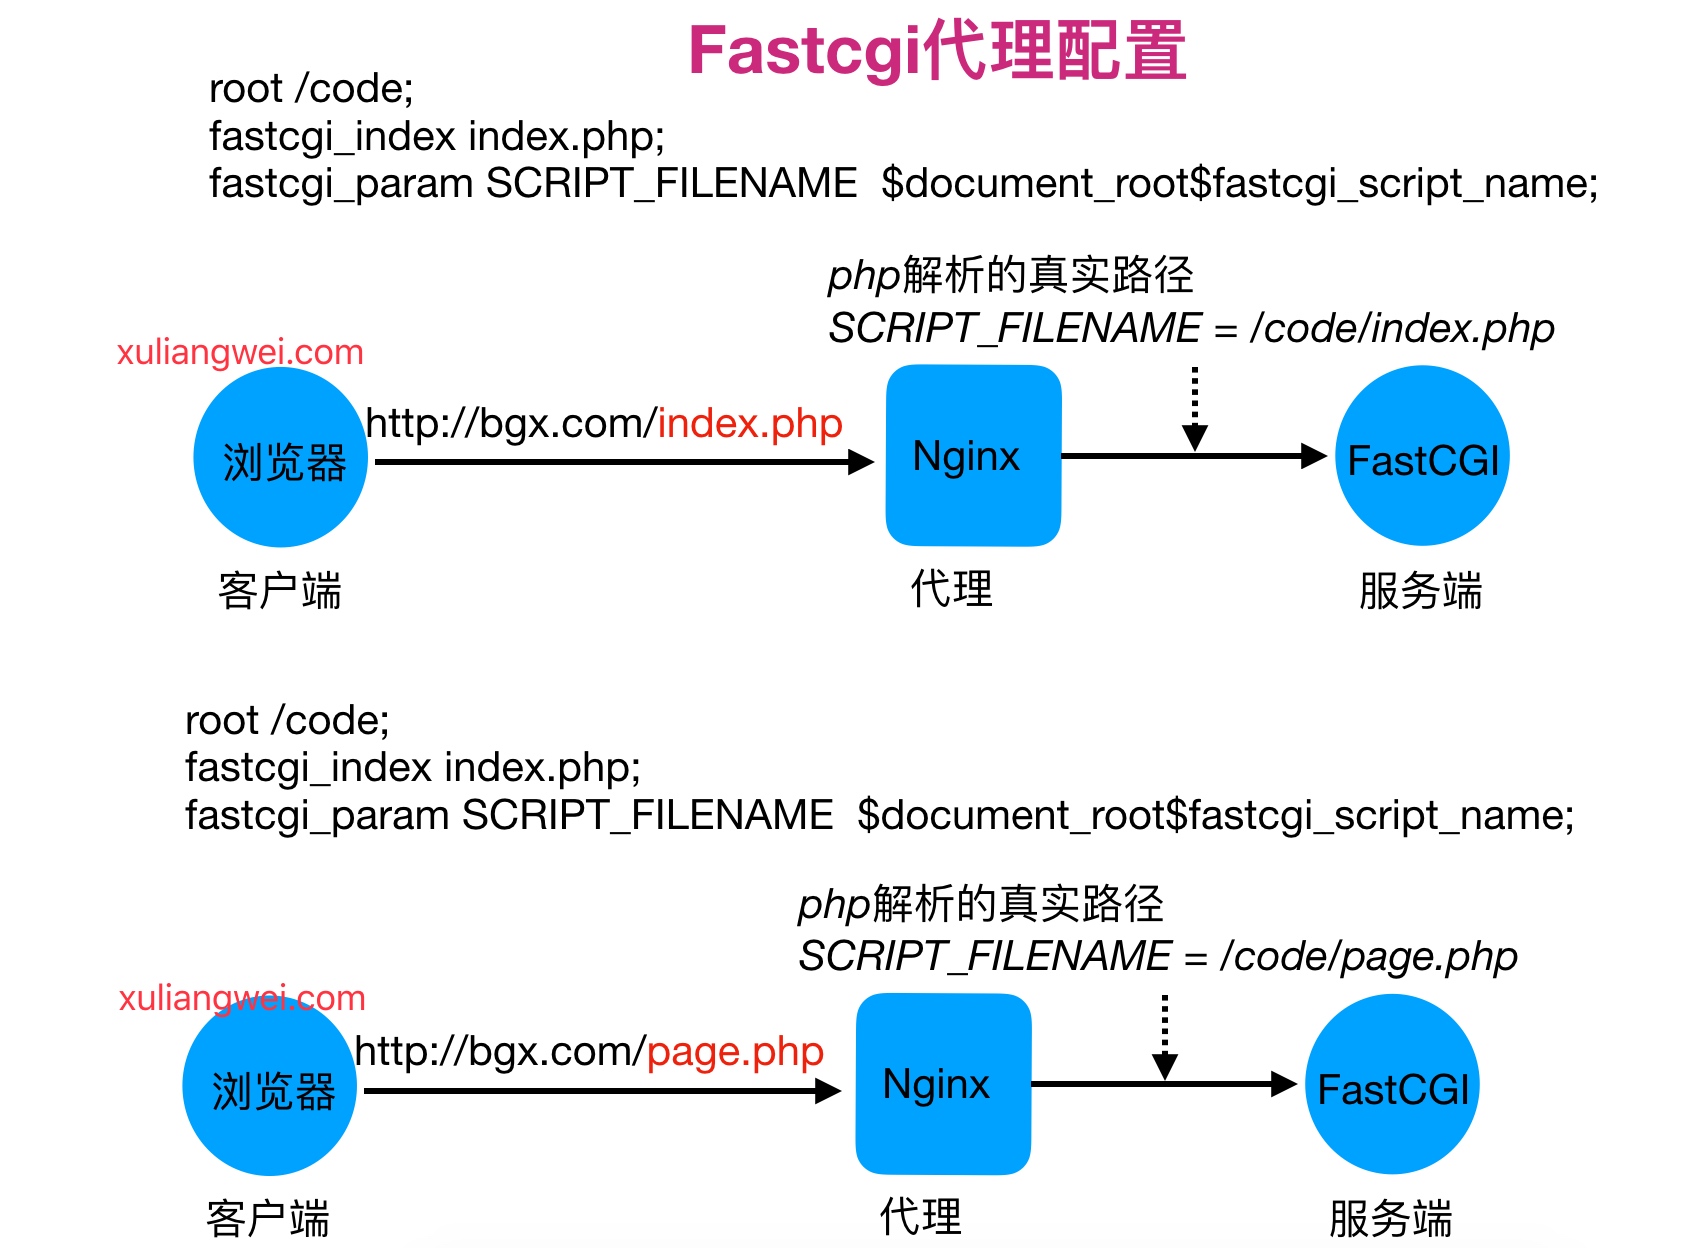
5.最终Nginx连接Fastcgi服务器配置如下
1 | [root@nginx ~]# cat /etc/nginx/conf.d/php.conf |
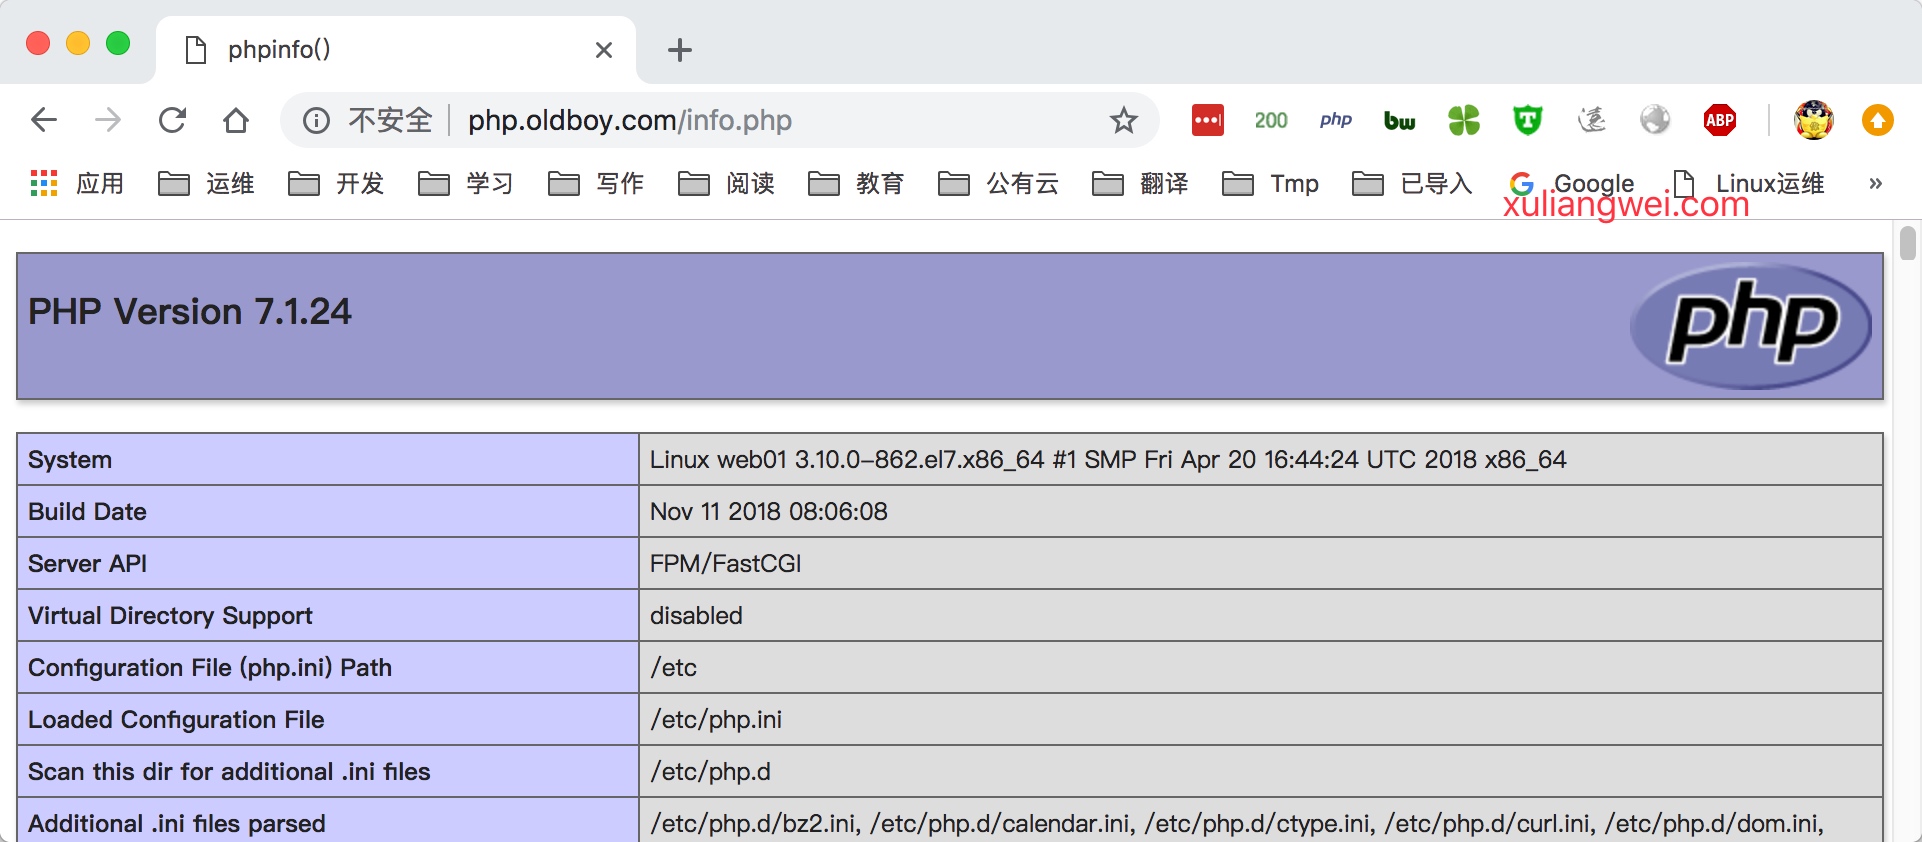
6.在/code目录下创建info.php文件,测试能否通过浏览器访问,访问成功如下图
1 | [root@nginx ~]# cat /code/info.php |
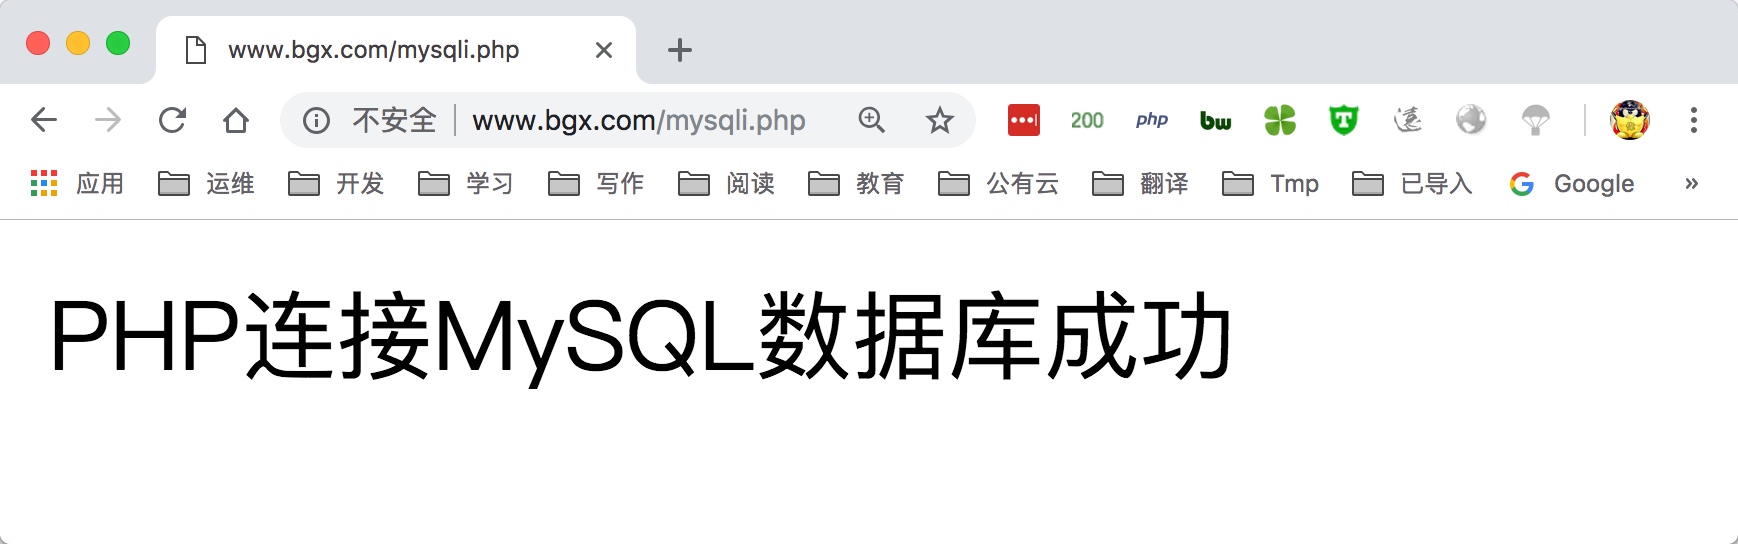
7 在/code目录下创建mysqli.php文件,填入对应的数据库IP、用户名、密码
1 | [root@nginx ~]# cat /code/mysqli.php |
8 最后通过浏览器访问/mysqli.php文件,如成功访问如下图
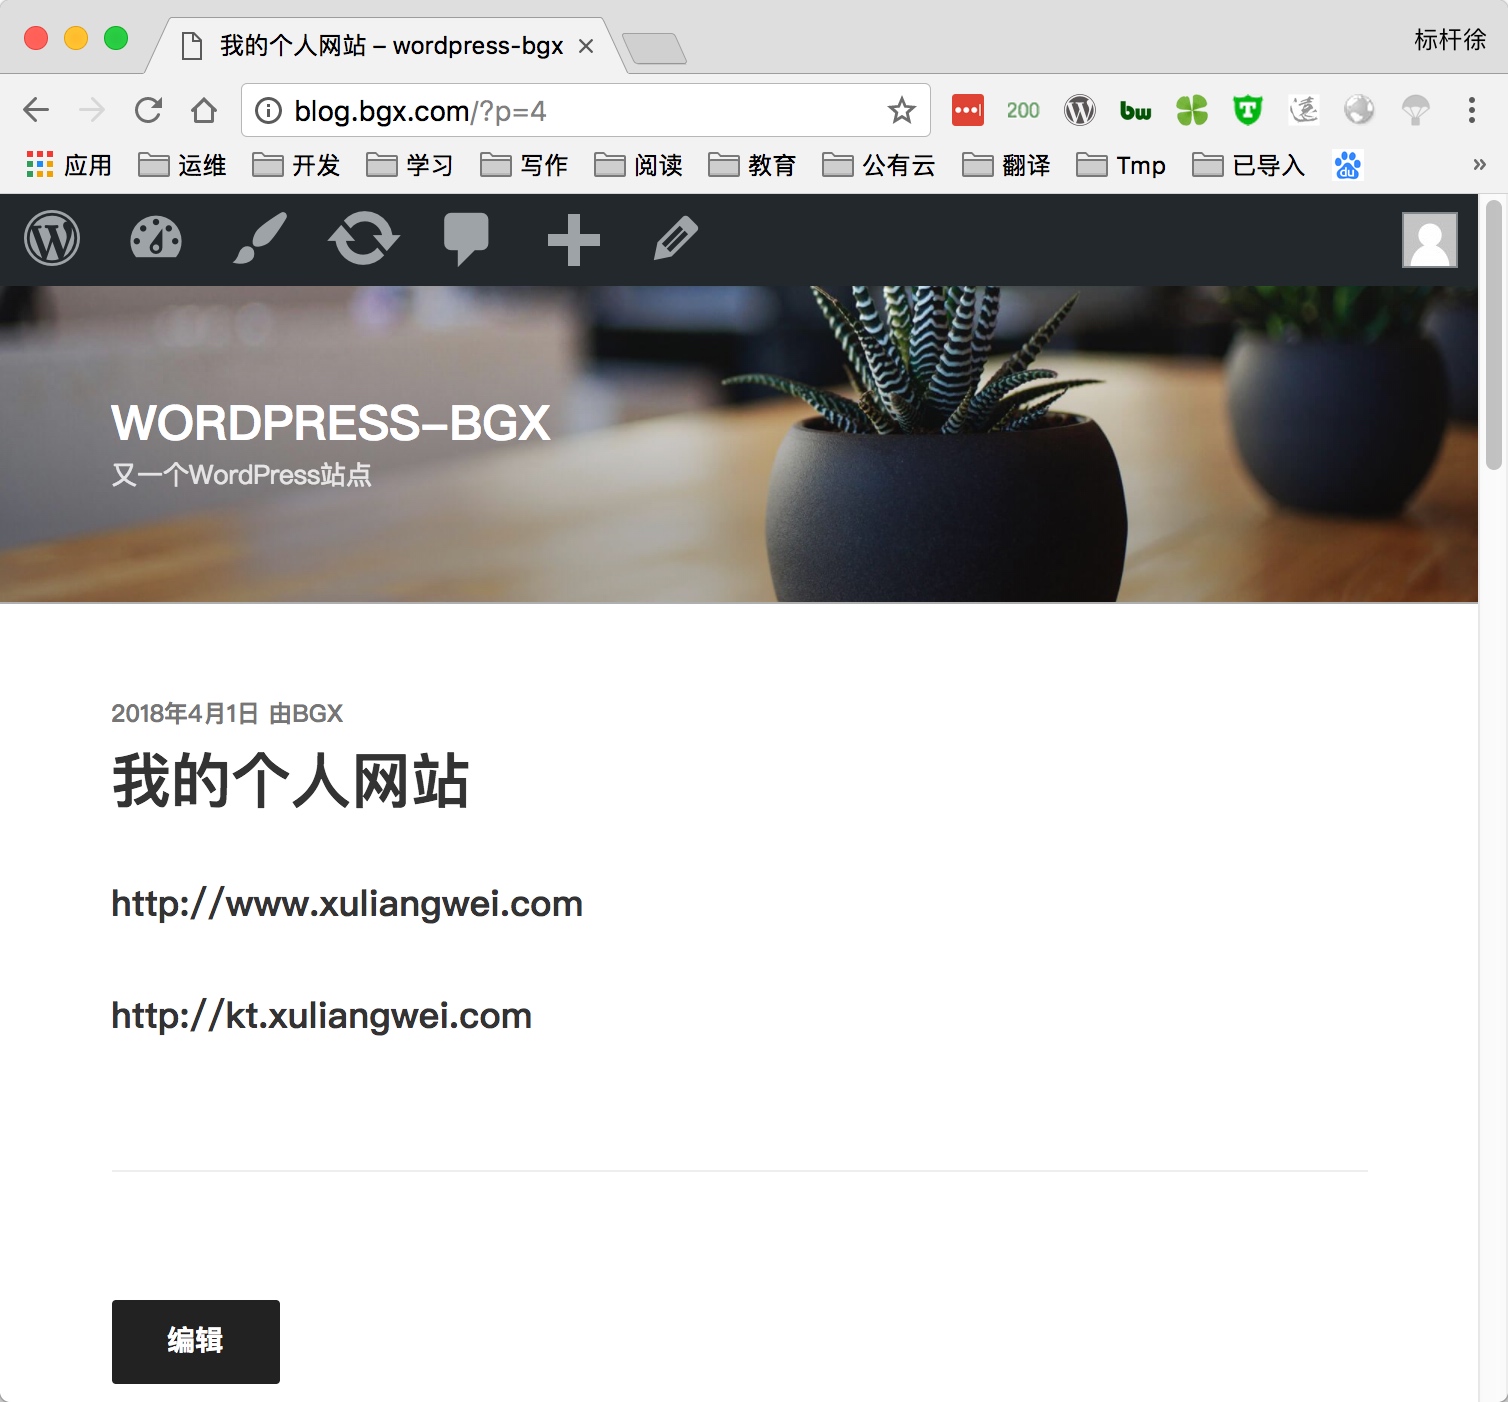
4.部署博客产品Wordpress
1) 配置Nginx虚拟主机站点,域名为blog.bgx.com
1 | #1.nginx具体配置信息 |
2) 重启nginx服务
1 | [root@nginx ~] |
3) 获取wordpress产品,解压并部署wordress
1 | [root@nginx ~] |
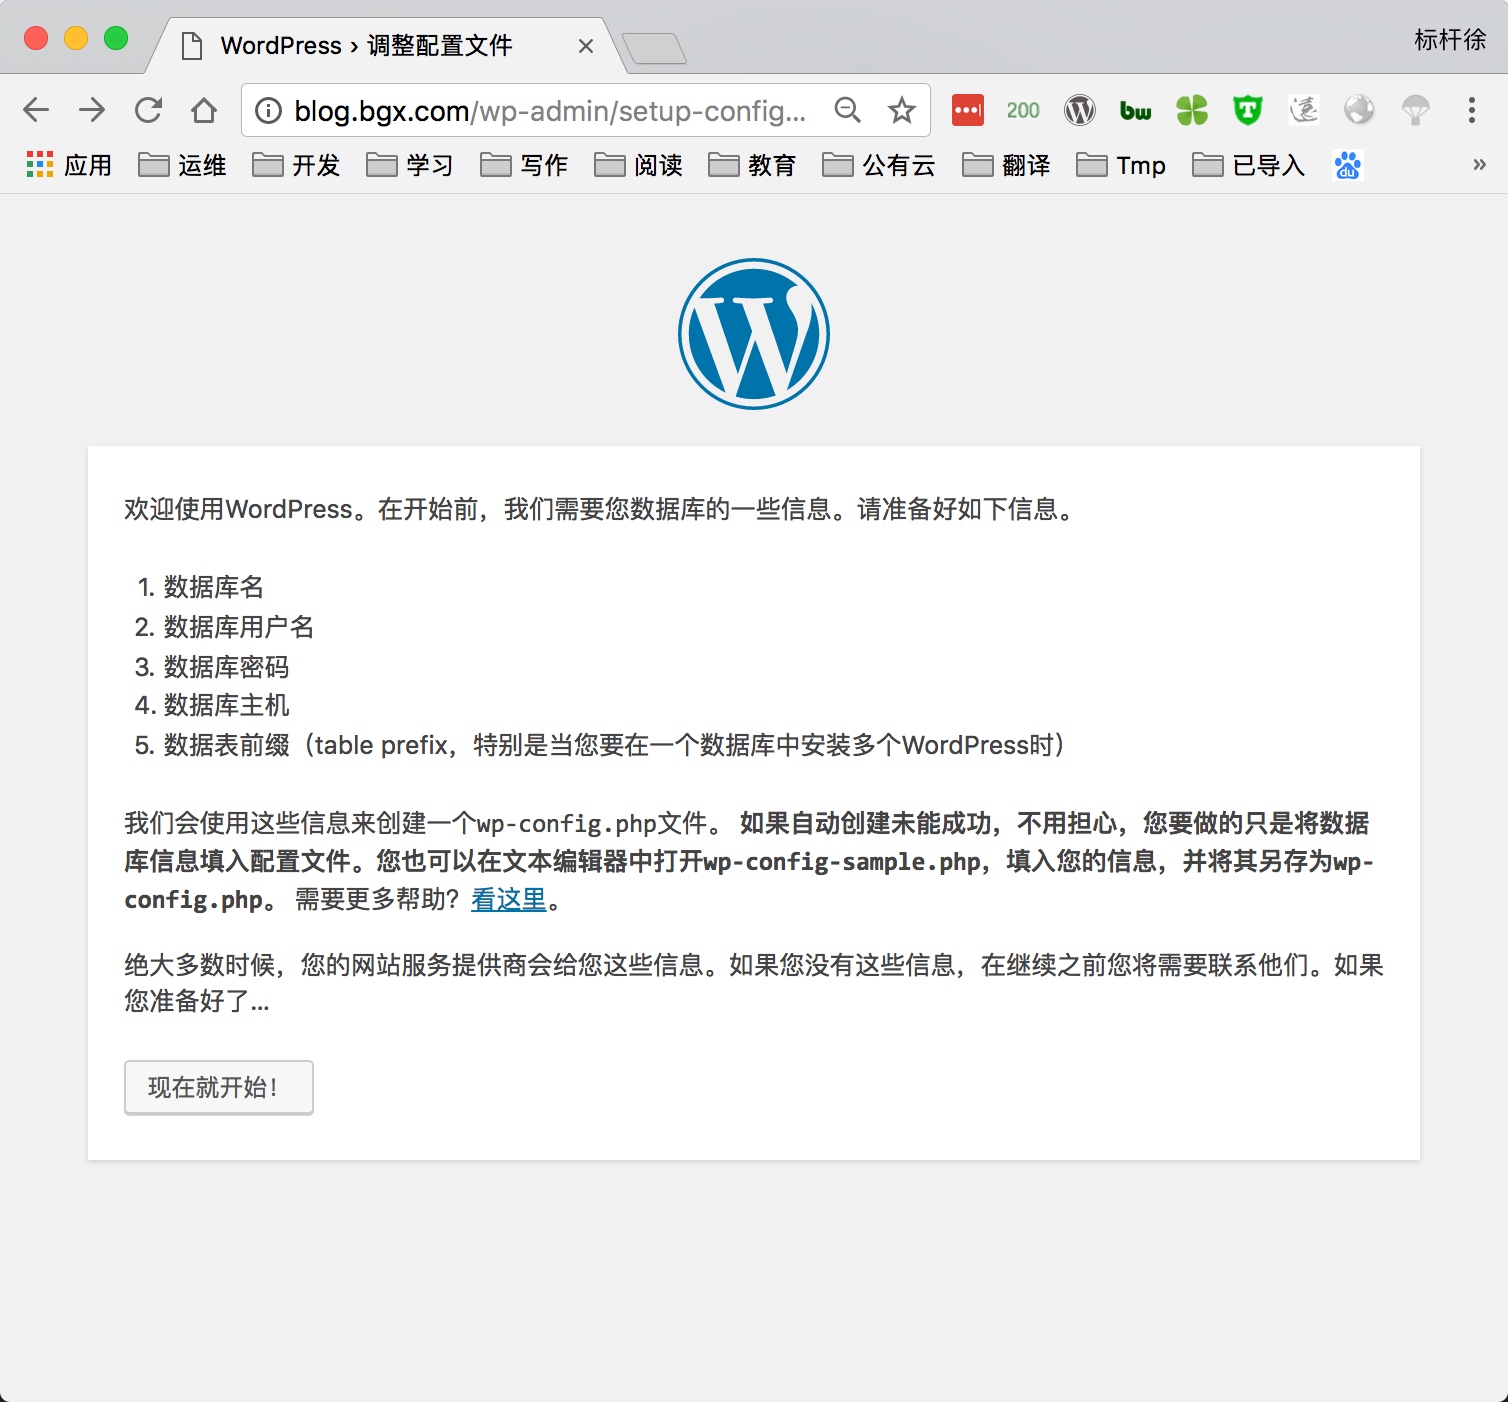
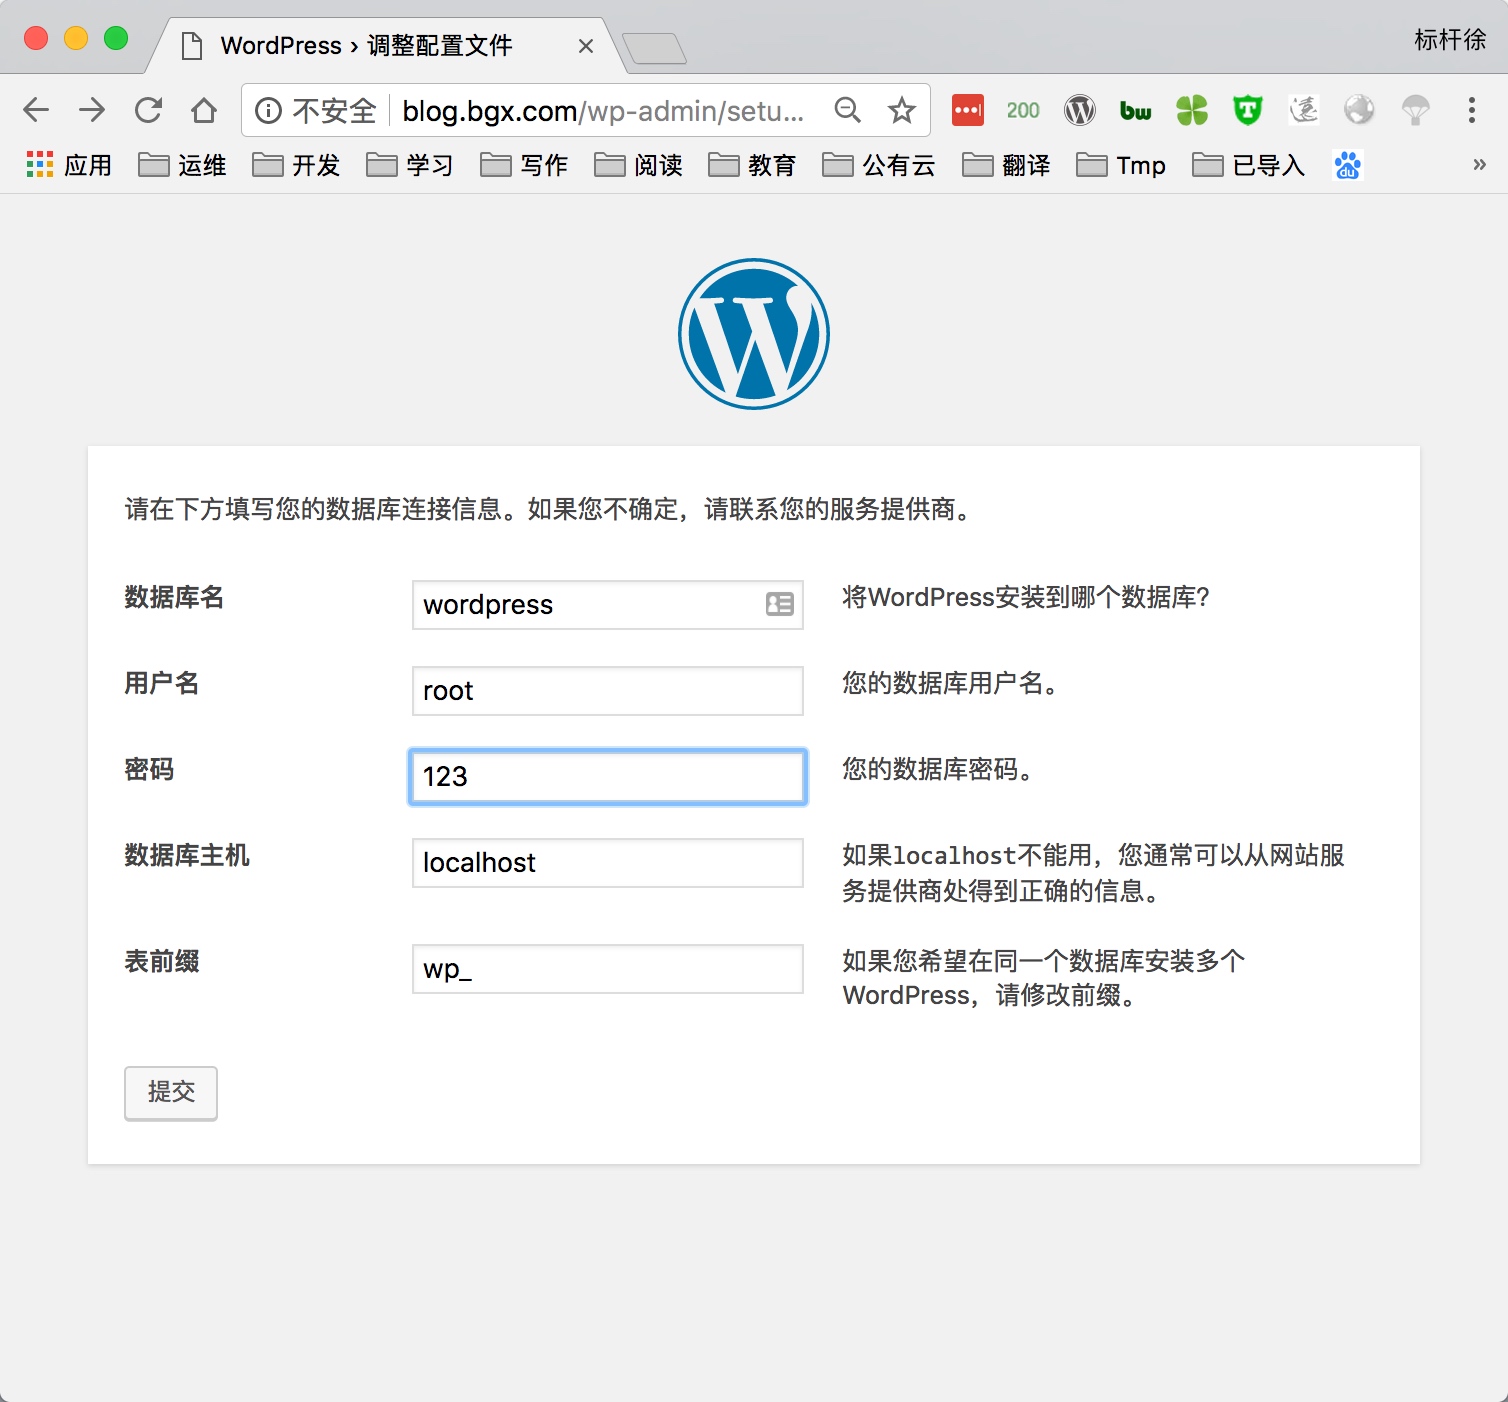
4) 由于wordpress产品需要依赖数据库, 所以需要手动建立数据库
1 | [root@nginx ~]# mysql -uroot -pBgx123.com |
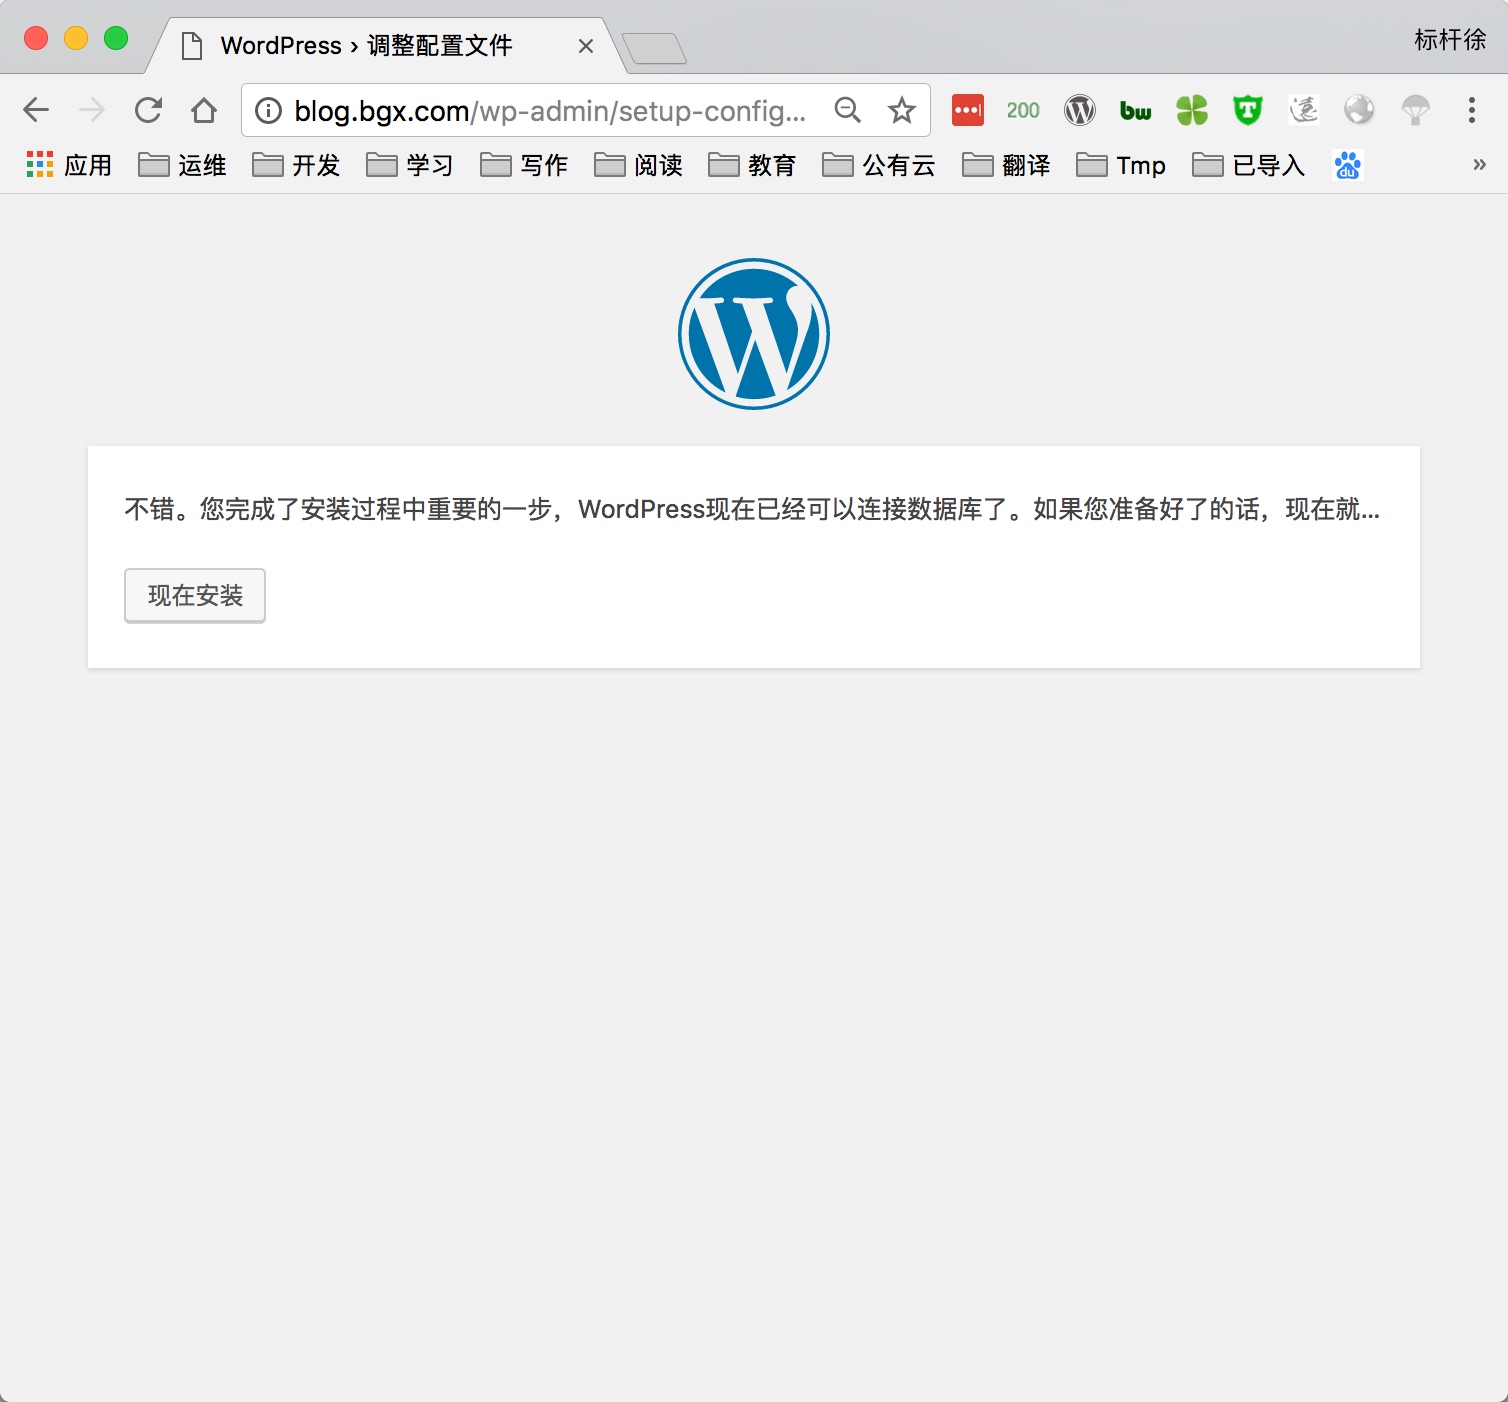
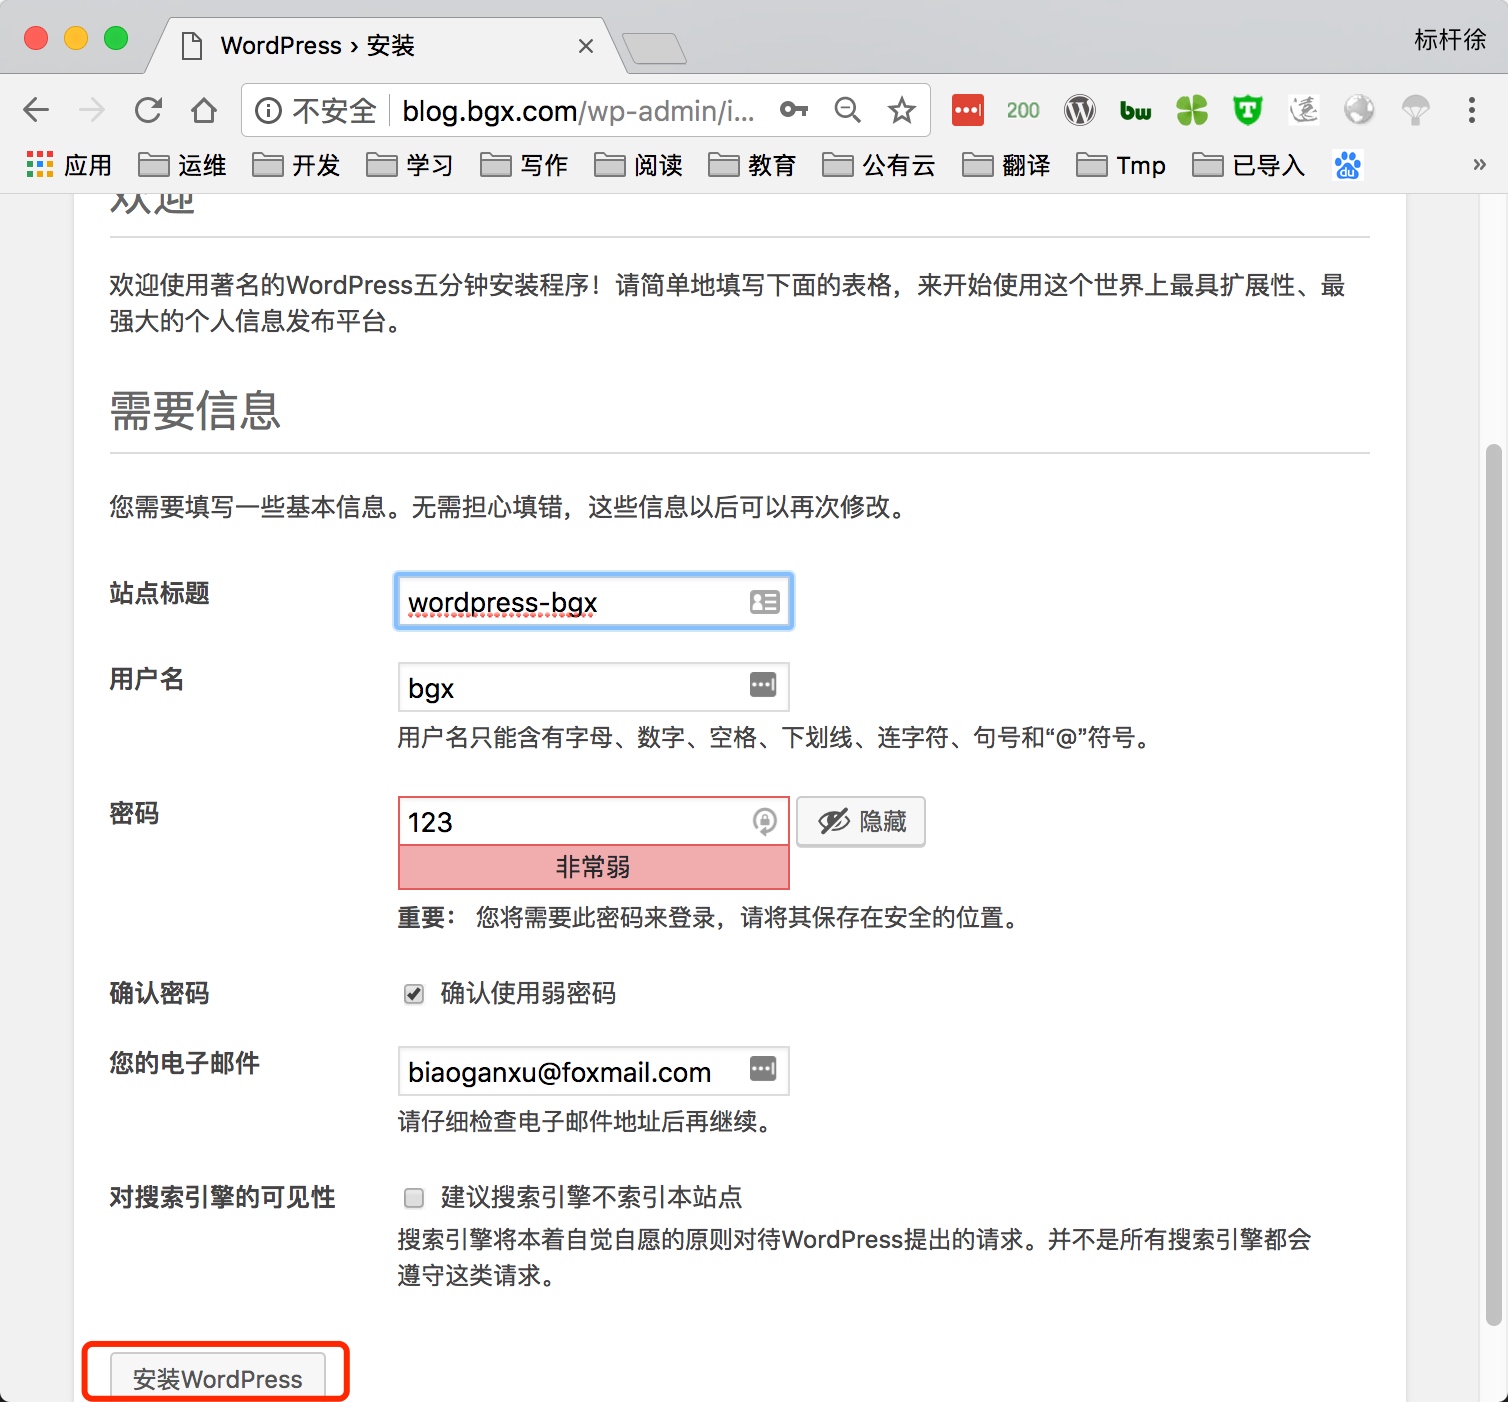
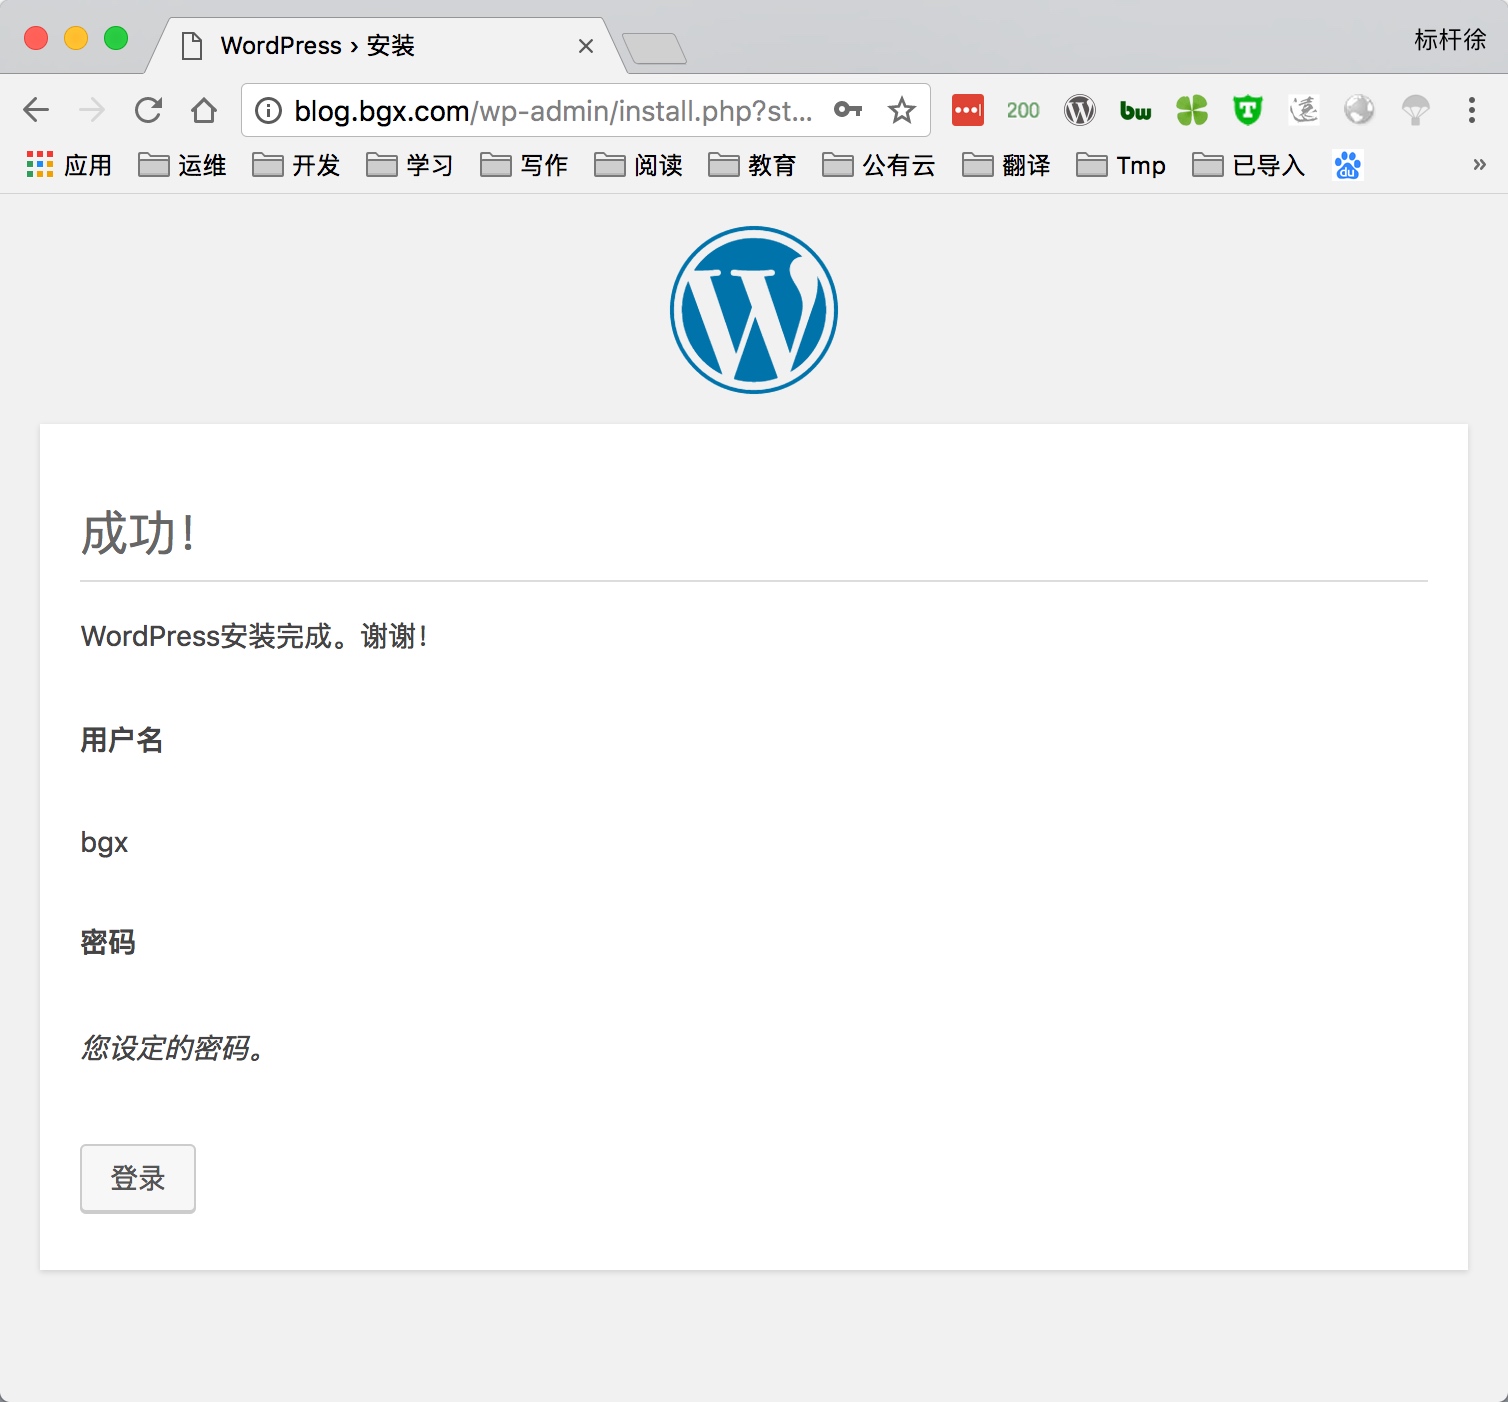
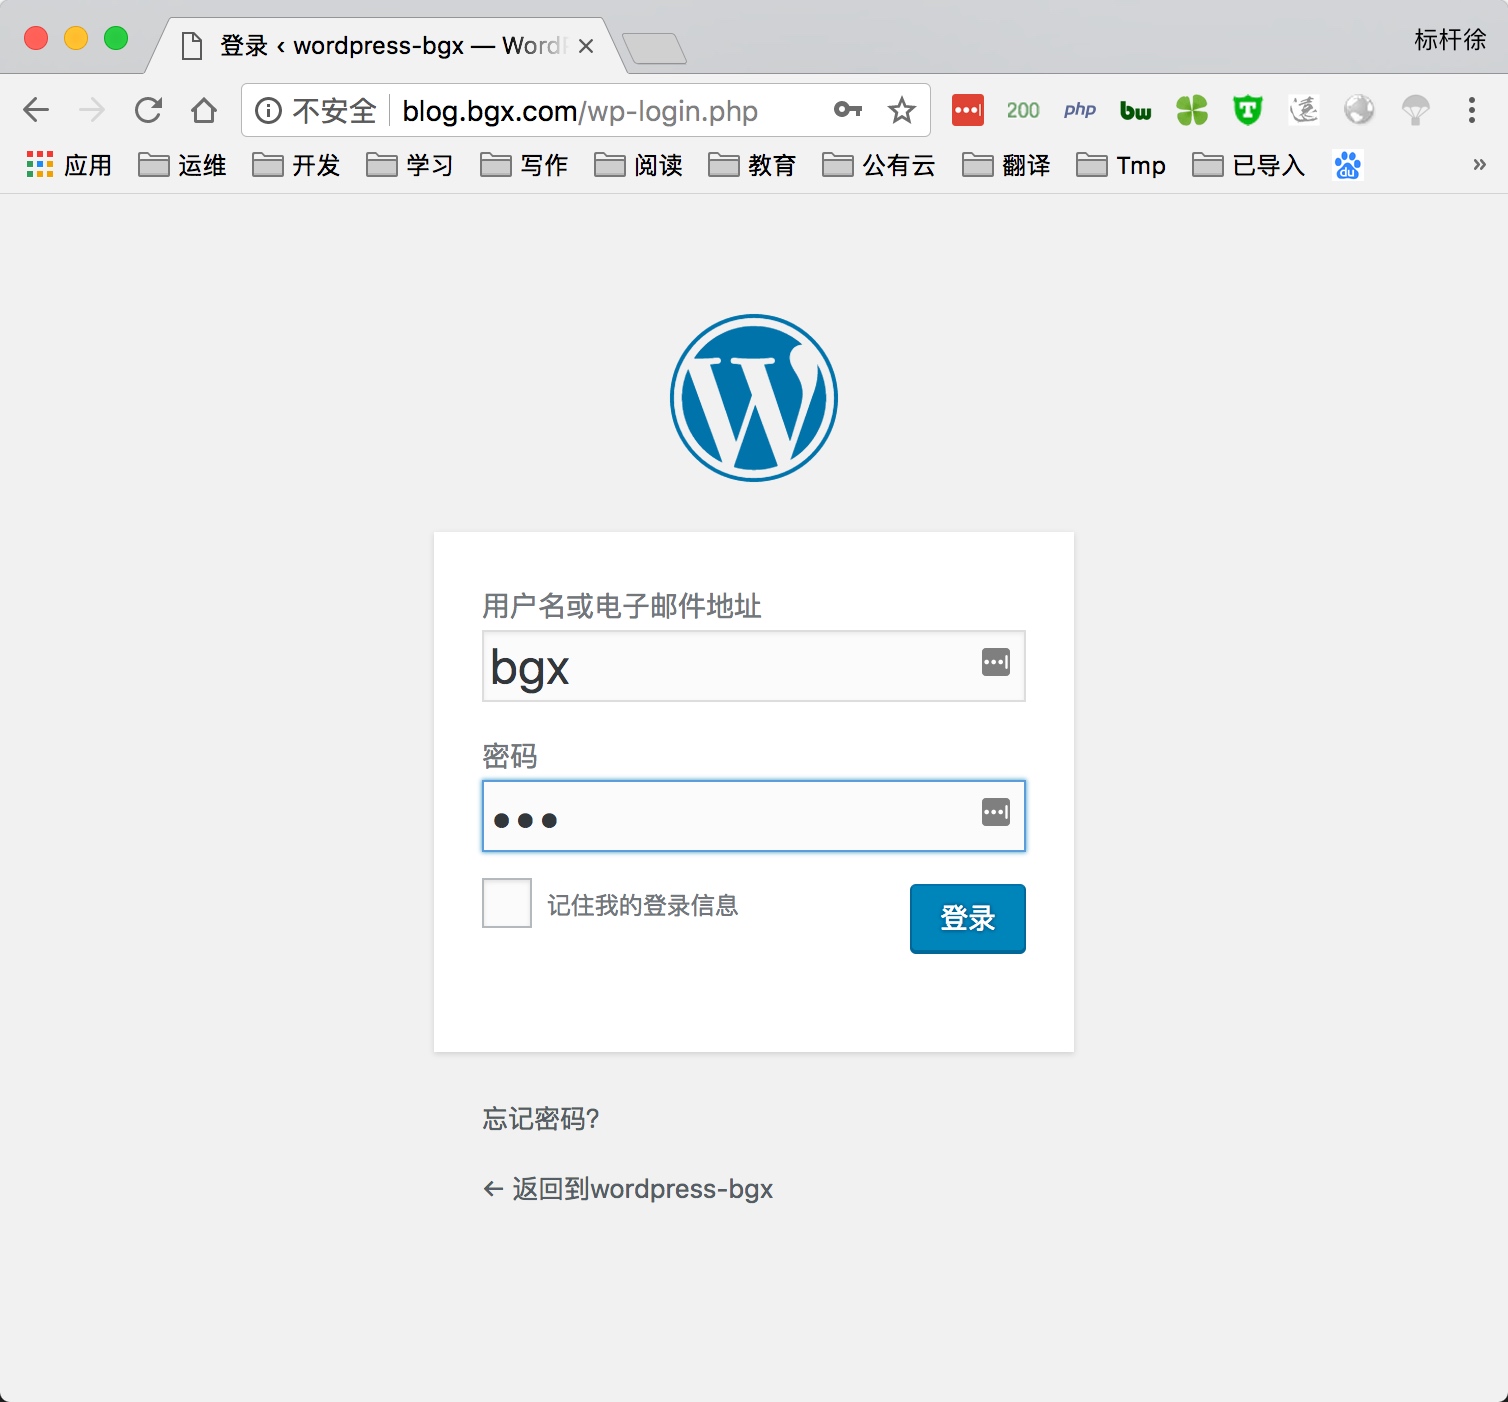
5) 通过浏览器访问wordpress, 并部署该产品
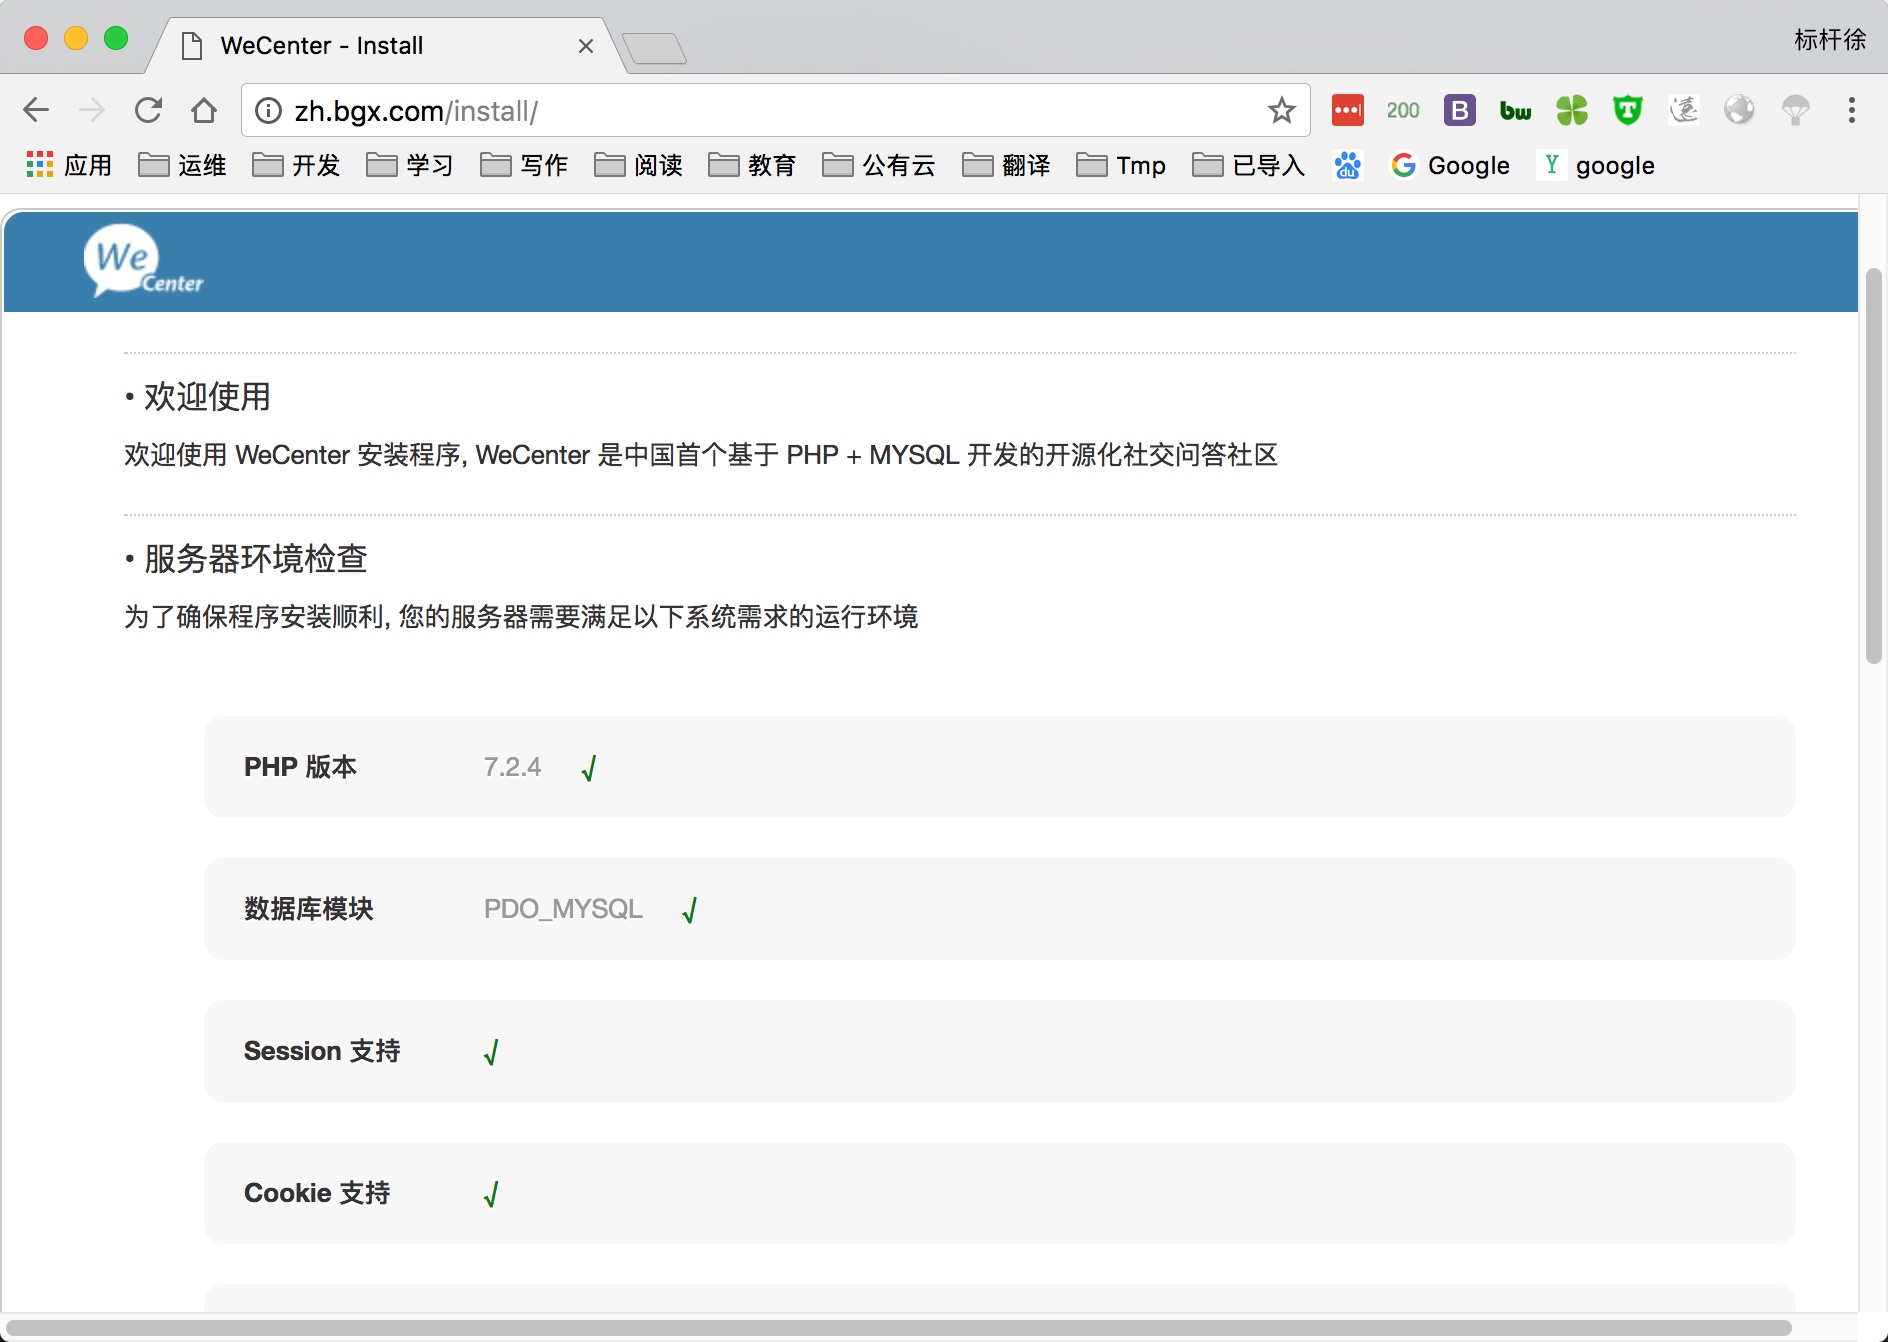
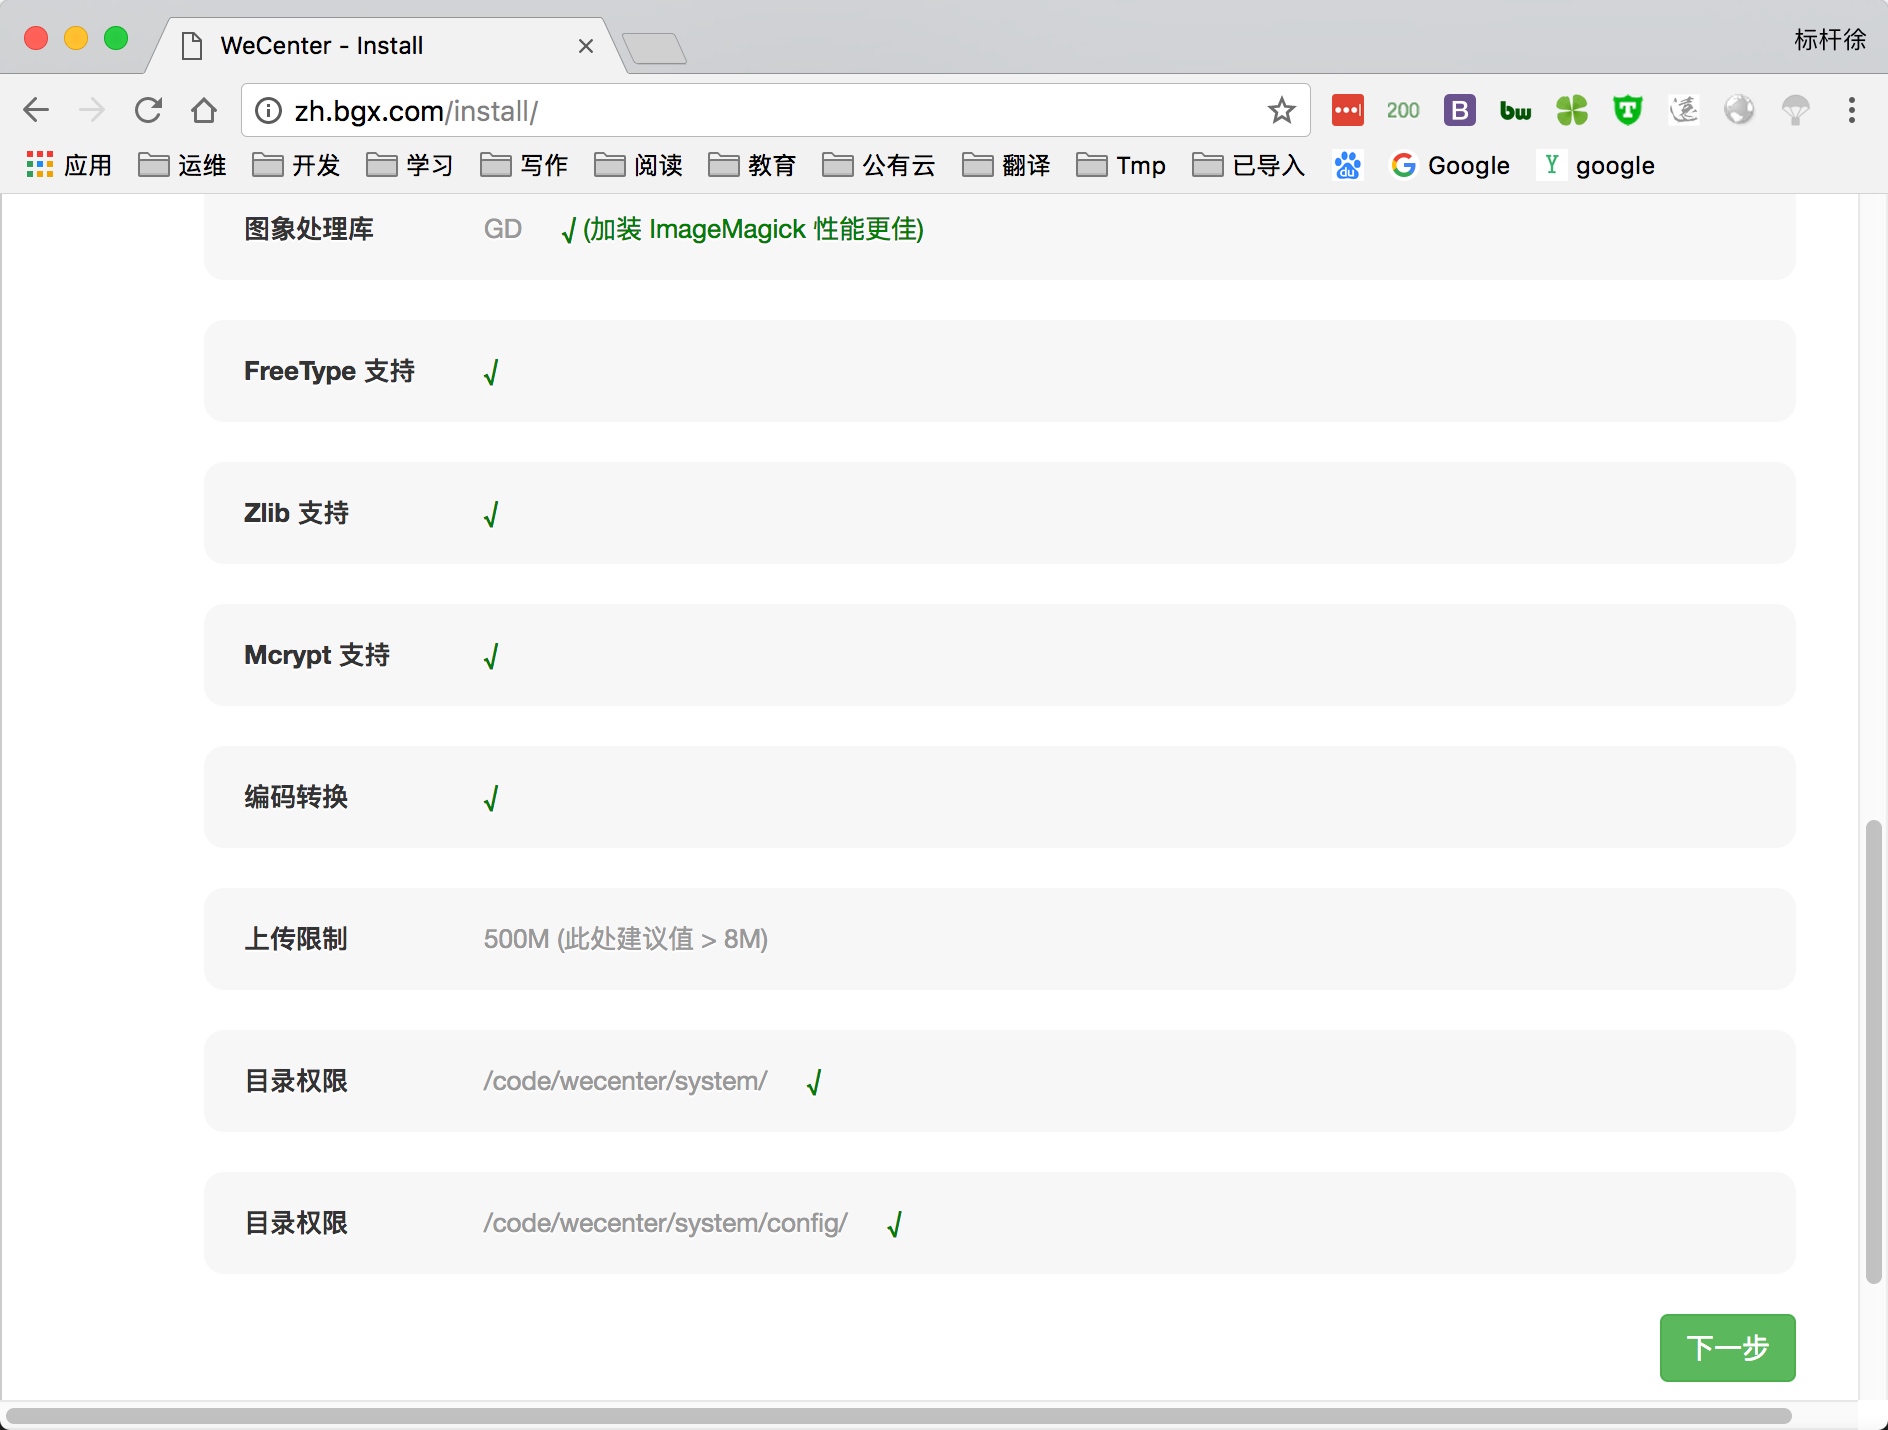
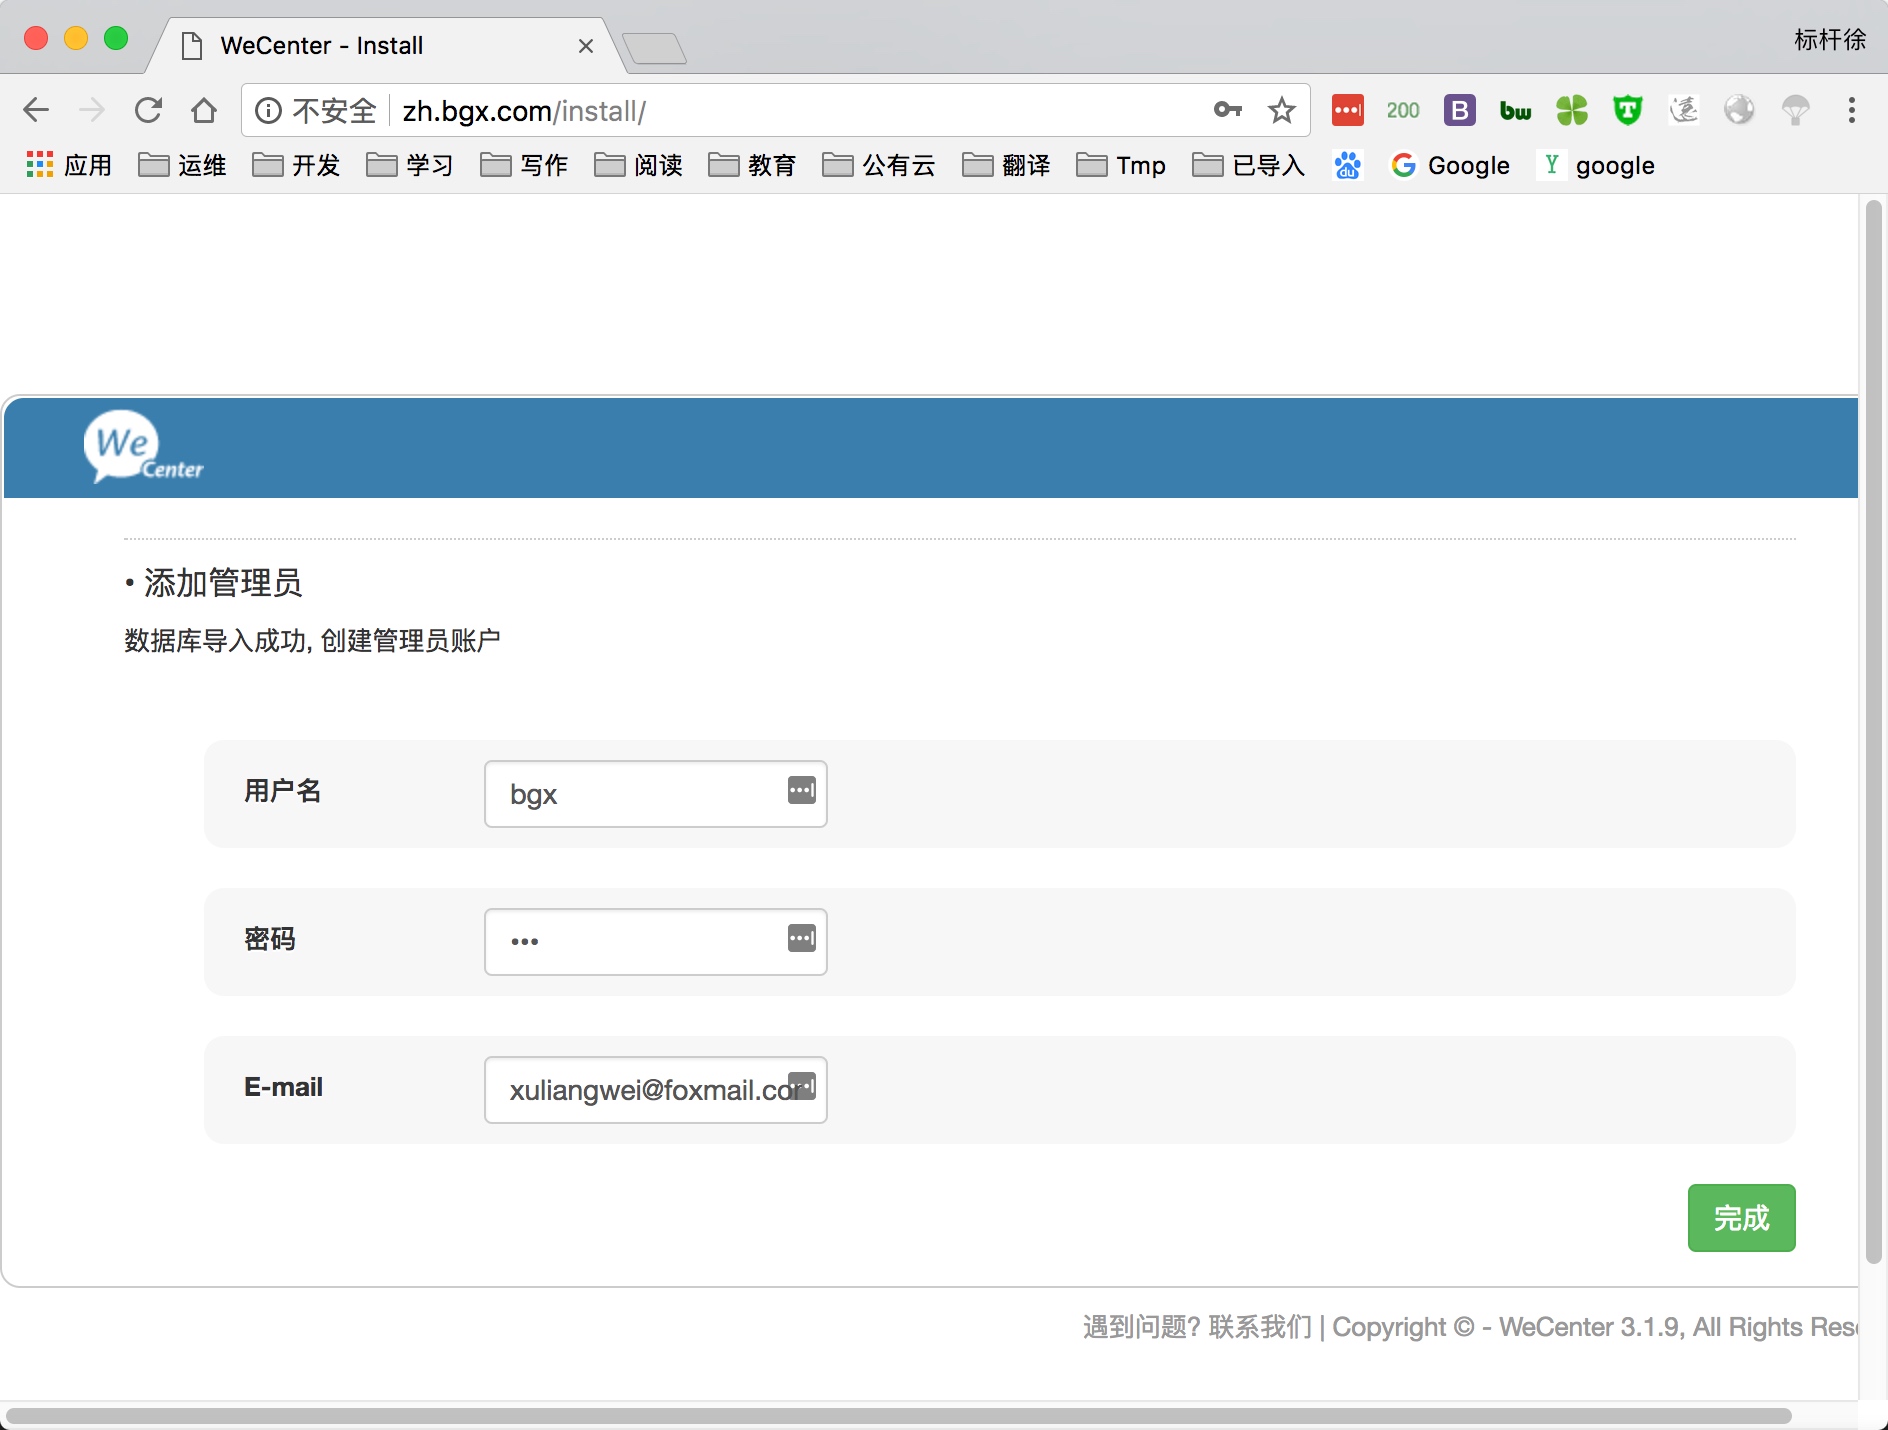
5.部署知乎产品Wecenter
1.配置Nginx虚拟主机站点,域名为zh.bgx.com
1 | [root@http-server ~]# cat /etc/nginx/conf.d/zh.conf |
2.下载Wecenter产品,部署Wecenter并授权
1 | [root@web02 ~] |
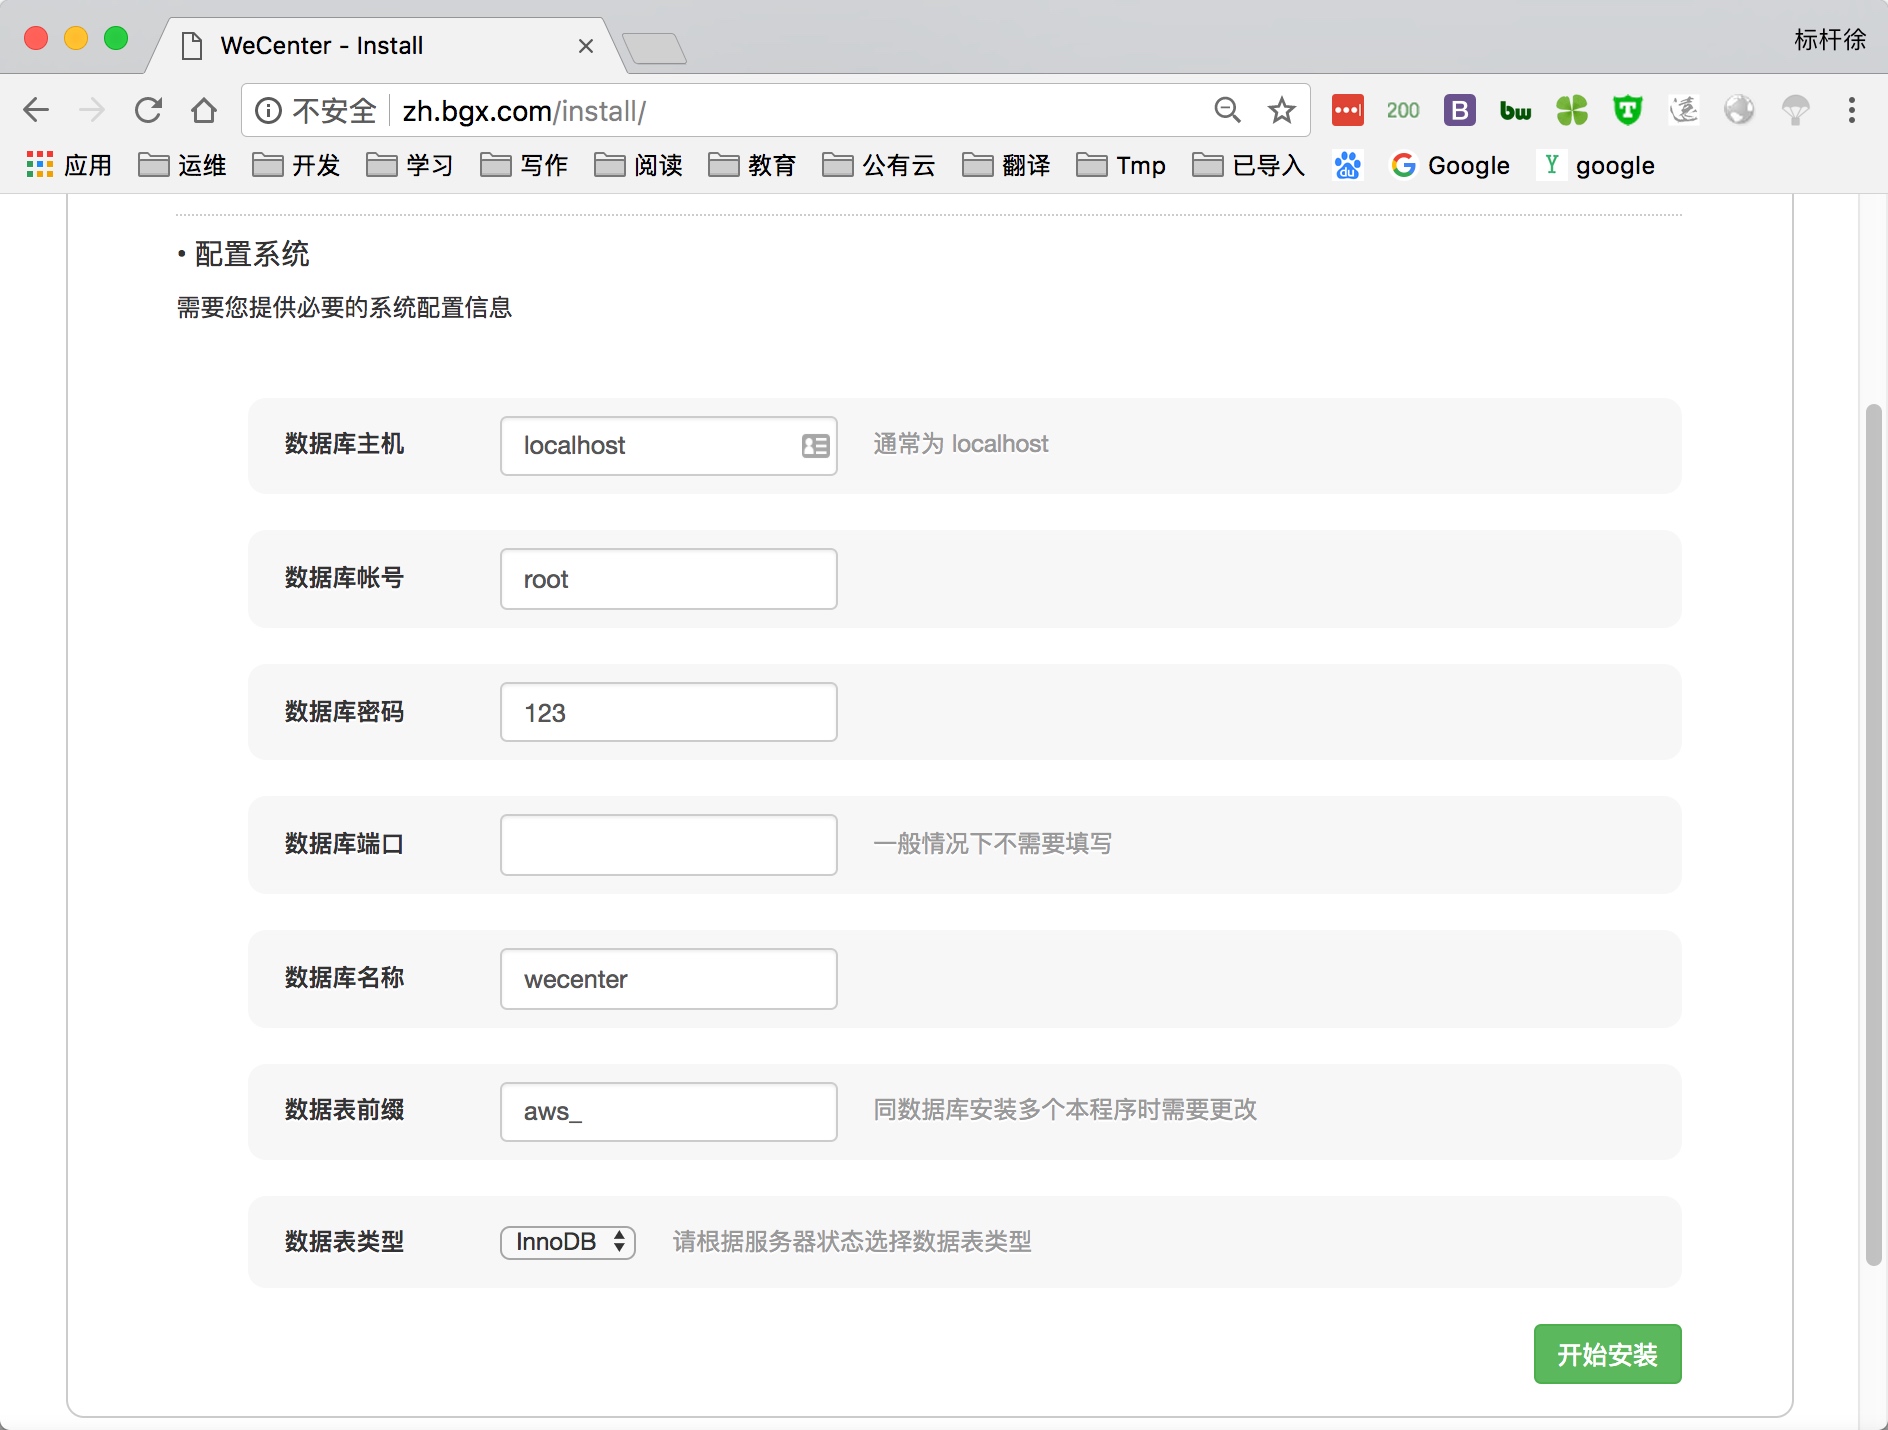
3.由于wecenter产品需要依赖数据库, 所以需要手动建立数据库
1 | [root@http-server ~]# mysql -uroot -pBgx123.com #登陆数据库 |
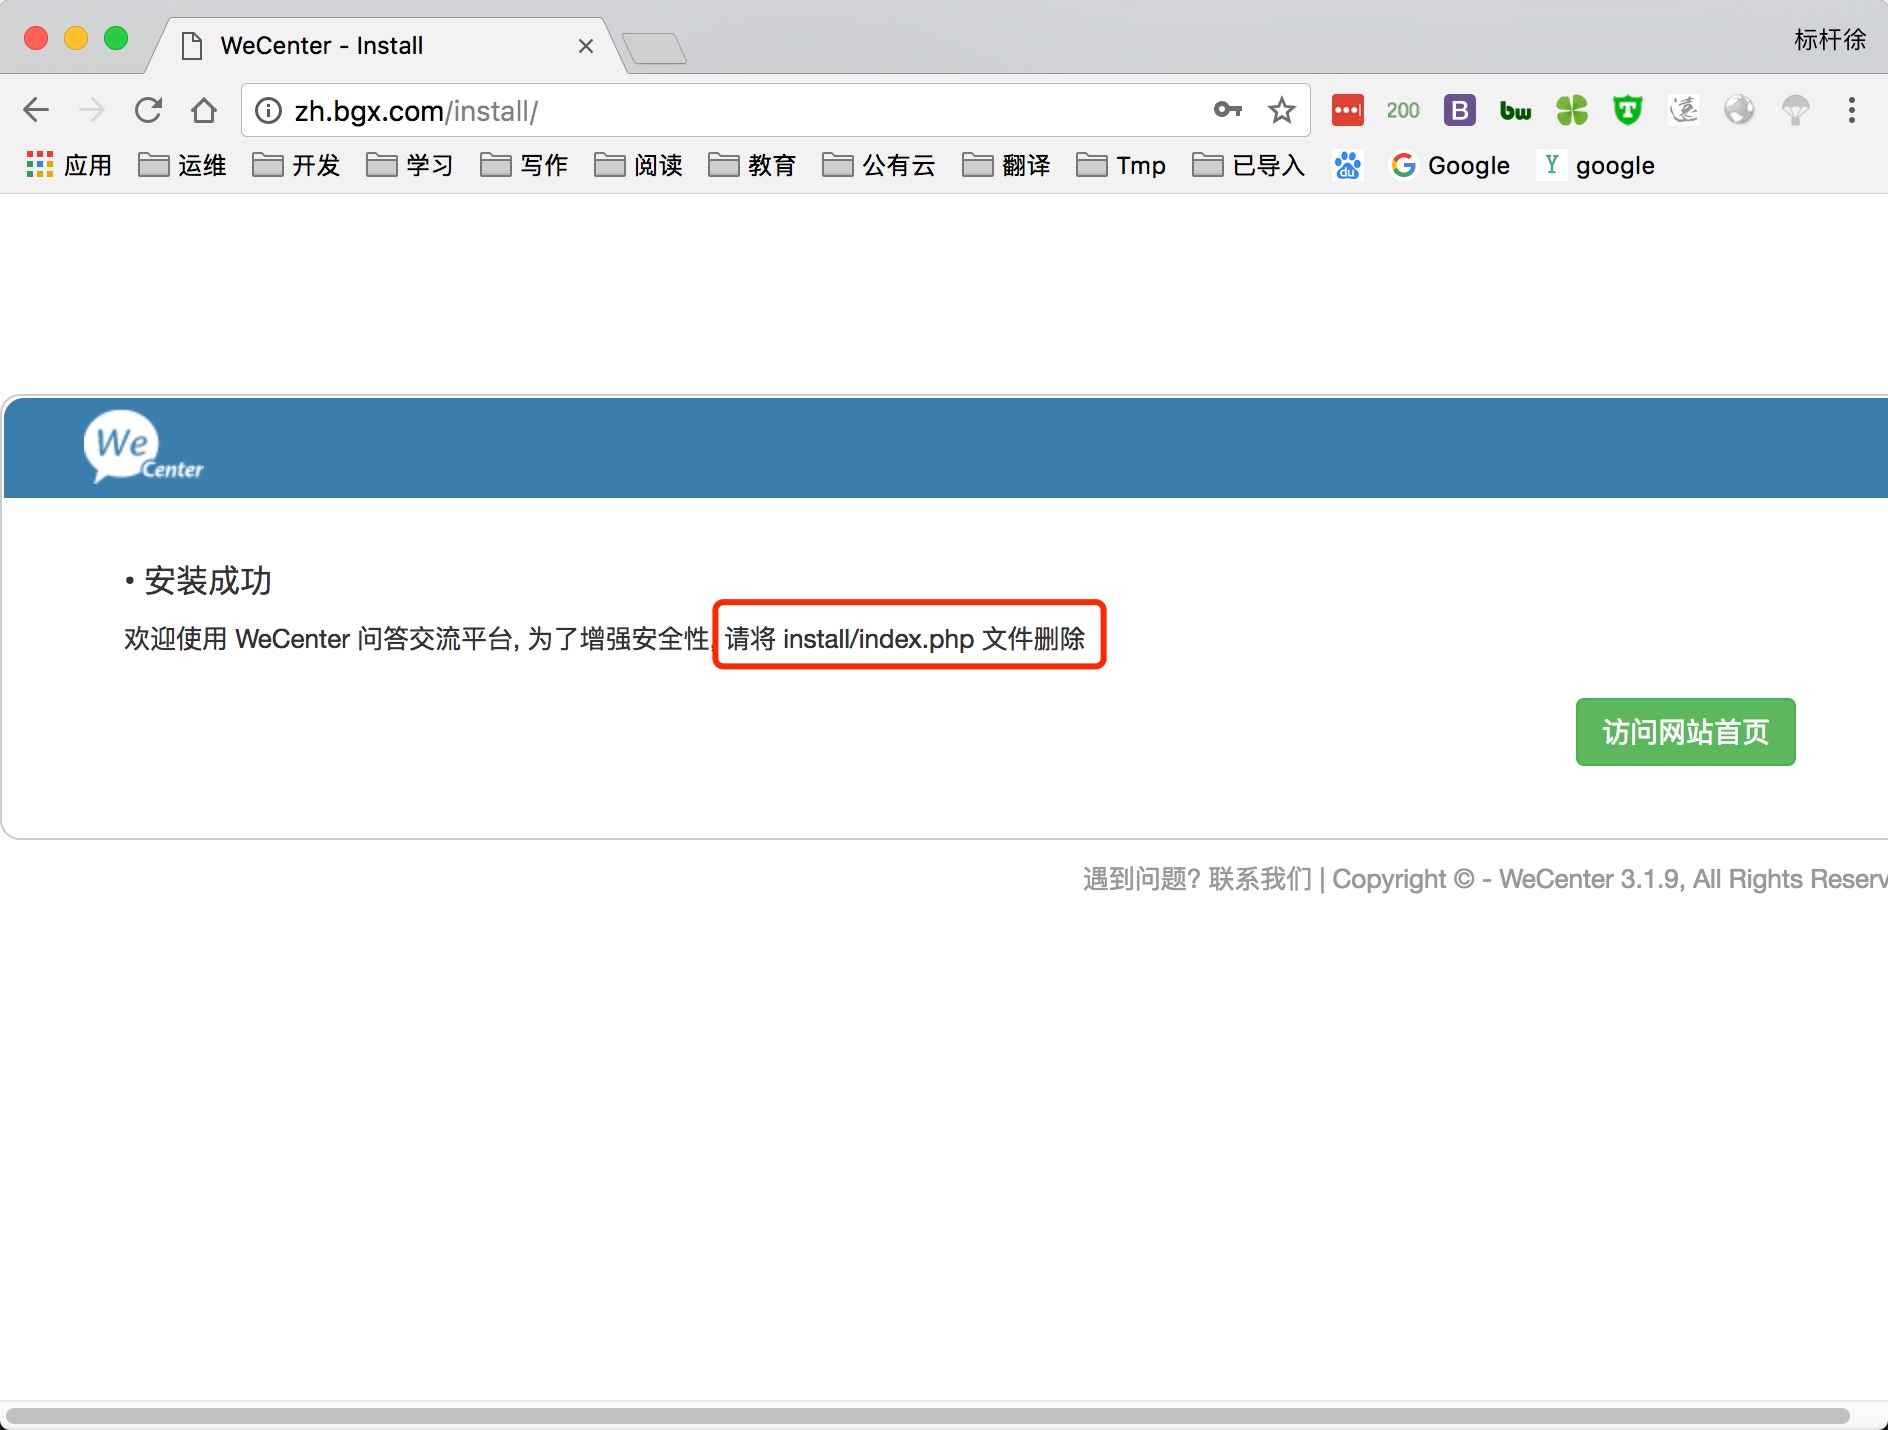
3.通过浏览器访问网站
7.拆分数据库至至独立服务器
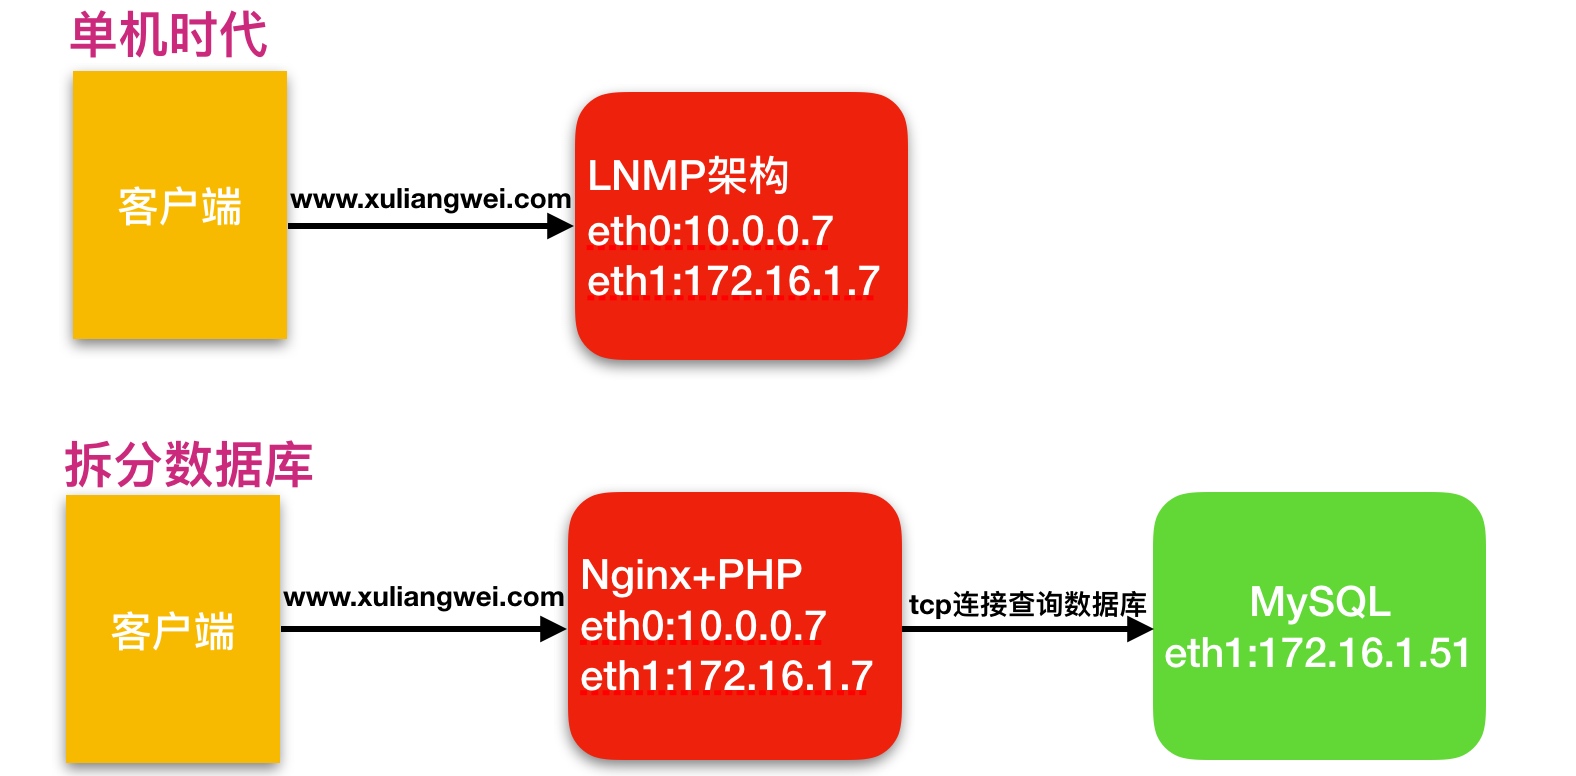
1.为什么要进行数据库的拆分
由于单台服务器运行LNMP架构会导致网站访问缓慢,当内存被吃满时,很容易导致系统出现oom,从而kill掉MySQL数据库,所以需要将web和数据库进行独立部署。
2.数据库拆分后解决了什么问题
1.缓解web网站的压力2.增强数据库读写性能3.提高用户访问的速度
3.数据库拆分架构演变过程,如下图所示
4.数据库拆分环境规划
| 主机名称 | 应用环境 | 外网地址 | 内网地址 |
|---|---|---|---|
| web01 | nginx+php | 10.0.0.7 | 172.16.1.7 |
| db01 | mysql | 172.16.1.51 |
5.数据库拆分架构详细步骤
1.web01网站服务器操作如下
1) 备份web01上的数据库,Bgx123.com是数据库密码
1 | [root@web01 ~] |
2) 将web01上备份的数据库拷贝至db01服务器上
1 | [root@web01 ~] |
2.db01数据库服务器操作如下
1) 将web01服务器上推送的数据库备份文件恢复至db01服务器新数据库中
1 | [root@db01 ~] |
2) 数据库导入完成后,重启数据库,使用新密码进行登录,并检查数据库已被导入成功
1 | [root@db01 ~] |
3) 在新数据库上授权, 允许所有网段, 通过all账户连接并操作该数据库
1 | 授权所有权限 grant all privileges |
3.web01修改代码连接新数据库环境
1) 修改Wordpress产品代码连接数据库的配置文件
1 | [root@web01 ~]# vim /code/wordpress/wp-config.php |
2) 修改wecenter产品代码连接数据库的配置文件
1 | [root@web01 zh]# grep -iR "Bgx123.com"|grep -v cache |
3) 最后访问网站,成功打开,至此拆分数据库完成
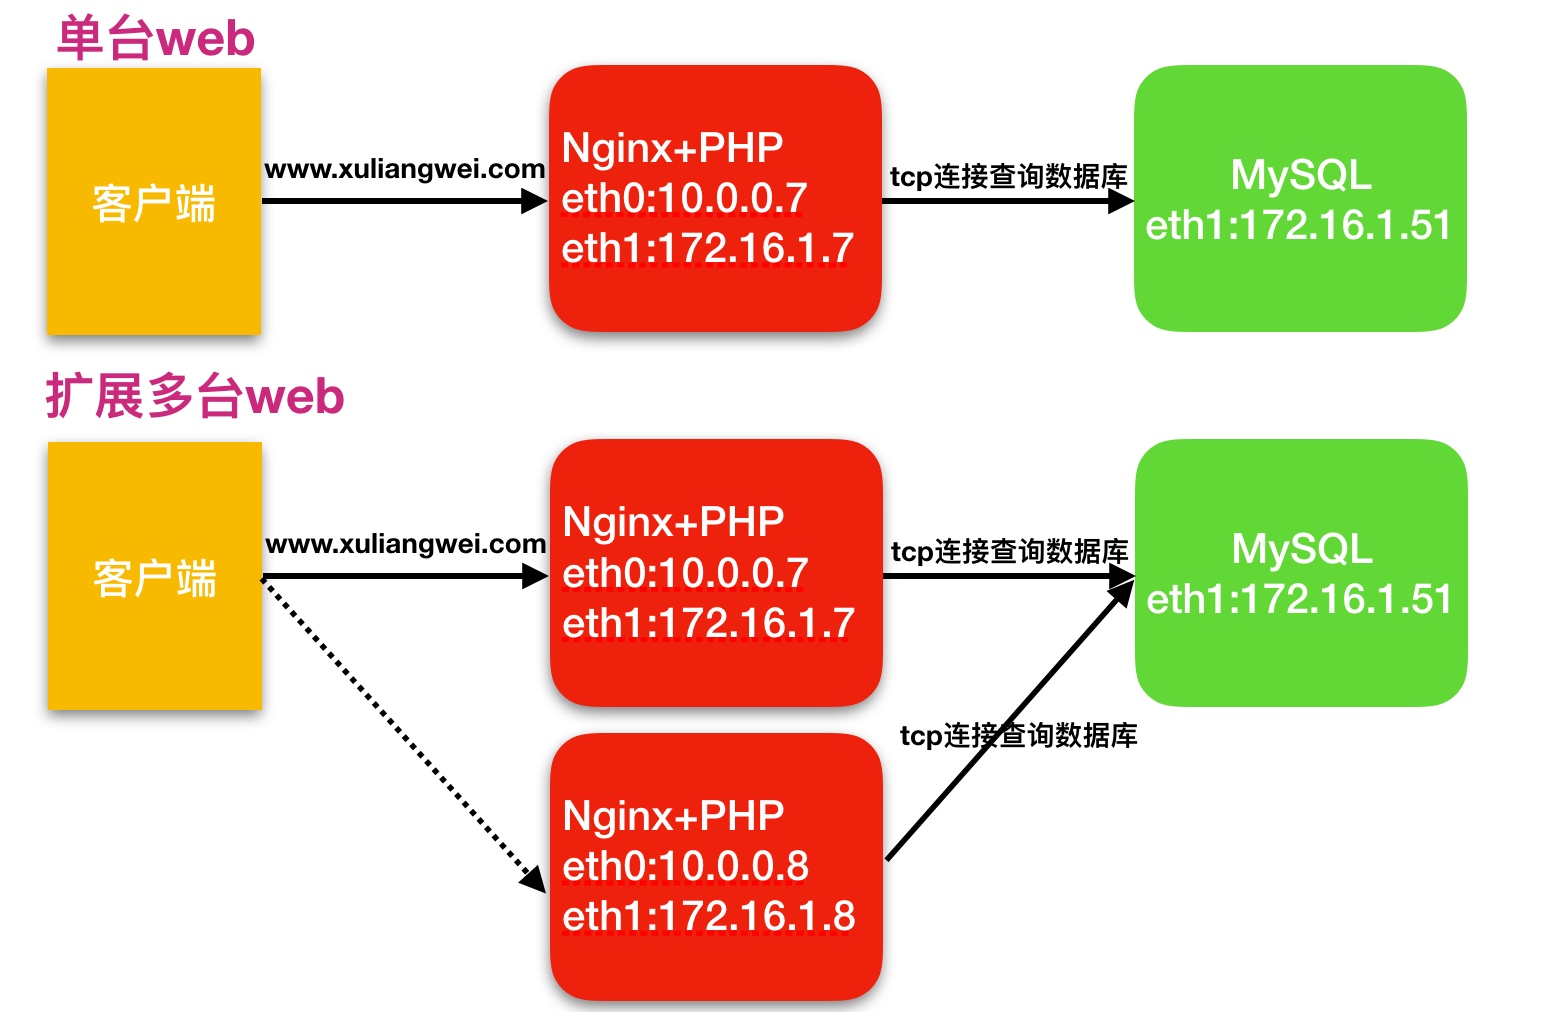
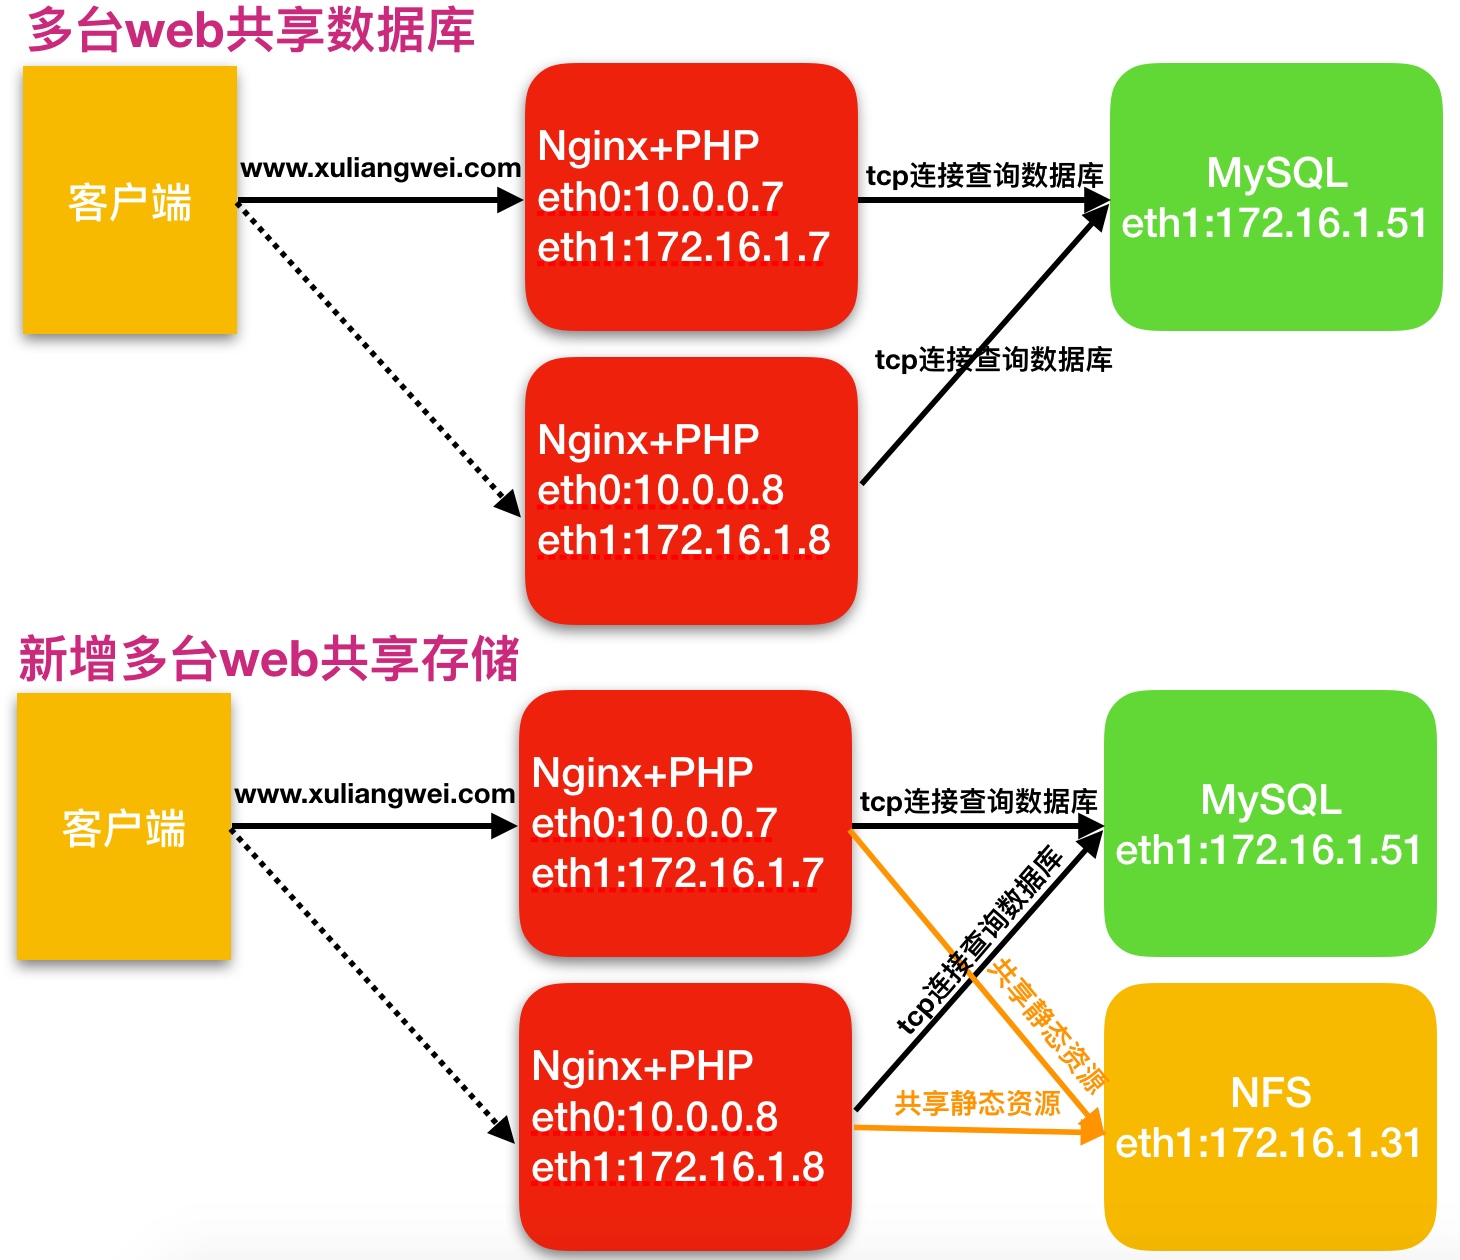
8.扩展多台相同的Web服务器
1.为什么要扩展多台web节点
单台web服务器能抗住的访问量是有限的,配置多台web服务器能提升更高的访问速度。
2.扩展多台web解决了什么问题
1.单台web节点如果故障,会导致业务down机2.多台web节点能保证业务的持续稳定,扩展性高3.多台web节点能有效的提升用户访问网站的速度
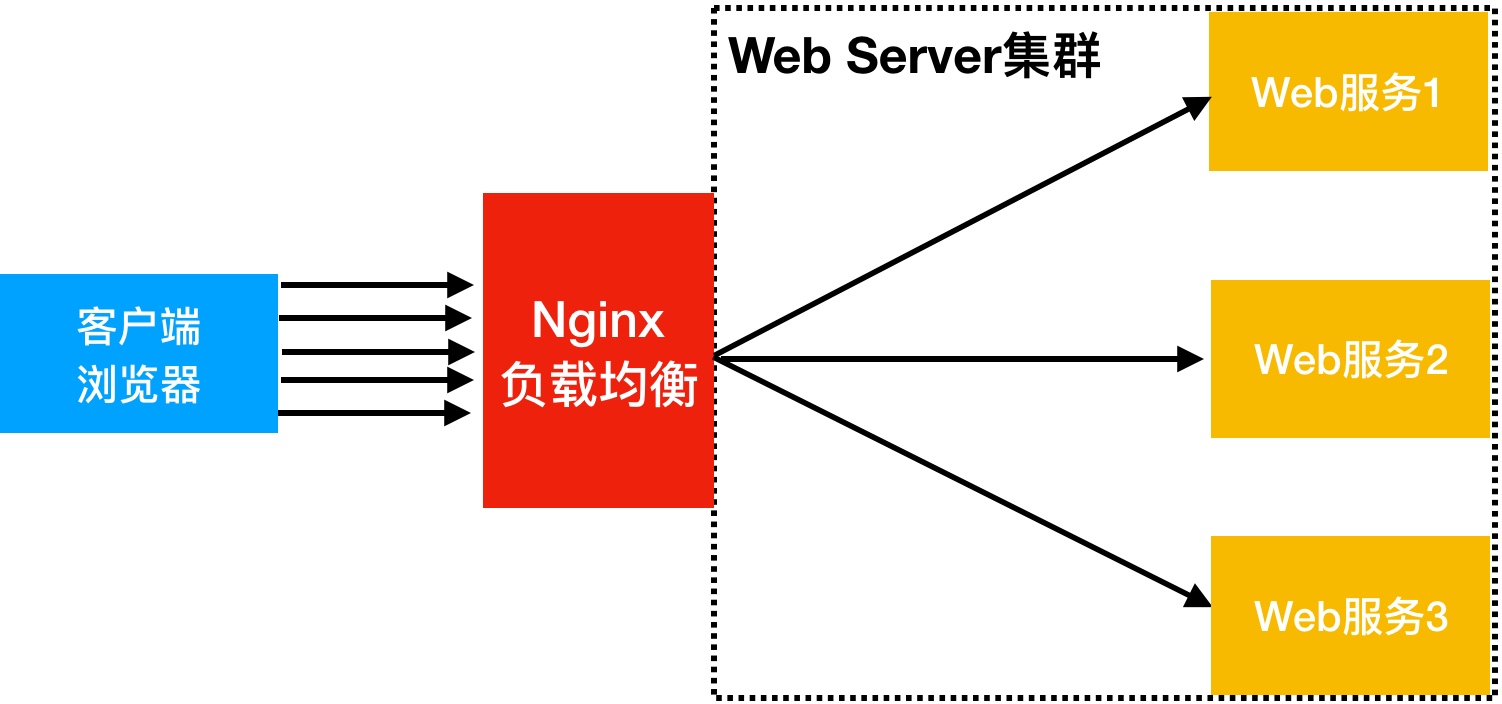
3.多台web节点技术架构组成,如下图所示
4.快速扩展一台web节点环境规划
| 主机名称 | 应用环境 | 外网地址 | 内网地址 |
|---|---|---|---|
| web01 | nginx+php | 10.0.0.7 | 172.16.1.7 |
| web02 | nginx+php | 10.0.0.8 | 172.16.1.8 |
| db01 | mysql | 172.16.1.51 |
5.快速扩展一台web节点详细步骤
通过web01现有环境快速的扩展一台web02的服务器,数据库统一使用db01
1) 创建www用户
1 | [root@web02 ~] |
2) 安装LNP
1 | [root@web02 ~] |
3) 将web01的nginx配置文件导入到web02
1 | [root@web02 ~] |
4) 将web01的php配置文件导入到web02
1 | [root@web02 ~] |
5) 将web01的产品代码打包传输到web02服务器上,在web1上线进行打包操作
1 | [root@web01 ~]# tar czf code.tar.gz /code |
6) 最后启动nginx与php-fpm,并加入开机自启
1 | [root@web03 ~] |
9.拆分静态资源至独立服务器
1.为什么拆分静态资源至独立存储服务器
当后端的web节点出现多台时,会导致用户上传的图片、视频附件等内容仅上传至一台web服务器,那么其他的web服务器则无法访问到该图片。
2.新增一台nfs存储解决了什么问题
1.保证了多台web节点静态资源一致。2.有效节省多台web节点的存储空间。3.统一管理静态资源,便于后期推送至CDN进行静态资源加速
3.多台web节点技术架构组成,如下图所示
4.快速扩展一台web节点环境规划
| 主机名称 | 应用环境 | 外网地址 | 内网地址 |
|---|---|---|---|
| web01 | nginx+php | 10.0.0.7 | 172.16.1.7 |
| web02 | nginx+php | 10.0.0.8 | 172.16.1.8 |
| nfs | nfs | 172.16.1.31 | |
| db01 | mysql | 172.16.1.51 |
5.快速扩展一台web节点详细步骤
1.nfs服务端,操作步骤如下
1) 安装并配置nfs
1 | [root@nfs ~]# yum install nfs-utils -y |
2) 创建共享目录,并进行授权
1 | [root@nfs01 ~]# mkdir /data/{blog,zh} -p |
3) 启动nfs服务,并加入开机自启
1 | [root@nfs01 ~] |
2.web01端操作步骤如下
1) web01节点安装nfs,然后使用showmount查看服务端共享的资源
1 | [root@web01 ~]# yum install nfs-utils -y |
2) 如何查找Wordpress静态资源存放的位置
1 | 浏览器->右键->检查->Network->选择左上角的Select按钮->点击对应的图片,然后能获取到对应的url地址,如下 |
3) 备份web01服务器上Wordpress的静态资源,因为该服务器上的资源资源最全
1 | [root@web01 ~] |
4) web01客户端执行挂载操作
1 | [root@web01 wp-content] |
5) 将挂载信息加入开机自启
1 | [root@web01 wp-content]# tail -1 /etc/fstab |
3.web02端,操作步骤如下
1) web02客户端直接挂载nfs即可
1 | [root@web02 ~]# mount -t nfs 172.16.1.31:/data/blog /code/wordpress/wp-content/uploads/ |
2) 将挂载信息加入开机自启
1 | [root@web02 ~]# tail -1 /etc/fstab |
05.Nginx反向代理服务
- 1.Nginx代理服务基本概述
- 2.Nginx代理服务常见模式
- 3.Nginx代理服务支持协议
- 4.Nginx反向代理配置语法
- 5.Nginx反向代理场景实践
徐亮伟, 江湖人称标杆徐。多年互联网运维工作经验,曾负责过大规模集群架构自动化运维管理工作。擅长Web集群架构与自动化运维,曾负责国内某大型电商运维工作。
个人博客”徐亮伟架构师之路“累计受益数万人。老男孩Linux云计算运维QQ交流群: 384467551 226199307
老男孩教育官网 http://www.oldboyedu.com
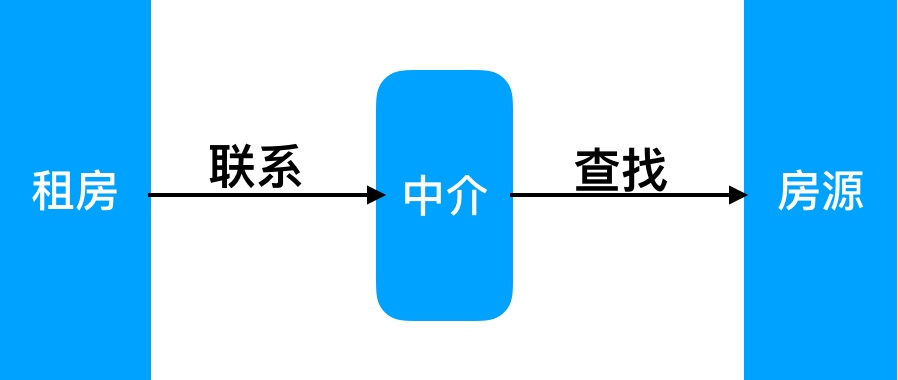
1.Nginx代理服务基本概述
1.代理一词往往并不陌生, 该服务我们常常用到如(代理理财、代理租房、代理收货等等),如下图所示
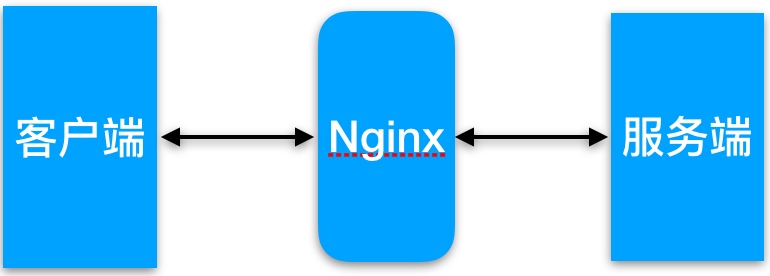
2.在没有代理模式的情况下,客户端和Nginx服务端,都是客户端直接请求服务端,服务端直接响应客户端。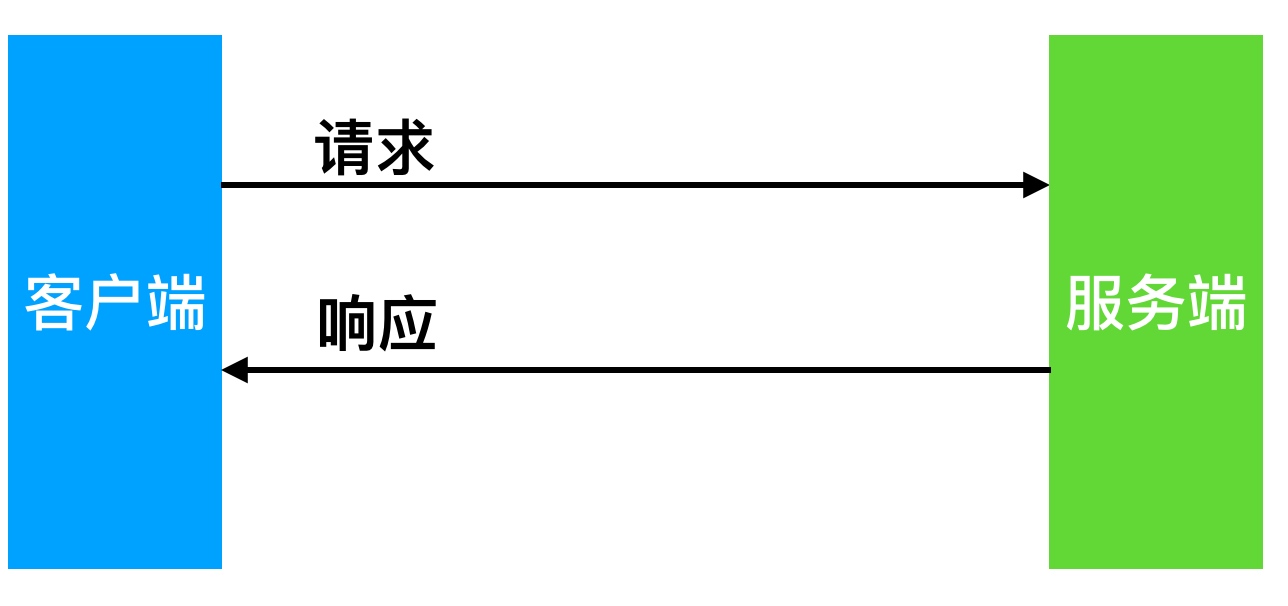
3.那么在互联网请求里面, 客户端往往无法直接向服务端发起请求, 那么就需要用到代理服务, 来实现客户端和服务通信,如下图所示
2.Nginx代理服务常见模式
那Nginx作为代理服务, 按照应用场景模式进行总结,代理分为正向代理、反向代理
正向代理,(内部上网) 客户端<-->代理->服务端

反向代理,用于公司集群架构中,客户端->代理<-->服务端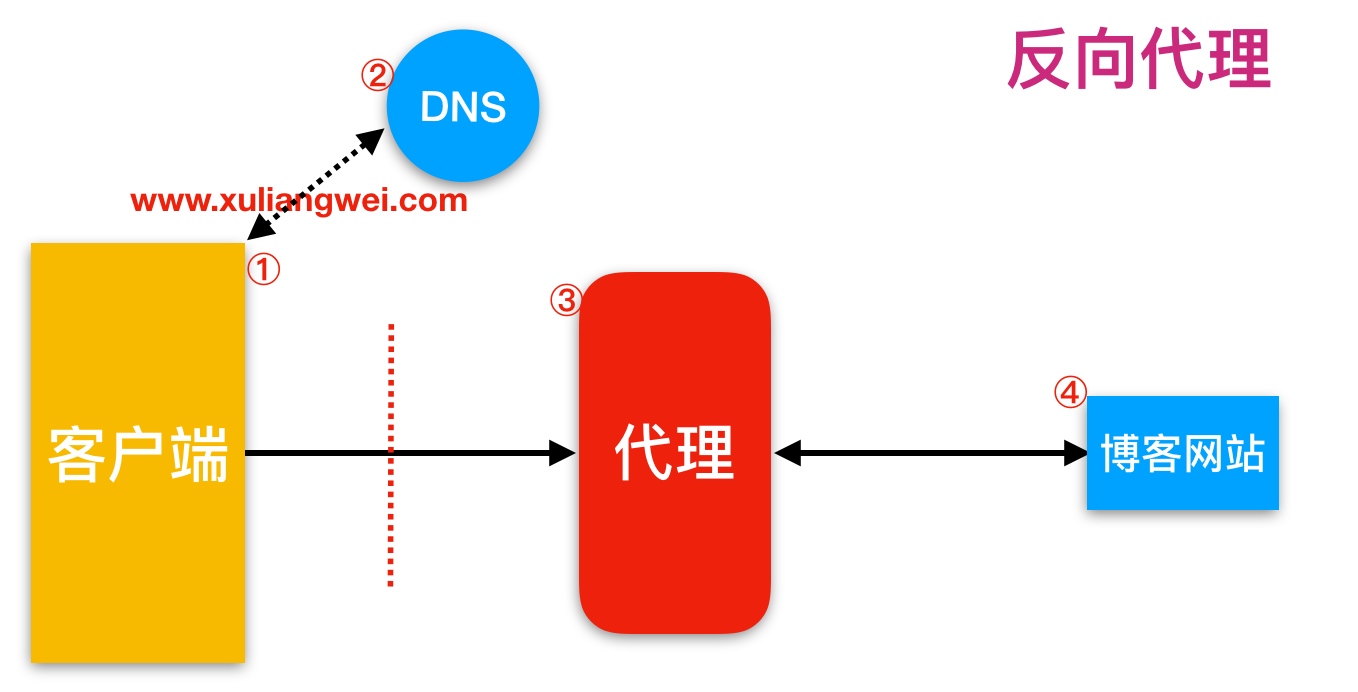
5.正向与反向代理的区别
区别在于形式上服务的”对象”不一样
正向代理代理的对象是客户端,为客户端服务
反向代理代理的对象是服务端,为服务端服务
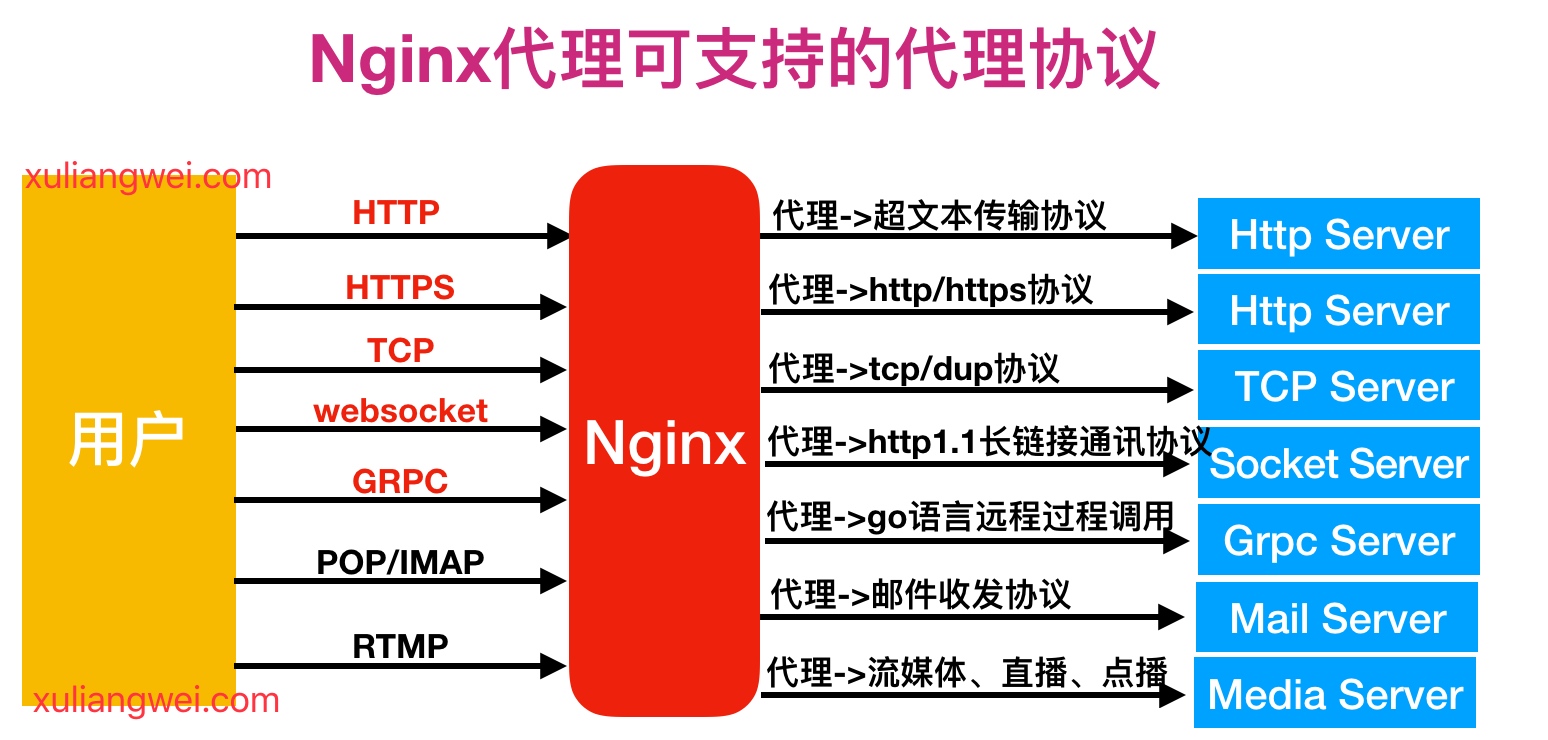
3.Nginx代理服务支持协议
1.Nginx作为代理服务,可支持的代理协议非常的多,具体如下图
2.如果将Nginx作为反向代理服务,常常会用到如下几种代理协议,如下图所示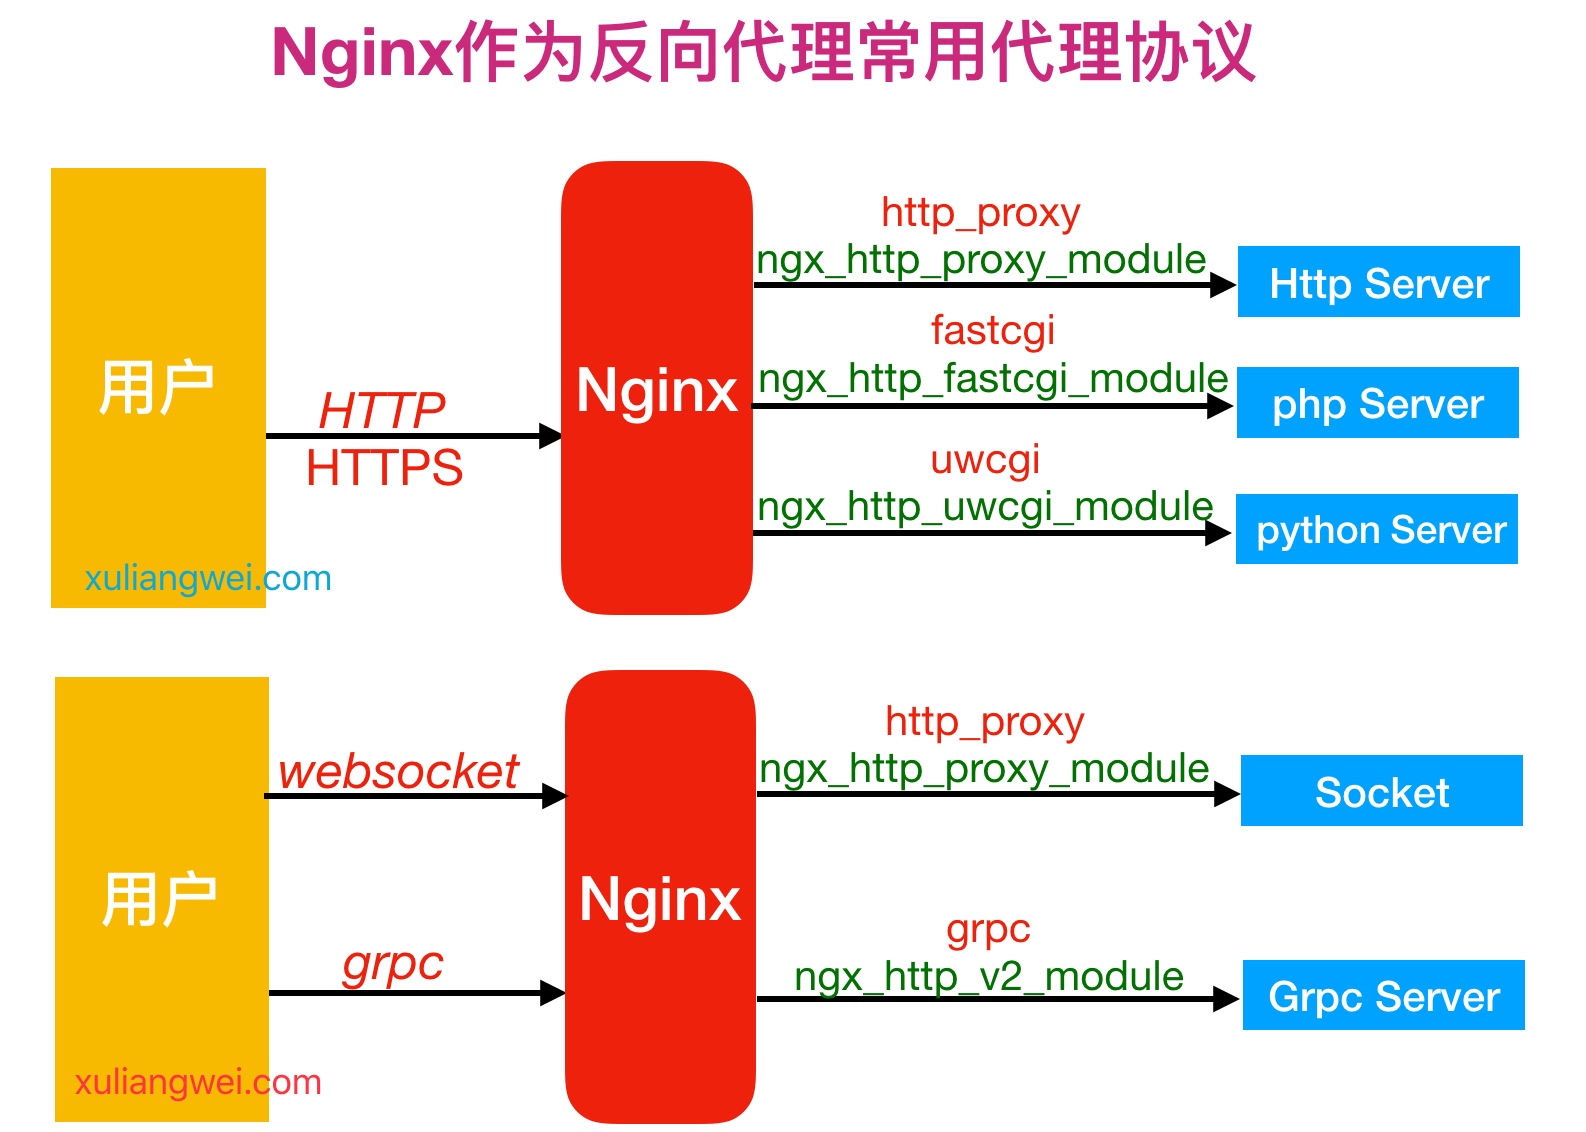
3.反向代理模式与Nginx代理模块总结如表格所示
| 反向代理模式 | Nginx配置模块 |
|---|---|
| http、websocket、https | ngx_http_proxy_module |
| fastcgi | ngx_http_fastcgi_module |
| uwsgi | ngx_http_uwsgi_module |
| grpc | ngx_http_v2_module |
4.Nginx反向代理配置语法
1.Nginx代理配置语法
1 | Syntax: proxy_pass URL; |
2.url跳转修改返回Location[不常用]参考URL
1 | Syntax: proxy_redirect default; |
3.添加发往后端服务器的请求头信息, 如图
1 | Syntax: proxy_set_header field value; |
4.代理到后端的TCP连接、响应、返回等超时时间, 如图
1 |
|
5.proxy_buffer代理缓冲区, 如图
1 | #nignx会把后端返回的内容先放到缓冲区当中,然后再返回给客户端,边收边传, 不是全部接收完再传给客户端 |
6.Proxy代理网站常用优化配置如下,将配置写入新文件,调用时使用include引用即可
1 | [root@Nginx ~]# vim /etc/nginx/proxy_params |
7.代理配置location时调用, 方便后续多个Location重复使用
1 | location / { |
5.Nginx反向代理场景实践
Nginx反向代理配置实例
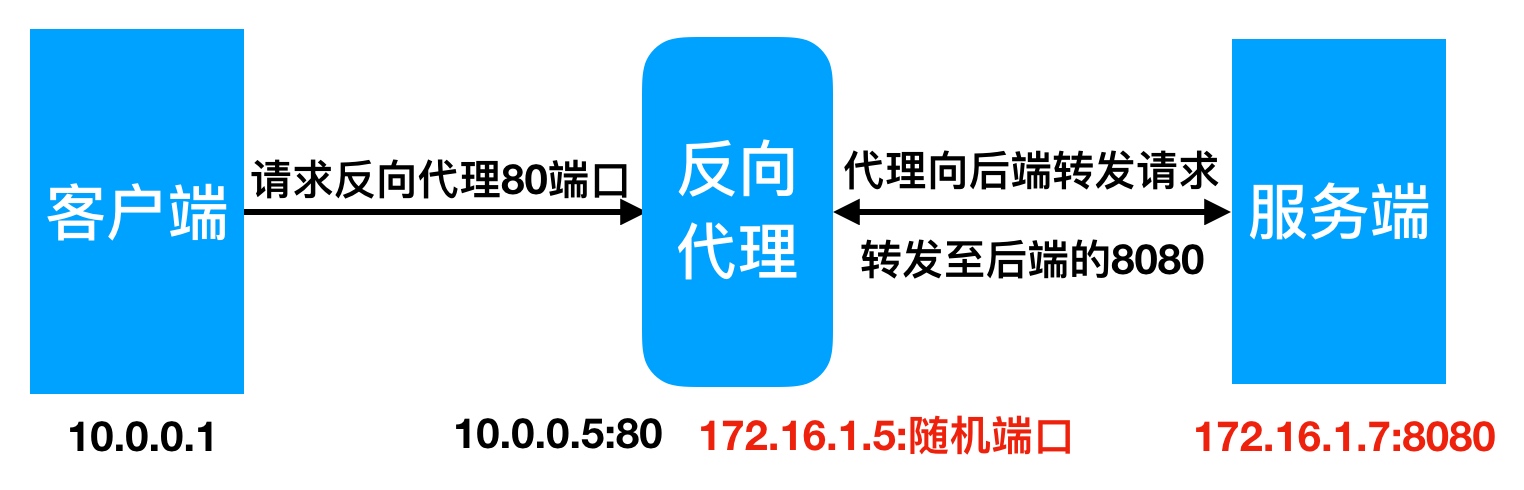
1.环境准备
| 角色 | 外网IP(NAT) | 内网IP(LAN) | 主机名 |
|---|---|---|---|
| Proxy | eth0:10.0.0.5 | eth1:172.16.1.5 | lb01 |
| web01 | eth1:172.16.1.7 | web01 |
2.web01服务器, 配置一个网站,监听在8080,此时网站仅172网段的用户能访问
1 | [root@web01 ~]# cd /etc/nginx/conf.d/ |
2.proxy代理服务器, 配置监听eth0的80端口,使10.0.0.0网段的用户,能够通过代理服务器访问到后端的172.16.1.7的8080端口站点内容
1 | [] |
06.Nginx代理缓存服务
通常情况下缓存是用来减少后端压力, 将压力尽可能的往前推, 减少后端压力,提高网站并发延时
1.缓存常见类型
服务端缓存
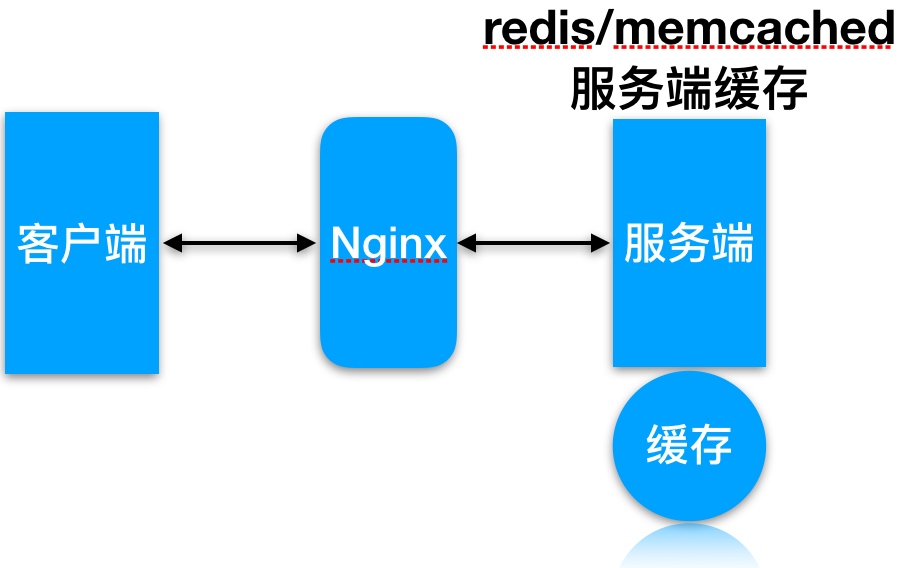
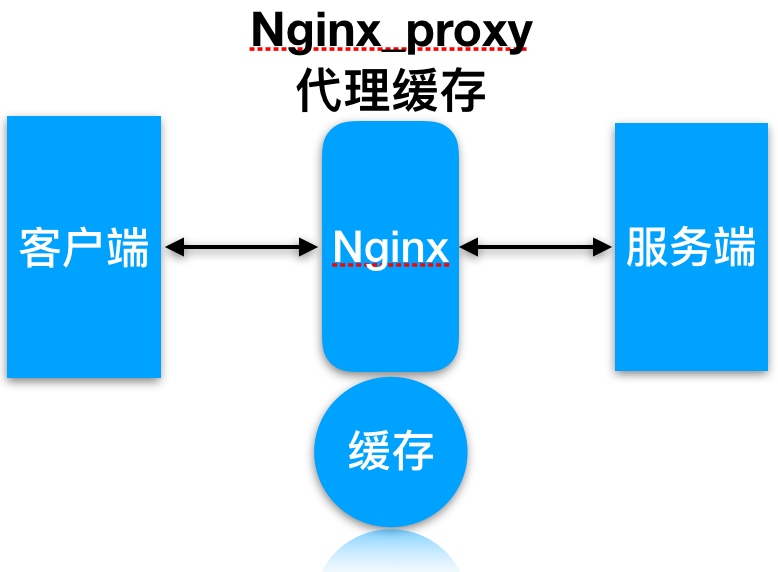
代理缓存, 获取服务端内容进行缓存
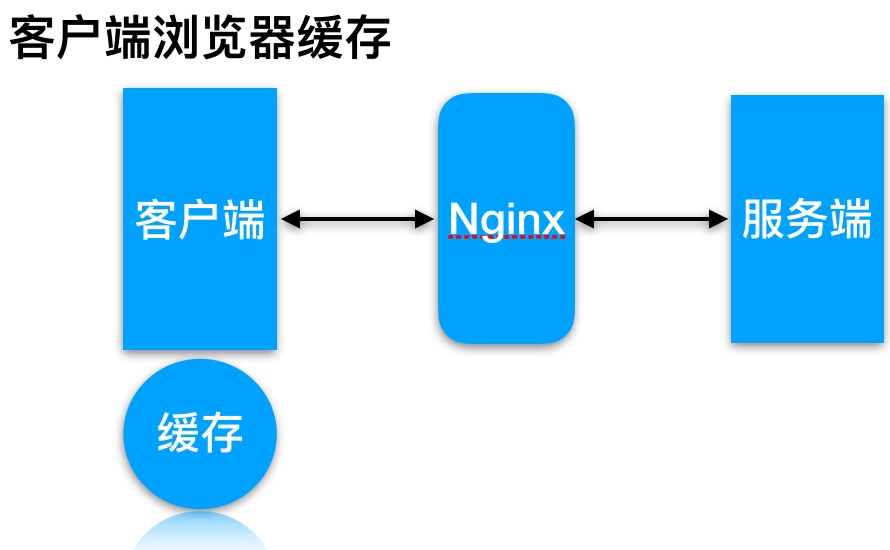
客户端浏览器缓存
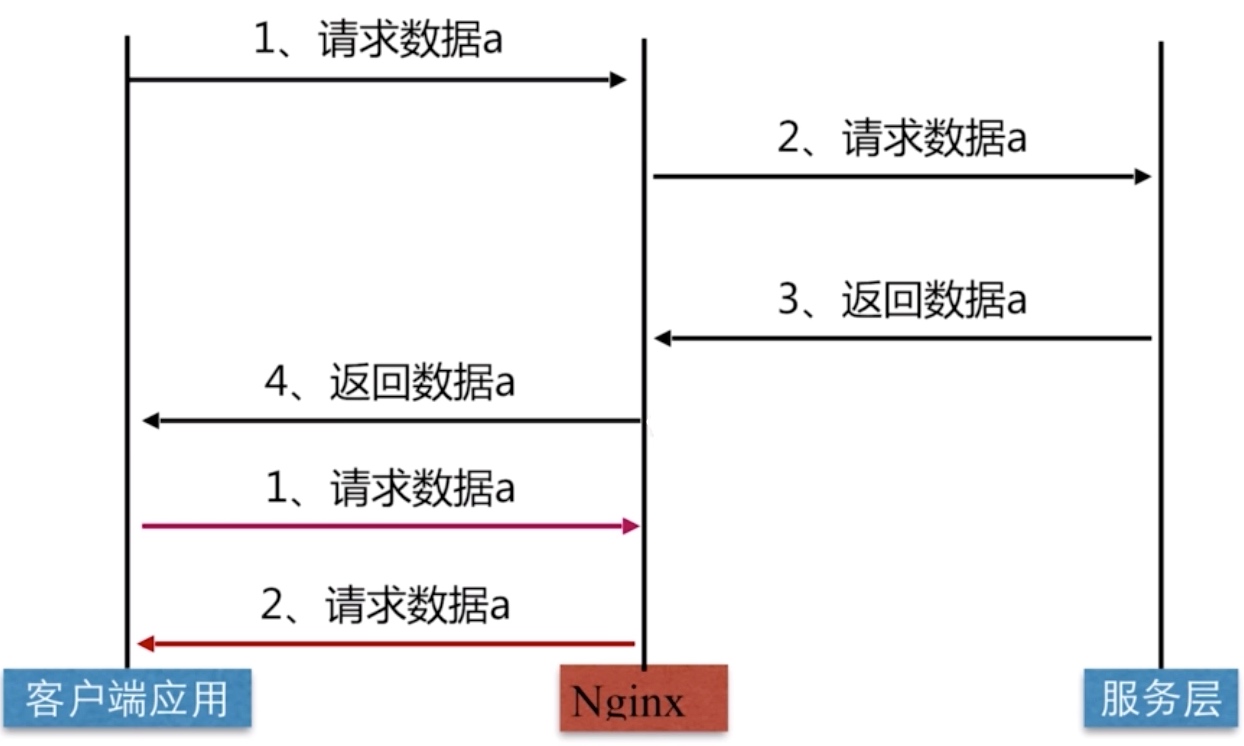
Nginx代理缓存原理
2.缓存配置语法
1.proxy_cache配置语法
1 | Syntax: proxy_cache zone | off; |
3.缓存配置实践
1.缓存准备
| 操作系统 | 应用服务 | 外网地址 | 内网地址 |
|---|---|---|---|
| CentOS7.5 | Nginx Proxy | 10.0.0.5 | 172.16.1.5 |
| CentOS7.5 | Nginx Web | 172.16.1.7 |
2.web节点准备
1 | #建立相关目录 |
3.代理配置缓存
1 | [root@lb01 ~]# mkdir /soft/cache |
3.客户端测试
1 |
|
4.缓存如何清理
如何清理proxy_cache代理的缓存
1.使用rm删除已缓存数据
1 | [root@lb01 ~] |
2.通过ngx_cache_purge扩展模块清理, 需要编译安装Nginx
1 | #建立对应目录 |
3.增加清理缓存的location,配置如下内容
1 | [root@lb01 ~]# cat /etc/nginx/conf.d/proxy_cache.conf |
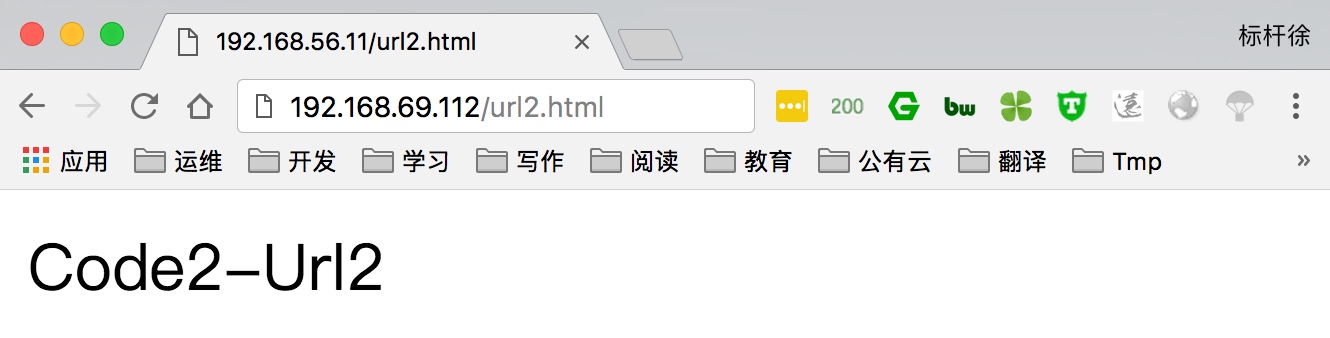
4.使用浏览器访问建立缓存
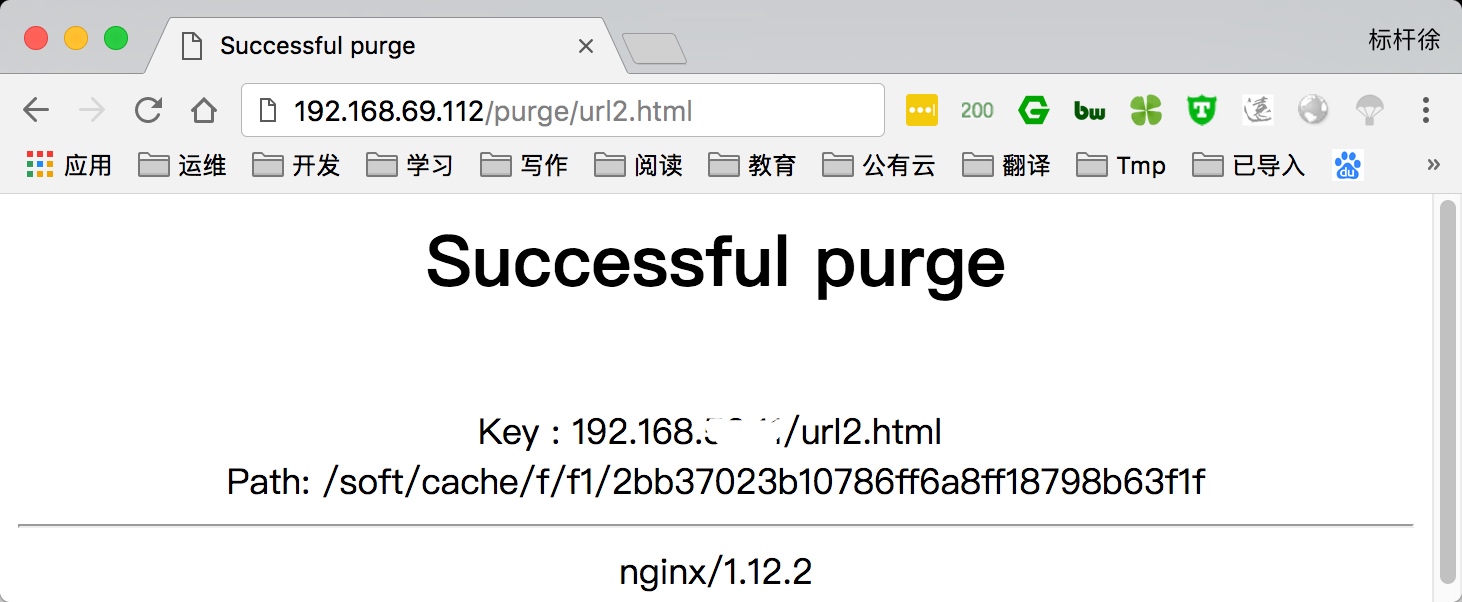
5.通过访问purge/url地址,删除对应的缓存
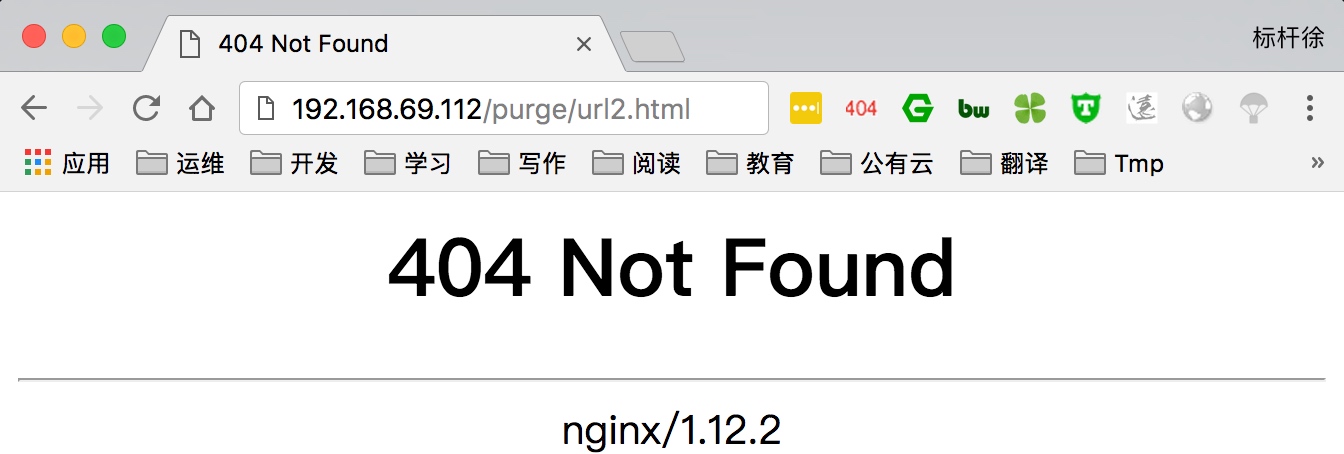
6.再次刷新就会因为缓存内容已清理,而出现404错误
5.指定页面不缓存
1.如何配置指定部分页面不进行proxy_Cache缓存
1 | [root@lb01 ~] |
6.缓存日志记录
通过日志记录proxy_cache命中情况与对应url
1.修改nginx的log_format格式,增加”$upstream_cache_status”,该变量包含如下几种状态
MISS 未命中,请求被传送到后端
HIT 缓存命中,通过缓存返回数据
EXPIRED 缓存已经过期请求被传送到后端
UPDATING 正在更新缓存,将使用旧的应答
STALE 后端将得到过期的应答
1 | [root@lb01 ~]# vim /etc/nginx/nginx.conf |
2.在server标签中添加对应的access日志
1 | server { |
3.使用curl访问, 最后检查日志命令情况
1 | [root@lb01 ~]# tail /var/log/nginx/proxy_cache.log |
Nginx查看命中率
07.Nginx七层负载均衡
- 1.Nginx负载均衡基本概述
- 2.Nginx负载均衡配置场景
- 3.Nginx负载均衡调度算法
- 4.Nginx负载均衡后端状态
- 5.Nginx负载均衡健康检查
- 6.Nginx负载均衡会话共享
徐亮伟, 江湖人称标杆徐。多年互联网运维工作经验,曾负责过大规模集群架构自动化运维管理工作。擅长Web集群架构与自动化运维,曾负责国内某大型电商运维工作。
个人博客”徐亮伟架构师之路“累计受益数万人。老男孩Linux云计算运维QQ交流群: 384467551 226199307
老男孩教育官网 http://www.oldboyedu.com
1.Nginx负载均衡基本概述
为什么需要使用负载均衡
当我们的Web服务器直接面向用户,往往要承载大量并发请求,单台服务器难以负荷,我使用多台WEB服务器组成集群,前端使用Nginx负载均衡,将请求分散的打到我们的后端服务器集群中,实现负载的分发。那么会大大提升系统的吞吐率、请求性能、高容灾
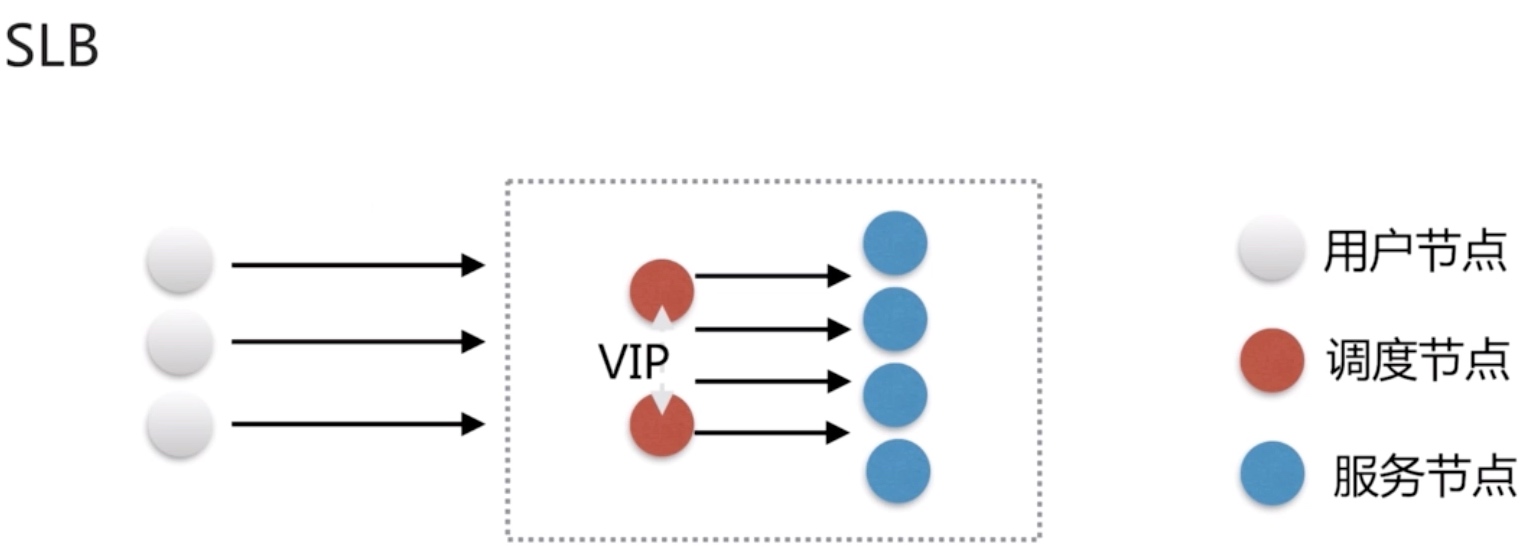
往往我们接触的最多的是SLB(Server Load Balance)负载均衡,实现最多的也是SLB、那么SLB它的调度节点和服务节点通常是在一个地域里面。那么它在这个小的逻辑地域里面决定了他对部分服务的实时性、响应性是非常好的。所以说当海量用户请求过来以后,它同样是请求调度节点,调度节点将用户的请求转发给后端对应的服务节点,服务节点处理完请求后在转发给调度节点,调度节点最后响应给用户节点。这样也能实现一个均衡的作用,那么Nginx则是一个典型的SLB
负载均衡能实现的应用场景一: 四层负载均衡
所谓四层负载均衡指的是OSI七层模型中的传输层,那么传输层Nginx已经能支持TCP/IP的控制,所以只需要对客户端的请求进行TCP/IP协议的包转发就可以实现负载均衡,那么它的好处是性能非常快、只需要底层进行应用处理,而不需要进行一些复杂的逻辑。

负载均衡能实现的应用场景二: 七层负载均衡
七层负载均衡它是在应用层,那么它可以完成很多应用方面的协议请求,比如我们说的http应用的负载均衡,它可以实现http信息的改写、头信息的改写、安全应用规则控制、URL匹配规则控制、以及转发、rewrite等等的规则,所以在应用层的服务里面,我们可以做的内容就更多,那么Nginx则是一个典型的七层负载均衡SLB

3.四层负载均衡与七层负载均衡区别
四层负载均衡数据包在底层就进行了分发,而七层负载均衡数据包则是在最顶层进行分发、由此可以看出,七层负载均衡效率没有四负载均衡高。
但七层负载均衡更贴近于服务,如:http协议就是七层协议,我们可以用Nginx可以作会话保持,URL路径规则匹配、head头改写等等,这些是四层负载均衡无法实现的。
2.Nginx负载均衡配置场景
Nginx要实现负载均衡需要用到proxy_pass代理模块配置.Nginx负载均衡与Nginx代理不同地方在于,Nginx代理仅代理一台服务器,而Nginx负载均衡则是将客户端请求代理转发至一组upstream虚拟服务池
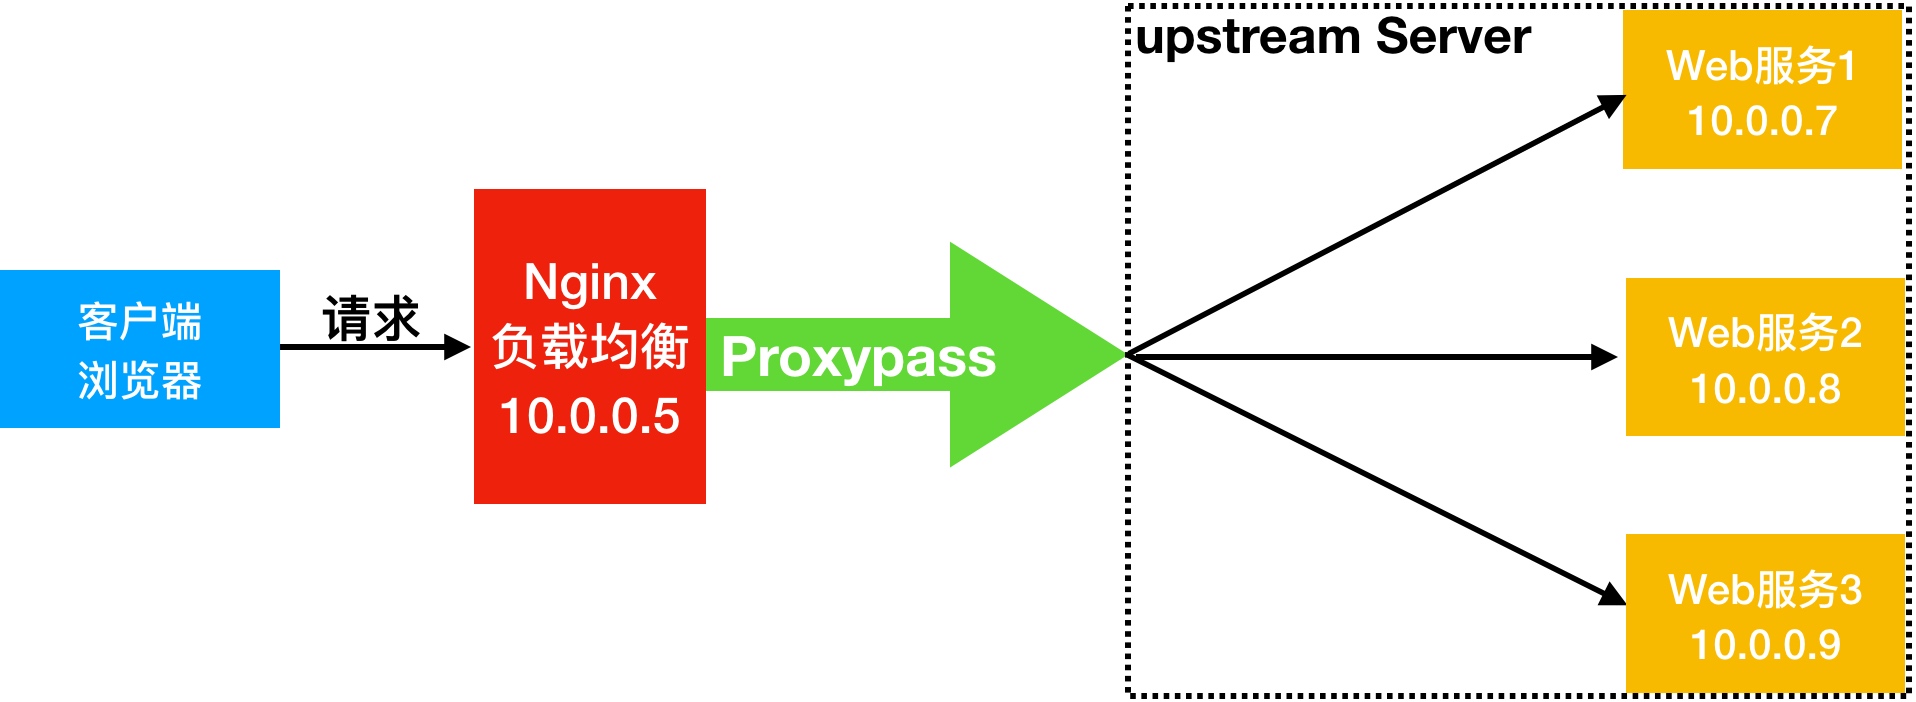
Nginx upstream虚拟配置语法
1 | Syntax: upstream name { ... } |
0.环境规划
| 角色 | 外网IP(NAT) | 内网IP(LAN) | 主机名 |
|---|---|---|---|
| LB01 | eth0:10.0.0.5 | eth1:172.16.1.5 | lb01 |
| web01 | eth0:10.0.0.7 | eth1:172.16.1.7 | web01 |
| web02 | eth0:10.0.0.8 | eth1:172.16.1.8 | web02 |
1.Web01服务器上配置nginx, 并创建对应html文件
1 | [root@web01 ~]# cd /etc/nginx/conf.d/ |
2.Web02服务器上配置nginx, 并创建对应html文件
1 | [root@web02 ~]# cd /etc/nginx/conf.d/ |
3.配置Nginx负载均衡
1 | [root@lb01 ~]# cd /etc/nginx/conf.d/ |
4.准备Nginx负载均衡调度使用的proxy_params
1 | [root@Nginx ~]# vim /etc/nginx/proxy_params |
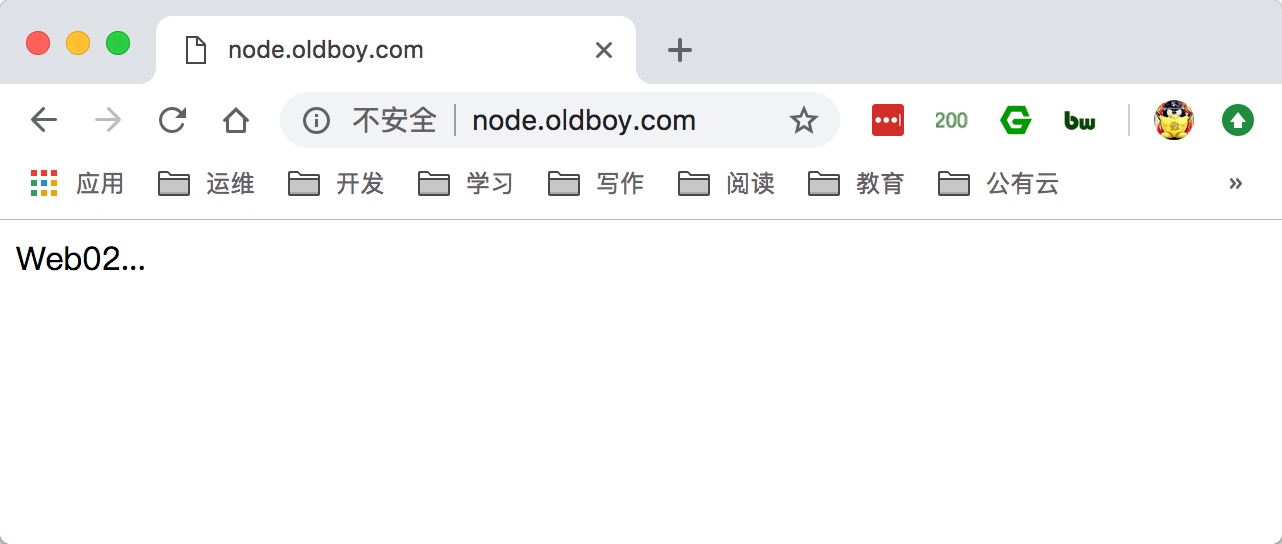
5.使用浏览器访问node.oldboy.com, 然后不断刷新测试

3.Nginx负载均衡调度算法
| 调度算法 | 概述 |
|---|---|
| 轮询 | 按时间顺序逐一分配到不同的后端服务器(默认) |
| weight | 加权轮询,weight值越大,分配到的访问几率越高 |
| ip_hash | 每个请求按访问IP的hash结果分配,这样来自同一IP的固定访问一个后端服务器 |
| url_hash | 按照访问URL的hash结果来分配请求,是每个URL定向到同一个后端服务器 |
| least_conn | 最少链接数,那个机器链接数少就分发 |
1.Nginx负载均衡[wrr]轮询具体配置
1 | upstream load_pass { |
2.Nginx负载均衡[weight]权重轮询具体配置
1 | upstream load_pass { |
3.Nginx负载均衡ip_hash具体配置, 不能和weight一起使用。
1 | #如果客户端都走相同代理, 会导致某一台服务器连接过多 |
4.Nginx负载均衡后端状态
后端Web服务器在前端Nginx负载均衡调度中的状态
| 状态 | 概述 |
|---|---|
| down | 当前的server暂时不参与负载均衡 |
| backup | 预留的备份服务器 |
| max_fails | 允许请求失败的次数 |
| fail_timeout | 经过max_fails失败后, 服务暂停时间 |
| max_conns | 限制最大的接收连接数 |
1.测试down状态, 测试该Server不参与负载均衡的调度
1 | upstream load_pass { |
2.测试backup以及down状态
1 | upstream load_pass { |
3.测试max_fails失败次数和fail_timeout多少时间内失败多少次则标记down
1 | upstream load_pass { |
4.测试max_conns最大TCP连接数
1 | upstream load_pass { |
5.Nginx负载均衡健康检查
在Nginx官方模块提供的模块中,没有对负载均衡后端节点的健康检查模块,但可以使用第三方模块nginx_upstream_check_module来检测后方服务的健康状态upstream_check_module项目地址
1.安装依赖包
1 | [root@lb02 ~] |
2.下载nginx源码包以及nginx_upstream_check模块第三方模块
1 | [root@lb02 ~]# wget http://nginx.org/download/nginx-1.14.2.tar.gz |
3.解压nginx源码包以及第三方模块
1 | [root@lb02 ~]# tar xf nginx-1.14.2.tar.gz |
4.进入nginx目录,打补丁(nginx的版本是1.14补丁就选择1.14的,p1代表在nginx目录,p0是不在nginx目录)
1 | [root@lb02 ~]# cd nginx-1.14.2/ |
5.编译Nginx,需要添加upstream_check第三方模块
1 | [root@lb02 nginx-1.14.2]# ./configure --prefix=/etc/nginx --sbin-path=/usr/sbin/nginx --modules-path=/usr/lib64/nginx/modules --conf-path=/etc/nginx/nginx.conf --error-log-path=/var/log/nginx/error.log --http-log-path=/var/log/nginx/access.log --pid-path=/var/run/nginx.pid --lock-path=/var/run/nginx.lock --http-client-body-temp-path=/var/cache/nginx/client_temp --http-proxy-temp-path=/var/cache/nginx/proxy_temp --http-fastcgi-temp-path=/var/cache/nginx/fastcgi_temp --http-uwsgi-temp-path=/var/cache/nginx/uwsgi_temp --http-scgi-temp-path=/var/cache/nginx/scgi_temp --user=nginx --group=nginx --with-compat --with-file-aio --with-threads --with-http_addition_module --with-http_auth_request_module --with-http_dav_module --with-http_flv_module --with-http_gunzip_module --with-http_gzip_static_module --with-http_mp4_module --with-http_random_index_module --with-http_realip_module --with-http_secure_link_module --with-http_slice_module --with-http_ssl_module --with-http_stub_status_module --with-http_sub_module --with-http_v2_module --with-mail --with-mail_ssl_module --with-stream --with-stream_realip_module --with-stream_ssl_module --with-stream_ssl_preread_module --add-module=/root/nginx_upstream_check_module-master --with-cc-opt='-O2 -g -pipe -Wall -Wp,-D_FORTIFY_SOURCE=2 -fexceptions -fstack-protector-strong --param=ssp-buffer-size=4 -grecord-gcc-switches -m64 -mtune=generic -fPIC' --with-ld-opt='-Wl,-z,relro -Wl,-z,now -pie' |
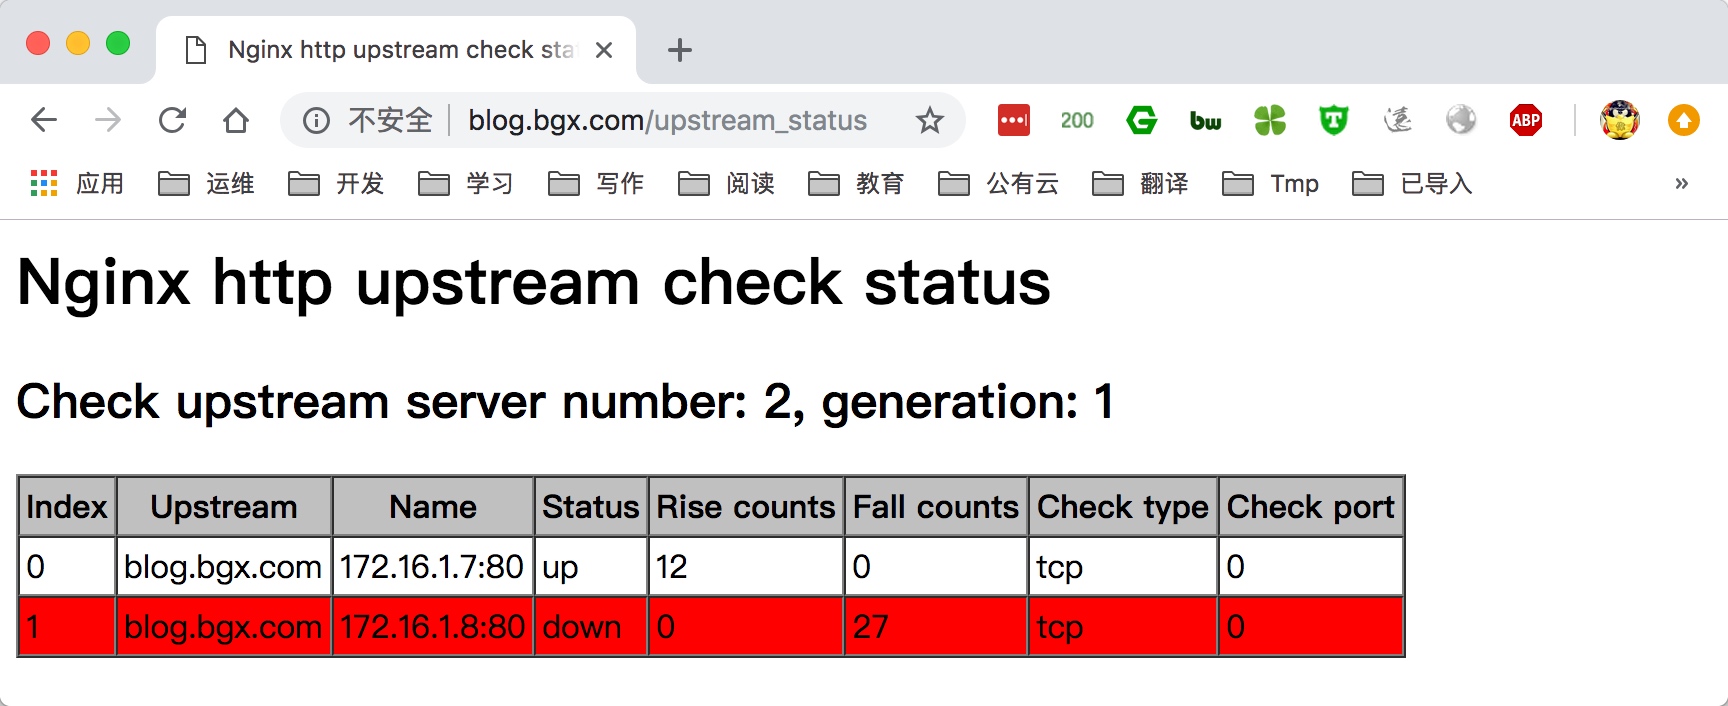
6.配置nginx负载均衡,同时打开upstream健康检查功能
1 | [root@lb02 conf.d]# cat proxy.blog.bgx.com.conf |
7.通过访问域名/upstream_status则能打开状态页面
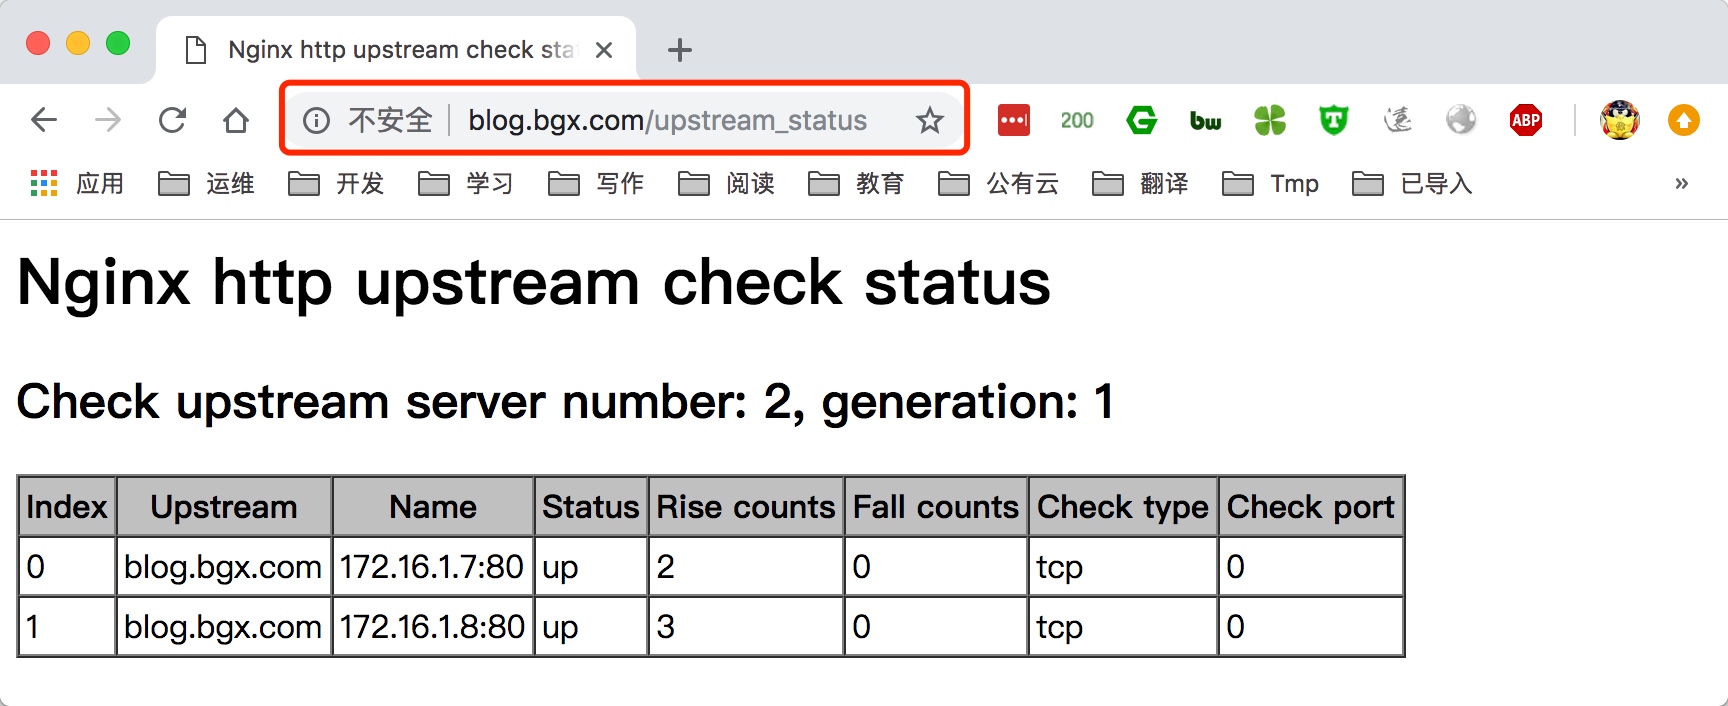
8.尝试关闭一台后端的webserver,再次打开检查见面
6.Nginx负载均衡会话共享
在使用负载均衡的时候会遇到会话保持的问题,可通过如下方式进行解决1.使用nginx的ip_hash,根据客户端的来源IP,将请求分配到相同服务器上2.基于服务端的Session会话共享(mysql/memcache/redis/file)
在解决负载均衡会话问题我们需要了解session和cookie。1.用户第一次请求服务端网站时,服务端会生成对应的session_id,然后存储至客户端浏览器的cookie中。2.客户端尝试登陆服务端网站时,浏览器的请求头自动携带cookie信息,在cookie信息中保存的则是session_id。3.客户端登陆服务端网站后,服务端会将session_id存储在本地文件中, 当用户下次请求网站时会去查询用户提交的cookie作为key去存储里找对应的value(session)注意: 同一域名下的网站登陆后cookie都是一样的。所以无论负载后端有几台服务器,无论请求分配到哪一台服务器上同一用户的cookie是不会发生变化的。也就是说cookie对应的session也是唯一的。所以,这里只要保证多台业务服务器访问同一个共享服务器(memcache/redis/mysql/file)就行了。
1.首先在多台web上都安装并配置phpmyadmin
1 |
|
2.在多台web上准备phpmyadmin的nginx配置文件
1 | [root@web01 ~]# cat /etc/nginx/conf.d/php.conf |
3.配置负载均衡服务,调度到后端两台web节点
1 | [root@lb01 ~] |
4.准备redis内存数据库存储session会话
1 |
|
5.配置php连接redis服务
1 | #1.修改/etc/php.ini文件 |
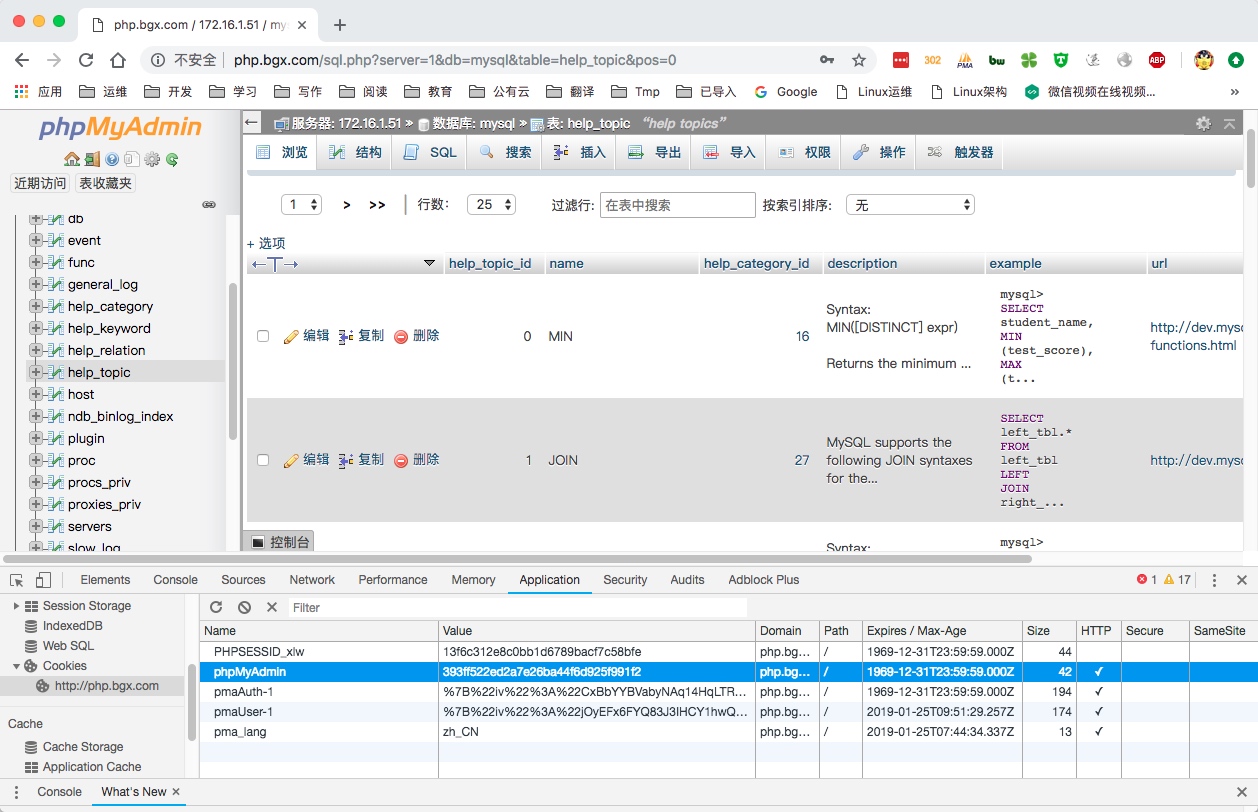
6.使用浏览器登陆网站,获取对应的cookie信息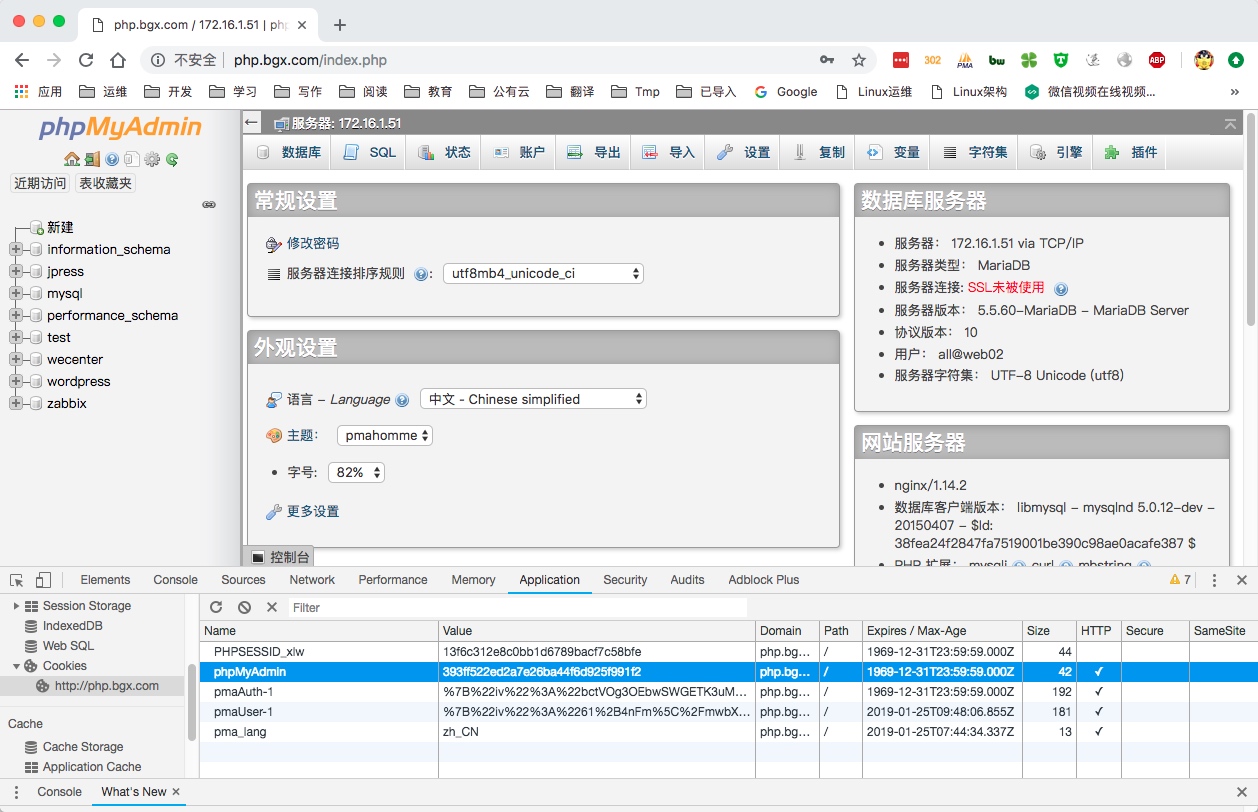
7.检查redis中是否存在cookie对应的session
1 | 172.16.1.51:6379> keys * |
8.此时用户的cookie始终都不会发生任何变化,无论请求被负载调度到那一台后端web节点服务器都不会出现没有登陆情况。
08.Nginx四层负载均衡
1.Nginx四层负载均衡基本概述
1.什么是四层负载均衡
四层负载均衡基于传输层协议包来封装的(如:TCP/IP),那我们前面使用到的七层是指的应用层,它的组装在四层基础之上,无论四层还是七层都是指的OSI网络模型。
2.四层层负载均衡应用场景
1.四层+七层来作负载均衡,4层可以保证7层的负载均衡的高可用性。如:nginx就无法保证自己的服务高可用,需要依赖lvs或者keepalive来作。2.,如:tcp协议的负载均衡,有些请求是TCP协议的(mysql、ssh),或者说这些请求只需要使用4层进行端口的转发就可以了,所以使用4层负载均衡。
3.四层+七层构建大规模集群架构使用场景
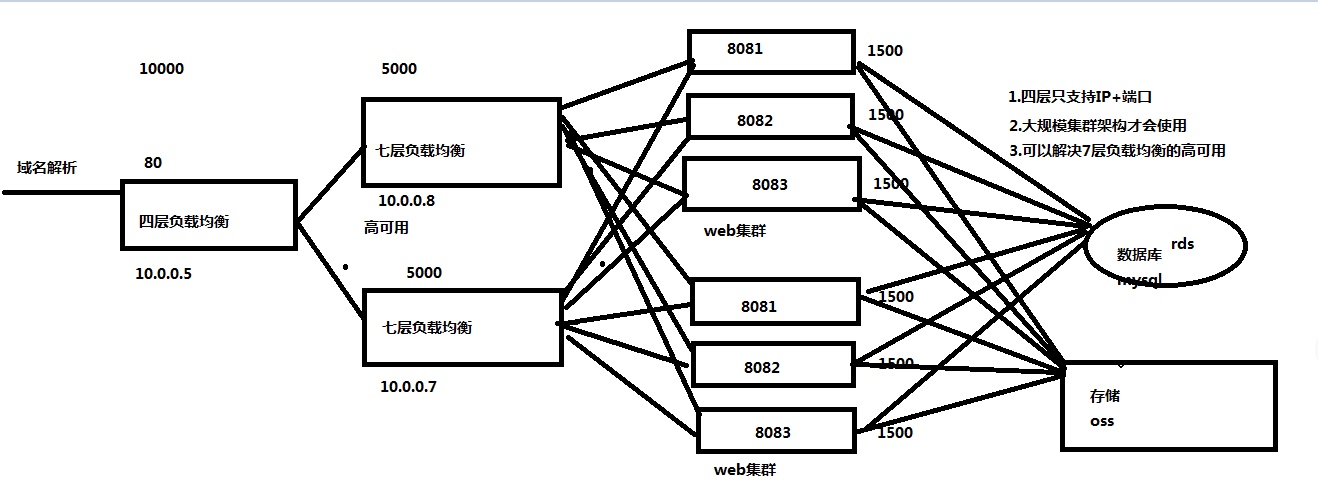
四层负载均衡总结
1.四层负载均衡仅能转发TCP/IP协议、UDP协议,通常用来转发端口,如: tcp/3306,tcp/22,udp/53。2.四层负载均衡可以用来解决七层负载均衡的端口限制问题。(七层负载均衡最大使用65535个端口号)3.可以用来解决七层负载均衡的高可用问题。(多台后端七层负载均衡能同时的使用)4.四层的转发效率比七层的高的多,但仅支持tcp/ip协议,不支持http或者https协议
2.Nginx四层负载均衡场景实践
Nginx如何配置四层负载均衡
1.通过访问负载均衡的5555端口,实际是后端的web01的22端口在提供服务。2.通过访问负载均衡的6666端口,实际是后端的mysql的3306端口在提供服务。
1.Nginx四层负载均衡配置语法
1 | stream { |
2.Nginx四层负载均衡实战
1 | [root@lb01 ~]# mkdir -p /etc/nginx/conf.c |
3.如何记录四层负载均衡日志,四层负载均衡日志必须配置在stream模块
1 | [root@lb01 ~]# cat /etc/nginx/conf.c/tcp_proxy.conf |
09.Nginx动静分离实战
- 1.Nginx动静分离基本概述
- 2.Nginx动静分离场景实践
- 3.Nginx资源分离场景实践
徐亮伟, 江湖人称标杆徐。多年互联网运维工作经验,曾负责过大规模集群架构自动化运维管理工作。擅长Web集群架构与自动化运维,曾负责国内某大型电商运维工作。
个人博客”徐亮伟架构师之路“累计受益数万人。老男孩Linux云计算运维QQ交流群: 384467551 226199307
老男孩教育官网 http://www.oldboyedu.com
1.Nginx动静分离基本概述
动静分离, 通过中间件将动静分离和静态请求进行分离。那为什么要通过中间件将动态请求和静态请求进行分离? 减少不必要的请求消耗, 同时能减少请求的延时。
通过中间件将动态请求和静态请求分离,逻辑图如下
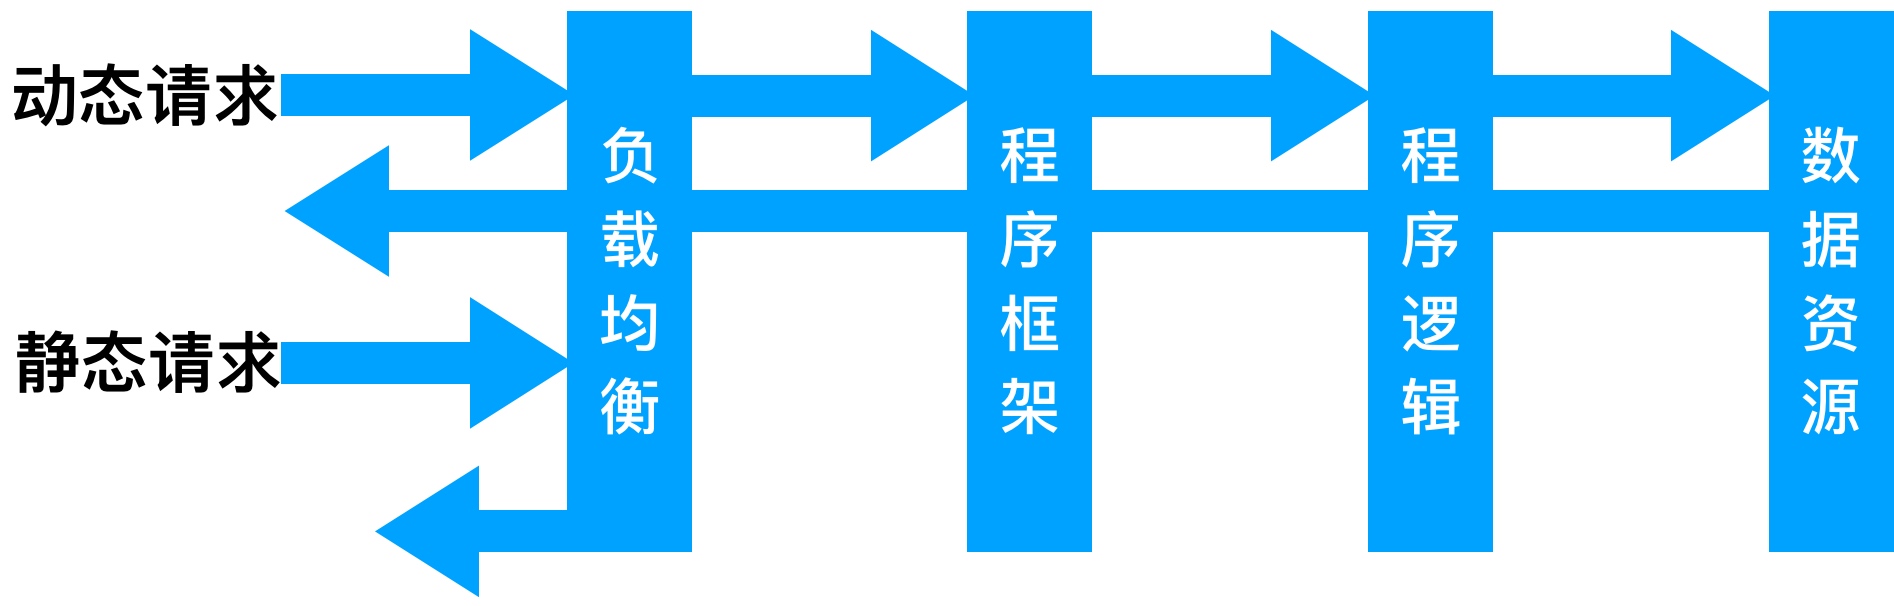
动静分离只有好处: 动静分离后, 即使动态服务不可用, 但静态资源不会受到影响
2.Nginx动静分离场景实践
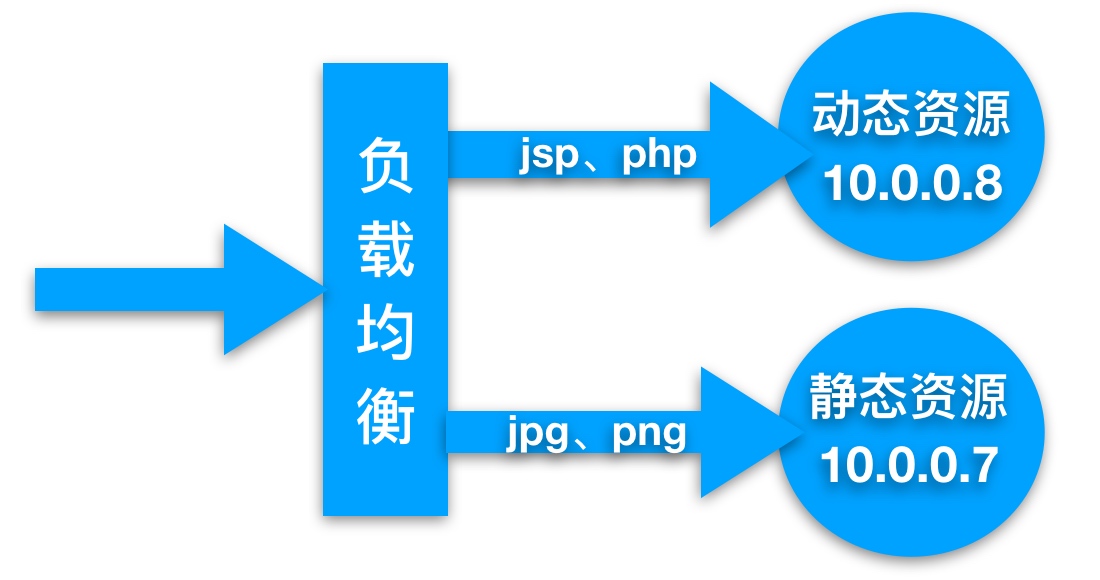
Nginx动静分离实践应用案例
0.环境准备
| 系统 | 服务 | 服务 | 地址 |
|---|---|---|---|
| CentOS7.5 | 负载均衡 | Nginx Proxy | 10.0.0.5 |
| CentOS7.5 | 静态资源 | Nginx Static | 10.0.0.7 |
| CentOS7.5 | 动态资源 | Tomcat Server | 10.0.0.8 |
1.在10.0.0.7服务器上配置静态资源
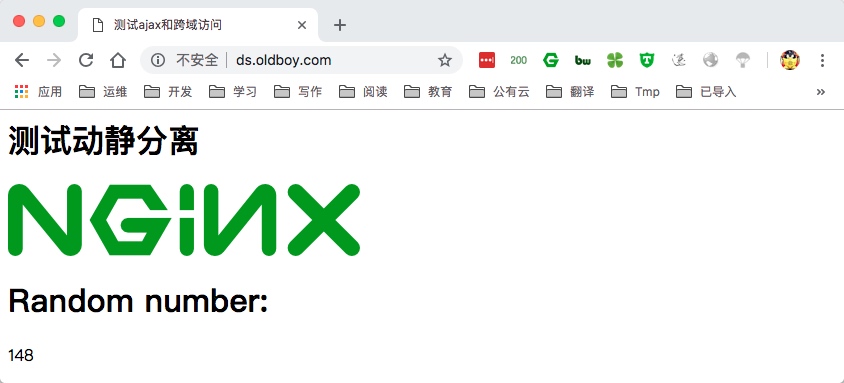
1 | [root@web01 conf.d]# cat ds_oldboy.conf |
2.在10.0.0.8服务器上配置动态资源
1 | [] |
3.在负载均衡10.0.0.5上配置调度, 实现访问jsp和png
1 | root@lb01 conf.d]# cat ds_proxy.conf |
4.通过负载测试访问静态资源
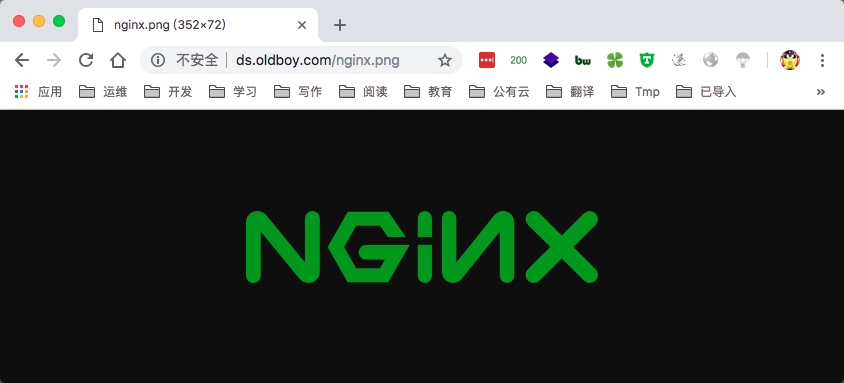
5.通过负载测试访问动态资源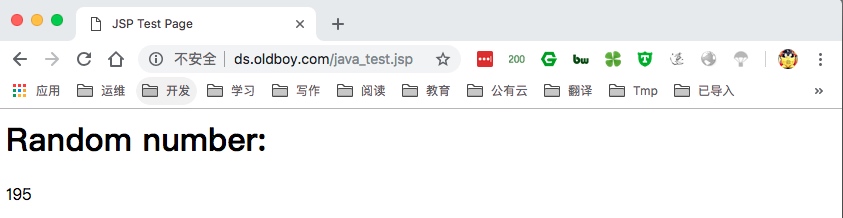
6.在负载均衡10.0.0.5上整合动态和静态资源的html文件
1 | [root@lb01 ~]# mkdir /soft/code -p |
7.测试动态和静态资源是否能正常加载在一个html文件中
8.当使用systemctl stop nginx停止Nginx后, 会发现静态内容无法访问, 动态内容依旧运行正常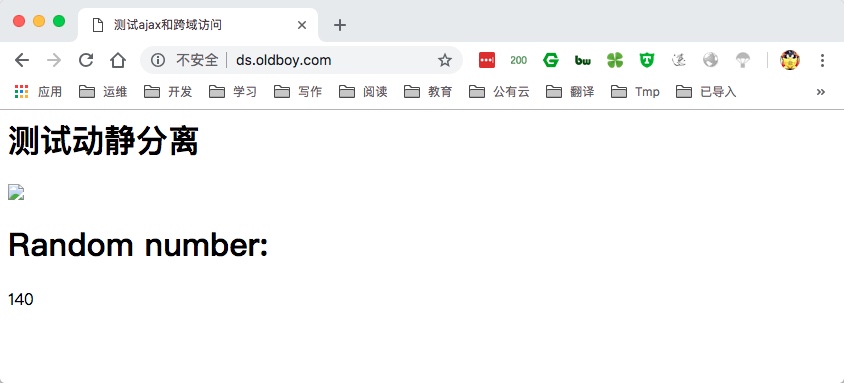
9.当使用systemctl stop tomcat停止tomcat后, 静态内容依旧能正常访问, 动态内容将不会被请求到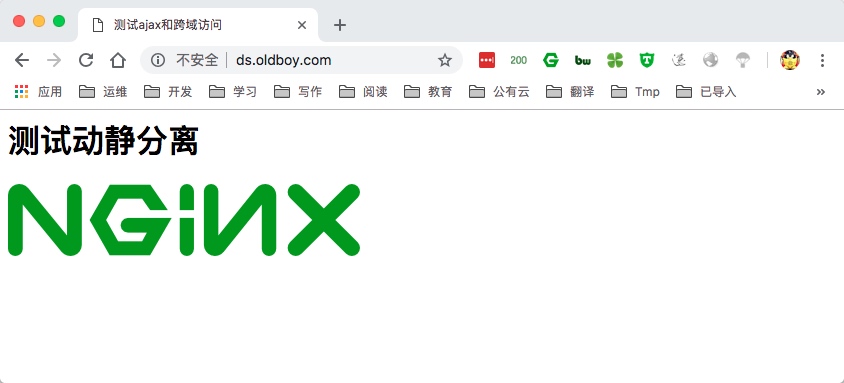
3.Nginx资源分离场景实践
Nginx通过负载均衡实现手机与PC调度至不同的后端节点应用案例
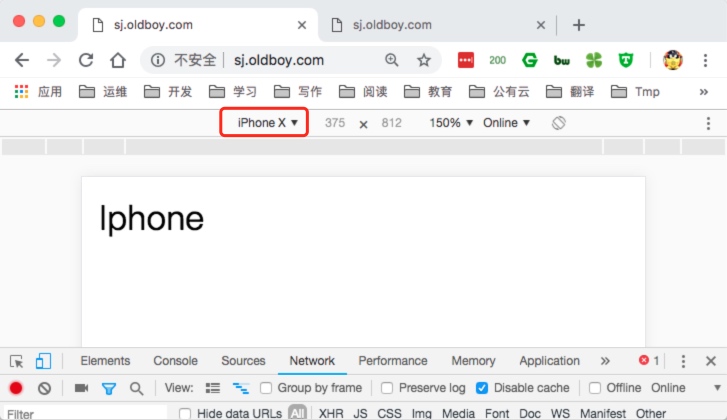
1.根据iphone、安卓、pc跳转不同的页面环境规划
| 系统版本 | 主机角色 | 外网IP | 内网IP | 提供端口 |
|---|---|---|---|---|
| CentOS7.5 | 负载均衡 | 10.0.0.5 | 172.16.1.5 | 80 |
| CentOS7.5 | 提供Android页面 | 172.16.1.7 | 9090 | |
| CentOS7.5 | 提供Iphone页面 | 172.16.1.7 | 9091 | |
| CentOS7.5 | 提供pc页面 | 172.16.1.7 | 9092 |
2.配置后端WEB节点的Nginx配置
1 | [root@web01 conf.d]# cat sj.conf |
2.为后端WEB节点配置对应的网站目录以及代码
1 | [root@web01 conf.d]# mkdir -p /code/{android,iphone,pc} |
2.配置负载均衡服务,根据不同的浏览器调度到不同的资源池
1 | [root@lb01 conf.d]# cat sj_proxy.conf |
3.直接使用浏览器访问,返回默认的结果
4.如果通过android设备访问,效果如下。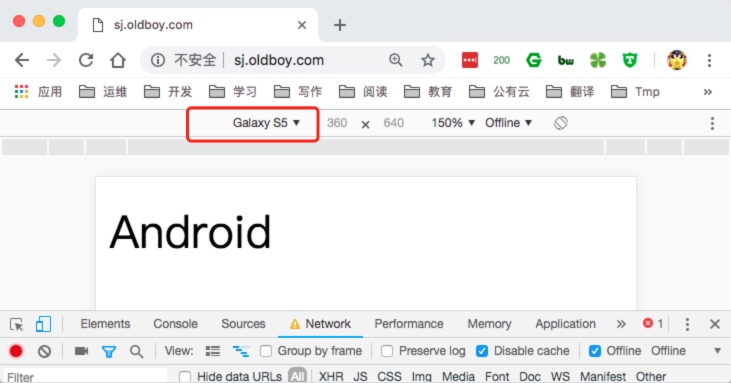
4.如果通过Iphone设备访问,效果如下。
11.Nginx Rewrite重写
- 1.Rewrite基本概述
- 2.Rewrite标记Flag
- 3.Rewrite规则实践
- 4.Rewrite规则补充
徐亮伟, 江湖人称标杆徐。多年互联网运维工作经验,曾负责过大规模集群架构自动化运维管理工作。擅长Web集群架构与自动化运维,曾负责国内某大型电商运维工作。
个人博客”徐亮伟架构师之路“累计受益数万人。老男孩Linux云计算运维QQ交流群: 384467551 226199307
老男孩教育官网 http://www.oldboyedu.com
1.Rewrite基本概述
1.什么是rewrite
Rewrite主要实现url地址重写, 以及地址重定向,就是将用户请求web服务器的地址重新定向到其他URL的过程。
2.Rewrite使用场景
1.地址跳转,用户访问www.xuliangwei.com/class这个URL时,将其定向至一个新的域名class.xuliangwei.com2.协议跳转,用户通过http协议请求网站时,将其重新跳转至https协议方式3.伪静态,将动态页面显示为静态页面方式的一种技术, 便于搜索引擎的录入, 同时减少动态URL地址对外暴露过多的参数, 提升更高的安全性。3.搜索引擎,SEO优化依赖于url路径, 好记的url便于支持搜索引擎录入
3.Rewrite配置示例
1 |
|
2.Rewrite标记Flag
rewrite指令根据表达式来重定向URI,或者修改URI字符串。每行rewrite指令最后跟一个flag标记,支持的flag标记有如下表格所示:
| flag | |
|---|---|
| last | 本条规则匹配完成后,停止匹配,不在匹配后面的规则 |
| break | 本条规则匹配完成后,停止匹配,不在匹配后面的规则 |
| redirect | 返回302临时重定向, 地址栏会显示跳转后的地址 |
| permanent | 返回301永久重定向, 地址栏会显示跳转后的地址 |
1.last与break区别对比示例
1 | [root@bgx conf.d]# cat rewrite.conf |
2.使用浏览器访问/break测试
3.使用浏览器访问/last测试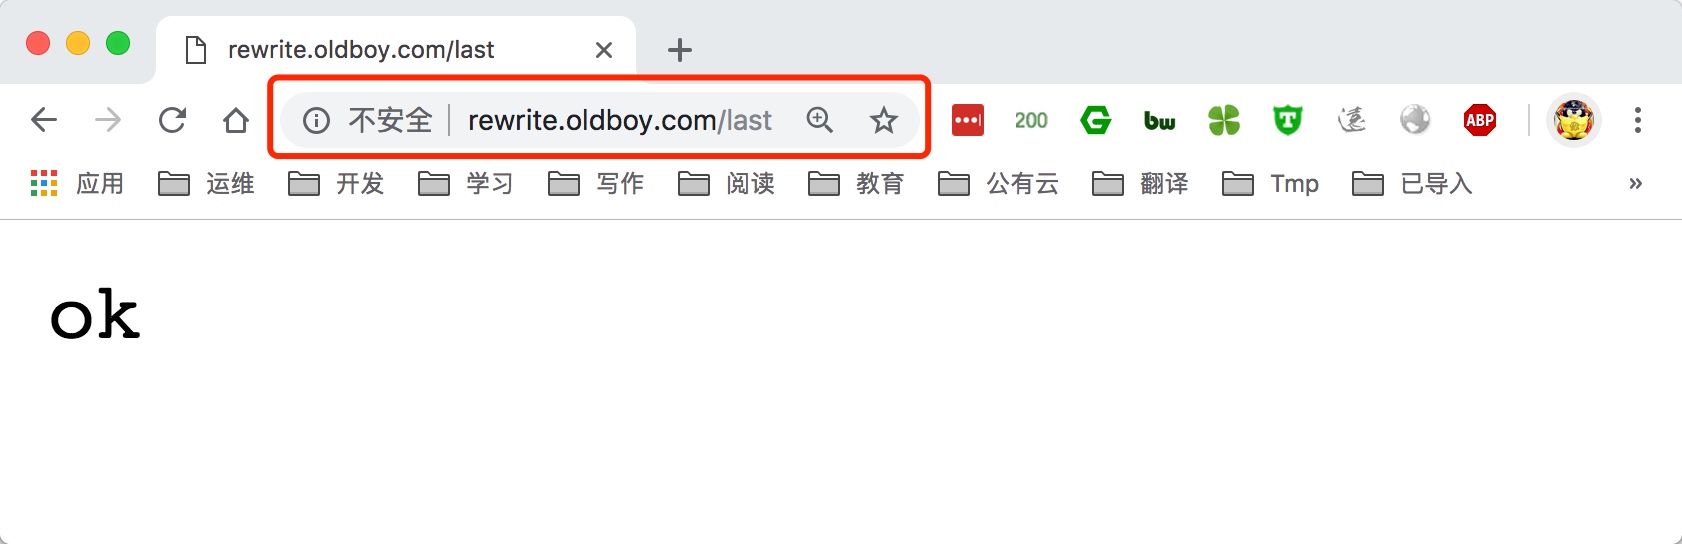
4.last和 break 都是一个作用,都是表示停止rewrite规则,那last和break区别在哪呢
break匹配到规则,则会去本地路径中目录中寻找对应请求的文件。last匹配到规则,会对其所在的server{…}标签重新发起请求。所以,在访问/break和/last请求时,虽然对应的请求目录/test都是不存在了,理论上都应该返回404,但是实际请求/last的时候,是会有后面localtion所匹配到的结果返回的,如果last匹配不到location的结果则在返回错误。
5.redirect与permanent区别对比示例
1 | [root@Nginx ~]# cat /etc/nginx/conf.d/rewrite.conf |
5.通过浏览器访问,redirect会进行302跳转

6.使用 systemctl stop nginx停止nginx,然后再次访问网站测试 redirect
7.通过浏览器访问,permanent会进行301跳转

8.使用 systemctl stop nginx停止nginx,然后再次访问网站测试 permanent

9.redirect和permanent都是一个跳转,那redirect和permanent区别在哪呢
3.Rewrite规则实践
例1:用户访问/abc/1.html实际上真实访问是/ccc/bbb/2.html
1 | #http://www.bgx.com/abc/1.html ==> http://www.bgx.com/ccc/bbb/2.html |
例2:用户访问/2018/ccc/bbb/2.html实际上真实访问是/2014/ccc/bbb/2.html
1 | #http://www.bgx.com/2018/ccc/bbb/2.html ==> http://www.bgx.com/2014/ccc/bbb/2.html |
例3:用户访问/test目录下任何内容, 实际上真实访问是http://www.xuliangwei.com
1 | location /test { |
例4:用户访问course-11-22-33.html实际上真实访问是/course/11/22/33/course_33.html
1 |
|
例5:将http请求,跳转至https
1 | server { |
4.Rewrite规则补充
1.Rewrite优先级
1.先执行server块的rewrite指令2.其次执行location匹配规则3.最后执行location中的rewrite
2.Rewrite常用变量,在匹配过程中可以引用一些Nginx的全局变量
$server_name 当前用户请求的域名$request_filename 当前请求的文件路径名(带网站的主目录/code/images/test.jpg)$request_uri 当前请求的文件路径名(不带网站的主目录/images/test.jpg)$scheme用的协议,比如http或者https
3.如何优雅的书写Rewrite规则
1 | server { |
12.Nginx HTTPS 实践
- 1.HTTPS安全证书基本概述
- 2.Nginx单台实现HTTPS实战
- 3.Nginx集群实现HTTPS实践
- 4.阿里云Nginx实现HTTPS实践
- 5.阿里云SLB负载实现HTTPS实践
- 6.Nginx4+7层负载实现HTTPS实战
徐亮伟, 江湖人称标杆徐。多年互联网运维工作经验,曾负责过大规模集群架构自动化运维管理工作。擅长Web集群架构与自动化运维,曾负责国内某大型电商运维工作。
个人博客”徐亮伟架构师之路“累计受益数万人。老男孩Linux云计算运维QQ交流群: 384467551 226199307
老男孩教育官网 http://www.oldboyedu.com
实战构建一个满足苹果要求的HTTPS后台服务
1.HTTPS安全证书基本概述
为什么需要使用HTTPS, 因为HTTP不安全。当我们使用http网站时,会遭到劫持和篡改,如果采用https协议,那么数据在传输过程中是加密的,所以黑客无法窃取或者篡改数据报文信息,同时也避免网站传输时信息泄露。
那么我们在实现https时,需要了解ssl协议,但我们现在使用的更多的是TLS加密协议。那么TLS是怎么保证明文消息被加密的呢?在OSI七层模型中,应用层是http协议,那么在应用层协议之下,我们的表示层,是ssl协议所发挥作用的一层,它通过(握手、交换秘钥、告警、加密)等方式,使应用层http协议没有感知的情况下做到了数据的安全加密
那么在数据进行加密与解密过程中,如何确定双方的身份,此时就需要有一个权威机构来验证双方省份。那么这个权威机构则是CA机构。那CA机构又是如何颁发证书

我们首先需要申请证书,需要进行登记,登记我是谁,我是什么组织,我想做什么,到了登记机构在通过CSR发给CA,CA中心通过后,CA中心会生成一对公钥和私钥,那么公钥会在CA证书链中保存,公钥和私钥证书订阅人拿到后,会将其部署在WEB服务器上1.当浏览器访问我们的https站点时,它会去请求我们的证书2.Nginx这样的web服务器会将我们的公钥证书发给浏览器3.浏览器会去验证我们的证书是否是合法和有效的。4.CA机构会将过期的证书放置在CRL服务器,那么CRL服务的验证效率是非常差的,所以CA又推出了OCSP响应程序,OCSP响应程序可以查询指定的一个证书是否过期,所以浏览器可以直接查询OCSP响应程序,但OCSP响应程序性能还不是很高。5.Nginx会有一个OCSP的开关,当我们开启后,Nginx会主动上OCSP上查询,这样大量的客户端直接从Nginx获取,证书是否有效。
那么证书究竟是怎样组成的呢,接下来我们看一下证书有哪几种类型?
HTTPS证书购买选择
保护1个域名 www保护5个域名 www images cdn test m通配符域名 \.oldboy.com*
HTTPS注意事项
Https不支持续费,证书到期需重新申请新并进行替换.Https不支持三级域名解析, 如test.m.oldboy.comHttps显示绿色, 说明整个网站的url都是https的。Https显示黄色, 因为网站代码中包含http的不安全连接。Https显示红色, 要么证书是假的,要么证书过期。
2.Nginx单台实现HTTPS实战
1.环境准备
1 |
|
2.使用openssl命令充当CA权威机构创建证书(生产不使用此方式生成证书,不被互联网认可的黑户证书)
1 | [root@Nginx ssh_key] |
3.生成自签证书,同时去掉私钥的密码
1 | [root@Nginx ssl_key]# openssl req -days 36500 -x509 \ |
4.证书申请完成后需要了解Nginx如何配置Https
1 | #启动ssl功能 |
5.配置Nginx配置Https实例
1 | [root@Nginx ~]# cat /etc/nginx/conf.d/ssl.conf |
6.浏览器输入https://s.oldboy.com访问, 由于该证书非第三方权威机构颁发,而是我们自己签发的,所以浏览器会警告
7.以上配置如果用户忘记在浏览器地址栏输入 https:// 那么将不会跳转至https,建议配置将用户访问 http请求强制跳转https
1 | [root@Nginx ~] |
3.Nginx集群实现HTTPS实践
实战Nginx负载均衡+Nginx WEB配置HTTPS安全

1) 环境准备
| 主机名 | 外网IP(NAT) | 内网IP(LAN) | 角色 |
|---|---|---|---|
| lb01 | eth0:10.0.0.5 | eth1:172.16.1.5 | nginx-proxy |
| web01 | eth0:10.0.0.7 | eth1:172.16.1.7 | nginx-web01 |
| web02 | eth0:10.0.0.8 | eth1:172.16.1.8 | nginx-web02 |
2) 配置后端两台web节点监听80端口, 如已配置则无需修改
1 | [root@web01 conf.d]# cat blog.oldboy.com.conf |
3) 配置第二台web节点
1 | [root@web02 ~] |
4) 重启两台后端web节点Nginx
1 | [root@web01 ~] |
5) Nginx负载均衡先生成证书
1 | [root@lb01 ~] |
6) Nginx负载均衡配置文件如下
1 | [root@lb01 ~] |
7) 重启Nginx 负载均衡
1 | [root@lb01 ~] |
8) wordpress早期安装如果是使用http方式, 那开启https后会导致, wordpress出现加载或无法登陆问题。
1 | #web节点增加此参数 |
4.阿里云Nginx实现HTTPS实践
在云上签发各品牌数字证书,实现网站HTTPS化,使网站可信,防劫持、防篡改、防监听。并进行统一生命周期管理,简化证书部署,一键分发到云上产品


上传阿里云证书, 并解压
1 | [root@Nginx ssl_key]# rz |
配置nginx https
1 | [root@Nginx conf.d] |
测试访问Https
使用腾讯云ATS检测工具检查是否满足苹果IOS要求苹果ATS测试传送门

5.阿里云SLB负载实现HTTPS实践
1) 环境准备
| 角色 | 外网IP(NAT) | 内网IP(LAN) | 协议 |
|---|---|---|---|
| slb | eth0:10.0.0.5 | eth1:172.16.1.5 | https |
| ecs01 | eth0:10.0.0.7 | eth1:172.16.1.7 | http |
| ecs02 | eth0:10.0.0.8 | eth1:172.16.1.8 | http |
6.Nginx4+7层负载实现HTTPS实战
配置1台nginx四层负载均衡,2台7层nginx负载,4台后端web节点实现全栈https
| 角色 | 弹性公网 | 内网网络 | 协议 | 端口 |
|---|---|---|---|---|
| tcp_proxy | 47.104.29.64 | 172.16.1.164 | https/http | 80/443 |
| http_proxy01 | 172.16.1.165 | http/https | 80/443 | |
| http_proxy02 | 172.16.1.166 | http/https | 80/443 | |
| http_web01 | 172.16.1.167 | http | 80 | |
| http_web02 | 172.16.1.168 | http | 80 | |
| http_web03 | 172.16.1.169 | http | 80 | |
| http_web04 | 172.16.1.170 | http | 80 |
1.Nginx四层负载均衡配置如下
1 | [root@tcp_lb conf.c]# cat tcp_lb.bjstack.com.conf |
2.lb01与lb02配置七层负载均,具体内容如下
1 | [root@lb-node1 ~]# cat /etc/nginx/conf.d/proxy_lb.bjstack.com.conf |
3.后端多台web节点配置如下
1 | [root@web02 ~]# cat /etc/nginx/conf.d/web_lb.bjstack.com.conf |
13.Nginx高可用架构
- 1.Keepalived高可用基本概述
- 2.Keepalived高可用安装配置
- 3.Keepalived高可用地址漂移
- 4.Keepalived高可用非抢占式
- 5.keepalived高可用故障脑裂
徐亮伟, 江湖人称标杆徐。多年互联网运维工作经验,曾负责过大规模集群架构自动化运维管理工作。擅长Web集群架构与自动化运维,曾负责国内某大型电商运维工作。
个人博客”徐亮伟架构师之路“累计受益数万人。老男孩Linux云计算运维QQ交流群: 384467551 226199307
老男孩教育官网 http://www.oldboyedu.com
1.Keepalived高可用基本概述
1.什么是高可用
一般是指2台机器启动着相同的业务系统,当有一台机器down机了, 另外一台服务器能快速的接管, 对于访问的用户是无感知的。
2.高可用通常使用什么软件?
通常服务高可用我们选择使用keepalived软件实现
3.keepalived是如何实现高可用的?
keepalived软件是基于VRRP协议实现的。VRRP虚拟路由冗余协议,主要用于解决单点故障问题
4.那VRRP是如何诞生的,VRRP的原理又是什么?
比如公司的网络是通过网关转换进行上网的,那如果该路由器故障了,网关无法转发报文了,此时所有人都将无法上网,这么时候怎么办呢?
通常做法是给路由增加一台备节点,但问题来了?如果我们的主网关master故障了,用户是需要手动修改网关指向Backup,如果用户过多修改起来会非常的麻烦。第一个问题: 假设用户将指向都修改到Backup路由器,那么Master路由器如果修复好了又该怎么办?第二个问题: 假设Master网关故障,我们将Backup网关配置为Master网关IP行不行?其实上不行,因为PC第一次是通过ARP广播寻找到Master网关的Mac地址与IP地址,PC则会将Master网关的对应IP与MAC地址写入ARP缓存表中,那么PC第二次则会直接读取ARP缓存表中的MAC地址与IP地址,然后进行数据包的转发。此时PC转发的数据包还是会教给Master。(除非PC的ARP缓存表过期,在次发起ARP广播的时候才能正确获取Bakcup的Mac地址与对应的IP地址。)
如何才能做到出现故障自动转移,此时VRRP就应运而生,我们的VRRP其实是通过软件或硬件的形式在Master和Backup外面增加一个虚拟MAC地址(简称VMAC)与虚拟IP地址(简称VIP)。那么在这种情况下,PC请求VIP的时候,无论是Master处理还是Backup处理,PC仅会在ARP缓存表中记录VMAC与VIP的对应关系。
5.高可用keepalived使用场景
通常业务系统需要保证7x24小时不DOWN机, 比如公司内部OA系统,每天公司人员都需要使用,则不允许Down机。作为业务系统来说随时都可用
6.高可用核心概念总结
1.如何确定谁是主节点谁是备节点。(投票选举?优先级?)2.如果Master故障,Backup自动接管,那Master恢复后会夺权吗?(抢占式、非抢占式)3.如果两台服务器都认为自己是Master会出现什么问题?(脑裂)
2.Keepalived高可用安装配置
1.实践环境,配置实现虚IP转移
| 状态 | IP | 角色 |
|---|---|---|
| 节点1 | 10.0.0.5 | Master |
| 节点2 | 10.0.0.6 | Backup |
| VIP | 10.0.0.3 |
2.在master与backup上分别安装keepalived
1 | [root@lb01 ~] |
3.配置节点1,Master
1 | [root@lb01 ~]# cat /etc/keepalived/keepalived.conf |
4.配置节点2,Backup
1 | [root@lb02 ~]# cat /etc/keepalived/keepalived.conf |
5.对比keepalived的master与backup配置的区别
| Keepalived配置区别 | Master配置 | Backup节配置 |
|---|---|---|
| route_id(唯一标识) | lb01 | lb02 |
| state(角色状态) | MASTER | BACKUP |
| priority(优先级) | 150 | 100 |
6.启动Master与Backup节点的keepalived
1 |
|
3.Keepalived高可用地址漂移
检查keepalived的虚拟VIP地址能否漂移
1.在Master上进行如下操作
1 | # Master存在vip地址 |
2.在Backup上进行如下操作
1 | #发现地址已经漂移至Backup端 |
3.此时重新启动Master上的Keepalived,会发现VIP被强行抢占
1 | [root@lb01 ~]# systemctl start keepalived |
4.通过windows查看arp缓存表,验证地址漂移后是否会自动更新MAC地址。
4.Keepalived高可用非抢占式
通常master服务故障后backup会变成master,但是当master服务又恢复的时候,master会抢占VIP,这样就会发生两次切换对业务繁忙的网站来说并不是太友好,此时我们可以配置keepalived为非抢占式(前提两台主机的硬件配置信息一致)
配置非抢占式步骤如下
1、两个节点的state都必须配置为BACKUP(官方建议)2、两个节点都在vrrp_instance中添加nopreempt参数3、其中一个节点的优先级必须要高于另外一个节点的优先级。两台服务器都角色状态启用nopreempt后,必须修改角色状态统一为BACKUP,唯一的区分就是优先级。
1 | #Master |
5.keepalived高可用故障脑裂
由于某些原因,导致两台keepalived高可用服务器在指定时间内,无法检测到对方的心跳消息,各自取得资源及服务的所有权,而此时的两台高可用服务器又都还活着。
1.服务器网线松动等网络故障2.服务器硬件故障发生损坏现象而崩溃3.主备都开启firewalld防火墙
1.在备上编写检测脚本, 测试如果能ping通主并且备节点还有VIP的话则认为产生了列脑
1 | [root@lb02 ~]# cat check_split_brain.sh |
2.如果Nginx宕机, 会导致用户请求失败, 但Keepalived并不会进行切换, 所以需要编写一个脚本检测Nginx的存活状态, 如果不存活则kill nginx和keepalived
1 | [root@lb01 ~]# mkdir /server/scripts |
3.在lb01主机的keepalived配置文件中调用此脚本
1 | [root@lb01 ~]# cat /etc/keepalived/keepalived.conf |
14.Nginx使用常见问题
- 1.Nginx多Server优先级
- 2.Nginx禁止IP直接访问
- 3.Nginx包含文件Include
- 4.Nginx路径root与alias
- 5.Nginx try_file路径匹配
- 6.Nginx调整上传文件大小
- 7.Nginx优雅显示错误页面
徐亮伟, 江湖人称标杆徐。多年互联网运维工作经验,曾负责过大规模集群架构自动化运维管理工作。擅长Web集群架构与自动化运维,曾负责国内某大型电商运维工作。
个人博客”徐亮伟架构师之路“累计受益数万人。老男孩Linux云计算运维QQ交流群: 384467551 226199307
老男孩教育官网 http://www.oldboyedu.com
1.Nginx多Server优先级
在开始处理一个http请求时,nginx会取出header头中的Host变量,与nginx.conf中每个server的server_name进行匹配,以此决定到底由哪一个server来处理这个请求。但nginx如配置多个相同的server_name,会导致server_name出现优先级访问冲突。
1.准备nginx对应的配置文件
1 | [root@web02 conf.d]# cat code1.conf |
2.准备站点目录
1 | [root@web02 conf.d]# mkdir /code{1..3} -p |
3.检查语法, 并重新加载Nginx
1 | [root@web02 conf.d]# nginx -t |
4.测试访问效果
1 | #1.当用户第一次访问, 由code1.conf返回输出信息 |
5.多ServerName优先级总结, 在开始处理一个HTTP请求时,Nginx会读取 header(请求头)中的host,与每个server中的 server_name进行匹配,来决定用哪一个server标签来完成处理这个请求。有可能一个Host与多个server中的server_name都匹配,这个时候就会更具匹配优先级来选择实际处理的server块。优先级匹配结果如下:
1.首先选择所有的字符串完全匹配的server_name。(完全匹配)
2.选择通配符在前面的server_name,如.bgx.com
3.选择通配符在后面的server_name,如bgx.
4.最后选择使用正则表达式匹配的server_name
5.如果全部都没有匹配到,那么将选择在listen配置项后加入[default_server]的server块
6.如果没写,那么就找到匹配listen端口的第一个Server块的配置文件
注意:当出现多个相同的Server_Name情况下,配置文件排序优先使用则会先被调用,所以建议配置相同端口, 不同域名,这样则不会出现域名访问冲突。
2.Nginx禁止IP直接访问
当用户通过访问IP或者未知域名访问你的网站的时候,你希望禁止显示任何有效内容,可以给他返回500,目前国内很多机房都要求网站主关闭空主机头,防止未备案的域名指向过来造成麻烦
1 | server { |
2.也可以将流量集中导入自己的网站,只要做以下跳转设置就可以
1 | server { |
3.Nginx包含文件Include
一台服务器配置多个server网站,如果配置都写在nginx.conf主配置文件中,会导致nginx.conf主配置文件变得非常庞大而且可读性非常的差。那么后期的维护就变得麻烦。假设现在希望快速的关闭一个站点,该怎么办?1.如果是写在nginx.conf中,则需要手动注释,比较麻烦2.如果是include的方式,那么仅需修改配置文件的扩展名,即可完成注释
Include包含的作用是为了简化主配置文件,便于人类可读。
4.Nginx路径root与alias
root与alias路径匹配主要区别在于nginx如何解释location后面的uri,这会使两者分别以不同的方式将请求映射到服务器文件上,alias是一个目录别名的定义,root则是最上层目录的定义。root的处理结果是:root路径+location路径alias的处理结果是:使用alias路径替换location路径
1.root路径配置实例: 用户访问www.xuliangwei.com/image/test.gif,实际上Nginx会上/code/image/目录下找去找test.gif文件
1 | server { |
2.alias配置实例: 用户访问www.xuliangwei.com/image/test.gif,实际上Nginx会上/code/目录下找去找test.gif文件。
1 | server { |
5.Nginx try_file路径匹配
nginx的try_file路径匹配,按顺序检查文件是否存在
1 | [root@bgx ~]# cat /etc/nginx/conf.d/try_file.conf |
1.演示环境准备
1 | [root@Nginx ~]# echo "Try-Page" > /soft/code/index.html |
2.配置Nginx的tryfiles
1 | [root@Nginx ~]# cat /etc/nginx/conf.d/try.conf |
3.测试tryfiles
1 | [root@Nginx ~]# curl http://try.bgx.com/index.html |
6.Nginx调整上传文件大小
在nginx使用过程中,上传文件的过程中,通常需要设置nginx报文大小限制。避免出现413 Request Entity Too Large
nginx上传文件大小限制配置语法
1 | Syntax: client_max_body_size size; |
nginx上传文件大小限制配置示例
1 | #也可以放入http层,全局生效 |
7.Nginx优雅显示错误页面
error_page错误日志
1 | [root@web01 conf.d]# cat code3.conf |
15.Nginx性能优化实践
1.性能优化概述
基于Nginx性能优化,那么在性能优化这一章,我们将分为如下几个方面做介绍1.首先我们需要了解性能优化要考虑哪些方面。2.然后我们需要了解性能优化必须要用到的压力测试工具ab。3.最后我们需要了解系统上有哪些注意和优化的点,以及Nginx配置文件。
我们在做性能优化工作前,我们重点需要考虑哪些方面,和了解哪些方面。
1.首先需要了解我们当前系统结构和瓶颈,了解当前使用的是什么,运行的是什么业务,都有哪些服务,了解每个服务最大能支撑多大并发。比如Nginx作为静态资源服务的并发是多少,最高瓶颈在哪里,能支持多少qps(每秒查询率)的访问请求,那我们怎么得出这组系统结构瓶颈呢,比如top查看系统的cpu负载、内存使用率、总的运行进程等,也可以通过日志去分析请求的情况,当然也可以通过我们前面介绍到的stub_status模块查看当前的连接情况,也可以对线上的业务进行压力测试(低峰期),去了解当前这套系统能承担多少的请求和并发,已做好相应的评估。这个是我们做性能优化最先考虑的地方。
2.其次我们需要了解业务模式,虽然我们是做性能优化,但每一个性能的优化都是为业务所提供服务的,我们需要了解每个业务接口的类型,比如:电商网站中的抢购模式,这种情况下面,平时没什么流量,但到了抢购时间流量会突增。我们还需要了解系统层次化的结构,比如: 我们使用Nginx做的是代理、还是动静分离、还是后端直接服务用户,那么这个就需要我们对每一层做好相应的梳理。以便更好的服务业务。
3.最后我们需要考虑性能与安全,往往注重了性能,但是忽略了安全。往往过于注重安全,性能又会产生影响。比如:我们在设计防火墙功能时,检测过于严密,这样就会给性能带来影响。那么如果对于性能完全追求,却不顾服务的安全,这个也会造成很大的隐患,所以需要评估好两者的关系,把握好两者的孰重孰轻。以及整体的相关性,权衡好对应的点。
2.压力测试工具
在系统业务量没有增长之前,我们就要做好相应的准备工作,已防患业务量徒增带来的接口压力,所以对于接口压力测试就显得非常重要了。我们首先要评估好系统压力,然后使用工具检测当前系统情况,是否能满足对应压力的需求。
1.安装ab压力测试工具
1 | [root@nginx-lua ~] |
2.了解压测工具使用方式
1 | [root@nginx-lua ~]# ab -n 200 -c 2 http://127.0.0.1/ |
3.配置Nginx静态网站与tomcat动态网站环境
1 | [root@web01 conf.d]# cat jsp.conf |
4.使用ab工具进行压力测试
1 | #总请求2000,同时并发2 |
5.将nginx下的bgx.html文件移走,再次压测会由tomcat服务进行解析返回
1 | Concurrency Level: 200 |
了解影响性能指标
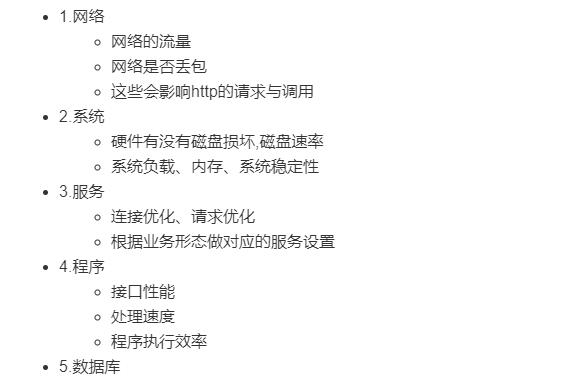
每个服务与服务之间都或多或少有一些关联, 我们需要将整个架构进行分层, 找到对应系统或服务的短板, 然后进行优化
3.系统性能优化
文件句柄, Linux一切皆文件,文件句柄可以理解为就是一个索引,文件句柄会随着我们进程的调用频繁增加,系统默认文件句柄是有限制的,不能让一个进程无限的调用,所以我们需要限制每个进程和每个服务使用多大的文件句柄,文件句柄也是必须要调整的优化参数。文件句柄的设置方式,1.系统全局性修改。2.用户局部性修改。3.进程局部性修改
1 | [root@nginx ~]# vim /etc/security/limits.conf |
4.代理服务优化
通常Nginx作为代理服务,负责转发用户的请求,那么在转发的过程中建议开启HTTP长连接,用于减少握手次数,降低服务器损耗。upstream keepalive说明
1.长连接语法示例,(应用层面优化)
1 | Syntax: keepalive connections; |
2.配置Nginx代理服务使用长连接方式
1 | upstream http_backend { |
3.对于fastcgi服务器,需要设置fastcgi_keep_conn以便保持长连接
1 | upstream fastcgi_backend { |
4.keepalive_requests设置通过一个keepalive连接提供的最大请求数。在发出最大请求数后,将关闭连接。
1 | Syntax: keepalive_requests number; |
5.keepalive_timeout设置超时,在此期间与代理服务器的空闲keepalive连接将保持打开状态。
1 | Syntax: keepalive_timeout timeout; |
注意:1.scgi和uwsgi协议没有保持连接的概念。2.但无论是proxy、fastcgi、uwsgi协议都有cache缓存的功能,开启后可加速网站访问的效率。
5.静态资源优化
Nginx作为静态资源Web服务器,用于静态资源处理,传输非常的高效

静态资源指的是,非WEB服务器端运行处理而生成的文件
| 静态资源类型 | 种类 |
|---|---|
| 浏览器渲染 | HTML、CSS、JS |
| 图片文件 | JPEG、GIF、PNG |
| 视频文件 | FLV、Mp4、AVI |
| 其他文件 | TXT、DOC、PDF、… |
5.1.静态资源缓存
浏览器缓存设置用于提高网站性能,尤其是新闻网站, 图片一旦发布,改动的可能是非常小的。所以我们希望能否用户访问一次后,图片缓存在用户的浏览器长时间缓存。浏览器是有自己的缓存机制,它是基于HTTP协议缓存机制来实现的,在HTTP协议中有很多头信息,那么实现浏览器的缓存就需要依赖特殊的头信息来与服务器进行特殊的验证,如: Expires (http/1.0) ; Cache-control (http/1.1)。Nginx静态资源缓存参考
1.浏览器无缓存
2.浏览器有缓存
3.浏览器缓存过期校验检查机制,说明如下:
1.浏览器请求服务器会先进行Expires、Cache-Control的检查,检查缓存是否过期,如果没有过期则直接从缓存文件中读取。2.如果缓存过期,首先检查是否存在etag,如果存在则会客户端会向web服务器请求if-None-Match,与etag值进行比对,由服务器决策返回200还是304。3.如果etag不存在,则进行last-Modified检查,客户端会向web服务器请求If-Modified-Since,与last-Modified进行比对,由服务器决策返回200还是304。
4.如何配置静态资源缓存expires
1 |
|
5.配置静态资源缓存场景
1 | server { |
6.如果开发代码没有正式上线时, 希望静态文件不被缓存
1 | #取消js css html等静态文件缓存 |
5.2.静态资源读取
1.文件读取高效sendfile,如下图
1 | Syntax: sendfile on | off; |

传统读取文件方式 VS sendfile读取文件方式
2.将多个包一次发送,用于提升网络传输效率,大文件推荐打开,需要开启sendfile才行
1 | Syntax: tcp_nopush on | off; |
3.提高网络传输实时性,需要开启keepalive
1 | Syntax: tcp_nodelay on | off; |
5.3.静态资源压缩
Nginx将响应报文发送至客户端之前启用压缩功能,然后进行传输,这能够有效地节约带宽,并提高响应至客户端的速度。
1.gzip传输压缩,传输前压缩,传输后解压
1 | Syntax: gzip on | off; |
2.gzip压缩哪些类型的文件
1 | Syntax: gzip_types mime-type ...; |
3.gzip压缩比率,加快传输,但压缩本身比较耗费服务端性能
1 | Syntax: gzip_comp_level level; |
4.gzip压缩协议版本,压缩使用在http哪个协议, 主流选择1.1版本
1 | Syntax: gzip_http_version 1.0 | 1.1; |
4.静态图片配置压缩案例
1 | [root@Nginx conf.d]# mkdir -p /soft/code/images |
5.测试没有开启gzip图片压缩
6.启用gzip压缩图片后(由于图片之前压缩过, 所以压缩比率不太明显)
7.文件压缩案例
1 | [root@Nginx conf.d]# mkdir -p /soft/code/doc |
没有启用gzip文件压缩
启用gzip压缩文件
5.4.防止资源盗链
防盗链,指的是防止资源被其他网站恶意盗用,
基础防盗链设置思路: 主要是针对客户端请求过程中所携带的一些Header信息来验证请求的合法性,比如客户端在请求的过程中都会携带referer信息(referer会告诉服务器我是丛哪一个页面过来的)。优点是规则简单,配置和使用都很方便,缺点是防盗链所依赖的Referer验证信息是可以伪造的,所以通过Referer信息防盗链并非100%可靠, 但是它能够限制大部分的盗链情况。
1 | Syntax: valid_referers none | blocked | server_names | string ...; |
1.在盗链服务器上准备html文件,偷取fj.xuliangwei.com网站上的图片
1 | [root@Nginx ~]# cat /code/referer_test.html |
2.使用浏览器能正常访问到偷链的资源
3.在kt.xuliangwei.com服务器上启动基于防盗链
1 | location ~ .*\.(jpg||jpeg|gif|png)$ { |
以上配置含义表示: 所有来自xuliangwei.com都可以访问到当前站点的图片,如果来源域名不在这个列表中,那么$invalid_referer等于1,在if语句中返回一个403给用户, 这样用户便会看到一个403的页面
4.使用浏览器验证会发现恶意的来源网站已经无法正常盗链
5.如果不使用return 403而使用rewrite,那么盗链图片会返回一个ks.jpeg给用户
1 | location ~ .*\.(jpg||jpeg|gif|png)$ { |
6.验证rewrite的效果
7.如果希望某些网站能够使用(盗链)资源
1 | location ~* \.(gif|jpg|png|bmp)$ { |
8.当然这种防护并不能百分百保证资源被盗链,因为我们可以通过命令修改来源的refrer信息。
5.5.允许跨域访问
什么是跨站访问,当我们通过浏览器访问a网站时,同时会利用到ajax或其他方式,同时也请求b网站,这样的话就出现了请求一个页面,使用了2个域名,这种方式对浏览器来说默认是禁止。
那Nginx允许跨站访问与浏览器有什么关系呢,因为浏览器会读取Access-Control-Allow-Origin的头信息,如果服务端允许,则浏览器不会进行拦截。
1 | Syntax: add_header name value [always]; |
1.在down.xuliangwei.com网站上准备跨站访问的文件
1 | [root@Nginx ~]# cat /code/http_origin.html |
2.通过浏览器测试,该跨站操作一定会被拒绝
3.我们在fj.xuliangwei.com的Nginx上配置允许跨域访问
1 | [root@Nginx conf.d]# cat fj.xuliangwei.com.conf |
4.再次通过浏览器访问,已经能实现跨域访问请求
5.6.CPU亲和配置
CPU亲和(affinity)减少进程之间不断频繁切换,减少性能损耗,其实现原理是将CPU核心和Nginx工作进程绑定方式,把每个worker进程固定对应的cpu上执行,减少切换cpu的cache miss,获得更好的性能。

1.查看当前CPU物理状态
1 | [root@nginx ~]# lscpu |grep "CPU(s)" |
2.将Nginx worker进程绑至不同的核心上,官方建议与cpu的核心保持一致
1 | # 第一种绑定组合方式 |
3.查看nginx worker进程绑定至对应cpu
1 | ps -eo pid,args,psr|grep [n]ginx |
5.7.通用优化配置
Nginx优化总结,Nginx通用优化配置文件
1 | [root@nginx ~]# cat nginx.conf |
Nginx安全与优化总结
1.cpu亲和、worker进程数、调整每个worker进程打开的文件数2.使用epool网络模型、调整每个worker进程的最大连接数3.文件的高效读取sendfile、nopush、4.文件的传输实时性、nodealy5.开启tcp长链接、以及长链接超时时间keepalived6.开启文件传输压缩gzip7.开启静态文件expires缓存8.隐藏Nginx的版本号9.禁止通过IP地址访问,禁止恶意域名解析,只允许域名访问10.配置放盗链、以及跨域访问11.防DDOS、cc攻击, 限制单IP并发连接,以及http请求12.优雅限制nginx错误页面13.nginx加密传输https优化14.nginx proxy_cache、fastcgi_cache、uwsgi_cache缓存
6.PHP服务优化
1.php程序配置管理文件/etc/php.ini,主要调整日志、文件上传、禁止危险函数、关闭版本号显示、等
1 | #;;;;;;;;;;;;;;;;; |
php危险函数禁用参考列表
2.php-fpm进程管理配置文件/etc/php-fpm.conf
1 | #第一部分,fpm配置 |
3.php-fpm监控模块,用于监控php-fpm状态使用
1 | [root@nginx ~]# vim /etc/php-fpm.d/www.conf |
4.访问测试phpfpm_status状态页面
1 | [root@nginx ~]# curl http://127.0.0.1/phpfpm_status |
5.PHP-FPM配置文件 4核16G、4核32G
1 | [root@nginx ~]# cat /etc/php-fpm.d/www.conf |
16.Nginx架构课程总结
- 1.架构总结
- 2.了解需求
- 3.设计评估
- 4.配置事项
徐亮伟, 江湖人称标杆徐。多年互联网运维工作经验,曾负责过大规模集群架构自动化运维管理工作。擅长Web集群架构与自动化运维,曾负责国内某大型电商运维工作。
个人博客”徐亮伟架构师之路“累计受益数万人。老男孩Linux云计算运维QQ交流群: 384467551 226199307
老男孩教育官网 http://www.oldboyedu.com
1.架构总结
当我们接手一套新的业务,需要去设计或配置中间件服务的时候,我们应该丛哪些地方去考虑。
2.了解需求
1.了解需求,了解对应好的需求,才能设计好合理的Nginx架构。2.设计评估,评估现有的资源、评估使用什么样的方式,评估后期的扩展3.配置注意事项。
16.Nginx架构课程总结
1.架构总结
当我们接手一套新的业务,需要去设计或配置中间件服务的时候,我们应该丛哪些地方去考虑。
2.了解需求
1.了解需求,了解对应好的需求,才能设计好合理的Nginx架构。2.设计评估,评估现有的资源、评估使用什么样的方式,评估后期的扩展3.配置注意事项。
3.设计评估

4.配置事项

17.Nginx Uwsgi代理
- 1.Uwsgi代理基本概述
- 2.Uwsgi代理使用优势
- 3.Uwsgi代理配置实践
徐亮伟, 江湖人称标杆徐。多年互联网运维工作经验,曾负责过大规模集群架构自动化运维管理工作。擅长Web集群架构与自动化运维,曾负责国内某大型电商运维工作。
个人博客”徐亮伟架构师之路“累计受益数万人。老男孩Linux云计算运维QQ交流群: 384467551 226199307
老男孩教育官网 http://www.oldboyedu.com
1.Uwsgi代理基本概述
cgi、fastcgi、wsgi、uwsgi

python框架Django是一个开放源代码的web的框架Flask是一个使用python编写的轻量级web应用框架
2.Uwsgi代理使用优势
框架为什么使用uwsgi,而不是proxy1.安全(nginx可以实现访问控制),直接后端对外是无法控制2.效率(实现动静分离)
3.Uwsgi代理配置实践
步骤一、安装python3的环境步骤二、安装Django框架、uwsgi步骤三、单独测试Django与uwsgi是否正常步骤四、配置项目,使项目以uwsgi方式启动步骤五、配置Nginx反向代理uwsgi
0.安装依赖软件包
1 | [root@web01 ~] |
1.安装python3环境
1 | [root@web01 ~] |
2.安装Django框架和uwsgi
1 | [root@web01 ~] |
3.测试uwsgi是否正常,新建test.py文件,内容如下
1 | [root@web01 ~]# vim test.py |
4.测试django是否正常,运行如下指令
1 | [root@web01 ~] |
5.配置uwsgi
1 | [root@web01 ~]# cat /root/demosite/uwsgi.ini |
6.启动uwsgi
1 |
|
7.配置Nginx代理至uwsgi协议
1 | [root@web01 demosite]# cat /etc/nginx/conf.d/py.conf |
7.使用UWSGI代理方式部署Python项目