Vue组件基础
1.1 什么是组件
组件的概念
组件(Component)是 Vue.js 最强大的功能之一。组件可以扩展 HTML 元素,封装可重用的代码。在较高层面上,组件是自定义元素,Vue.js 的编译器为它添加特殊功能。在有些情况下,组件也可以表现为用 is 特性进行了扩展的原生 HTML 元素。
所有的 Vue 组件同时也都是 Vue 的实例,所以可接受相同的选项对象(除了一些根级特有的选项)并提供相同的生命周期钩子。
如何理解组件
简单理解,组件其实就是一个独立的 HTML,它的内部可能有各种结构、样式、逻辑,某些地方来说有些像 iframe,它都是在页面中引入之后展现另一个页面的内容,但实际上它与 iframe 又完全不同,iframe 是一个独立封闭的内容,而组件既是一个独立的内容,还是一个受引入页面控制的内容。
通常一个应用会以一棵嵌套的组件树的形式来组织:

例如,你可能会有页头、侧边栏、内容区等组件,每个组件又包含了其它的像导航链接、博文之类的组件。
为什么要使用组件
举个简单的列子,最近我的项目中有一个日历模块,多个页面都要用这个日历,而每个页面的日历都存在一些差别,如果不使用组件,我要完成这个项目,做到各个页面的日历大体一致,而部分地方存在差异,我可能就需要写几套日历代码了。
而使用组件呢?一套代码,一个标签,然后分别在不同地方引用,根据不同的需求进行差异控制即可。
1 | <calendar></calendar> |
我可以通过给 calendar 传递值实现在本页面对日历的控制,让它满足我这个页面的某些单独需求。
有人会问,你 calendar 标签是什么鬼?前面有这么一句话,组件是自定义元素。calendar 就是我自定义的元素,它就是一个组件。所以在项目中,你会发现有各种五花八门的标签名,他们就是一个个组件。
####
1.2 创建组件
注册组件
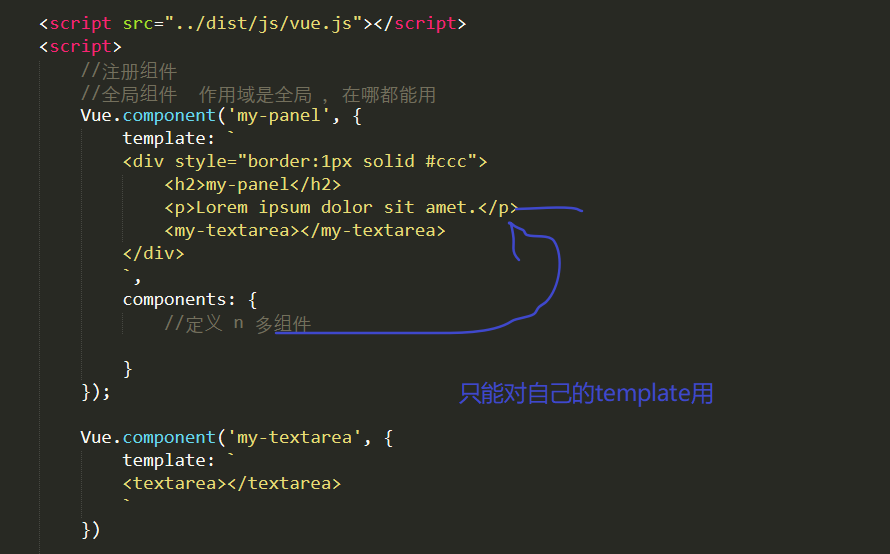
我们把创建一个组件称为注册组件,如果你把组件理解成为变量,那么注册组件你就可以理解为声明变量。我们通过 Vue.component 来注册一个全局组件
1 | Vue.component(componentName, { |
对于自定义组件的命名,Vue.js 不强制遵循 W3C 规则(小写,并且包含一个短杠),尽管这被认为是最佳实践。
组件的选项
- 与创建Vue示例时的选项相同(除了一些根级特有的选项)
- 一个组件的 data 选项必须是一个函数 (每个组件实例具有自己的作用域,组件复用不会互相影响)
1 | // 定义一个名为 button-counter 的新组件 |
组件的使用
1 | <div id="components-demo"> |
组件可以复用
1 | <div id="components-demo"> |
组件模板
每个组件模板必须只有一个根元素
模板的形式:
template 选项指定字符串 (模板字符串)
单文件组件(.vue) 最优方式
内联模板 (不推荐)
1 | <my-component inline-template> |
X-Templates
该显示到hello-world组件上
1 | <script type="text/x-template" id="hello-world-template"> |
1 | Vue.component('hello-world', { |
可以插入数据
1 | <script type="text/x-template" id="my-panel-template"> |
1 | //x-templates 模板 |
根实例

vue组件
1 | <!DOCTYPE html> |
全局组件和局部组件
使用 Vue.component()注册的组件都是全局组件
我们可以定义局部组件
局部组件的命名
1 | var localTag = { |
组件是局部作用域
data一定是方法不是数据需要返回值
data需要绑定方法,数据通过方法返回值进行处理,达到组件复用时,数据的私有化
每个组件都是一个独立的对象
1 | var btnTag = { |
全局组件附属于Vue实例,可以不需要注册就可以使用
1 | <body> |
2种全局组件的区别
第一种
第二中对根组件使用
1 | new Vue({ |
1 | var ComponentA = { /* ... */ } |
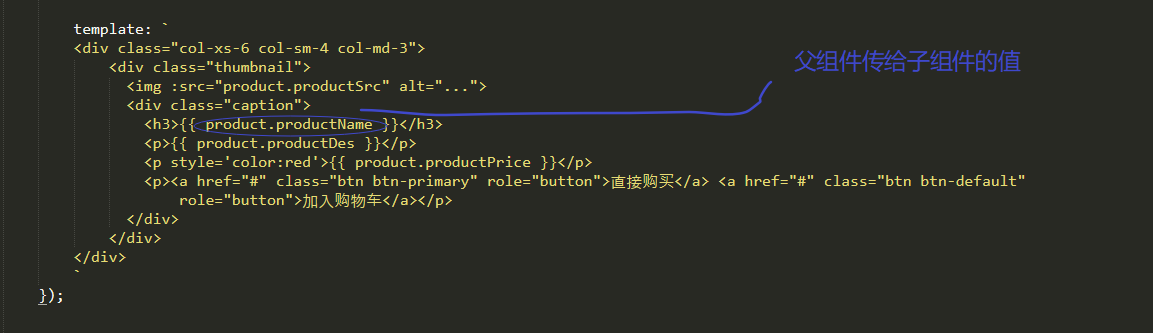
2. 组件之间的嵌套使用和互相通信
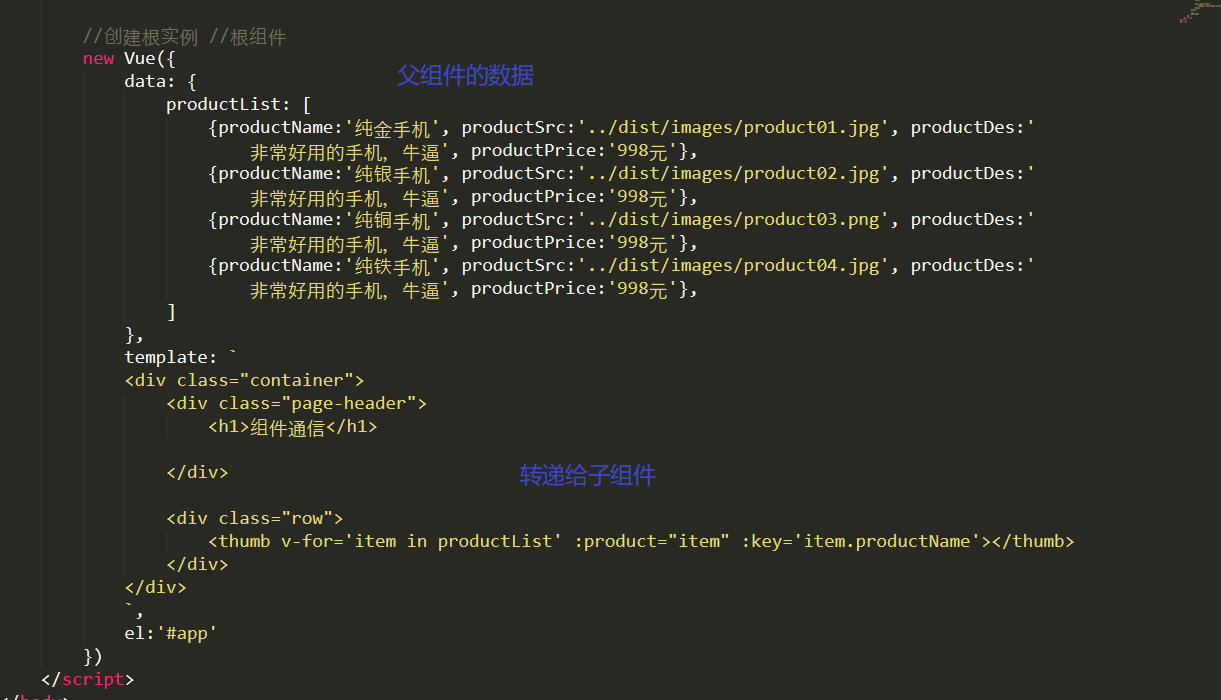
组件设计初衷就是要配合使用的,最常见的就是形成父子组件的关系:组件 A 在它的模板中使用了组件 B。它们之间必然需要相互通信:父组件可能要给子组件下发数据,子组件则可能要将它内部发生的事情告知父组件。
每个组件的作用域都是独立的,所以在组件嵌套使用的时候子组件不能直接使用父组件中的数据。

父组件同绑定属性的方式进行数据传输
1.给在父组件中出现的子组件名定义标签的全局属性
2.全局属性的值赋值为父组件的数据变量
3.在子组件内部,通过props拿到标签中的全局属性名
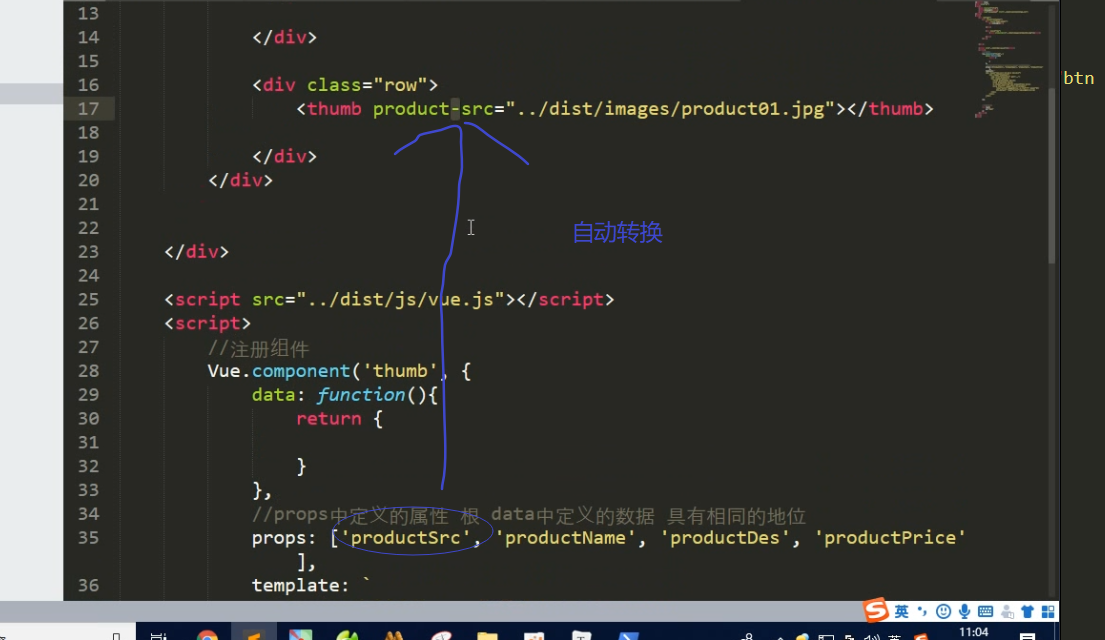
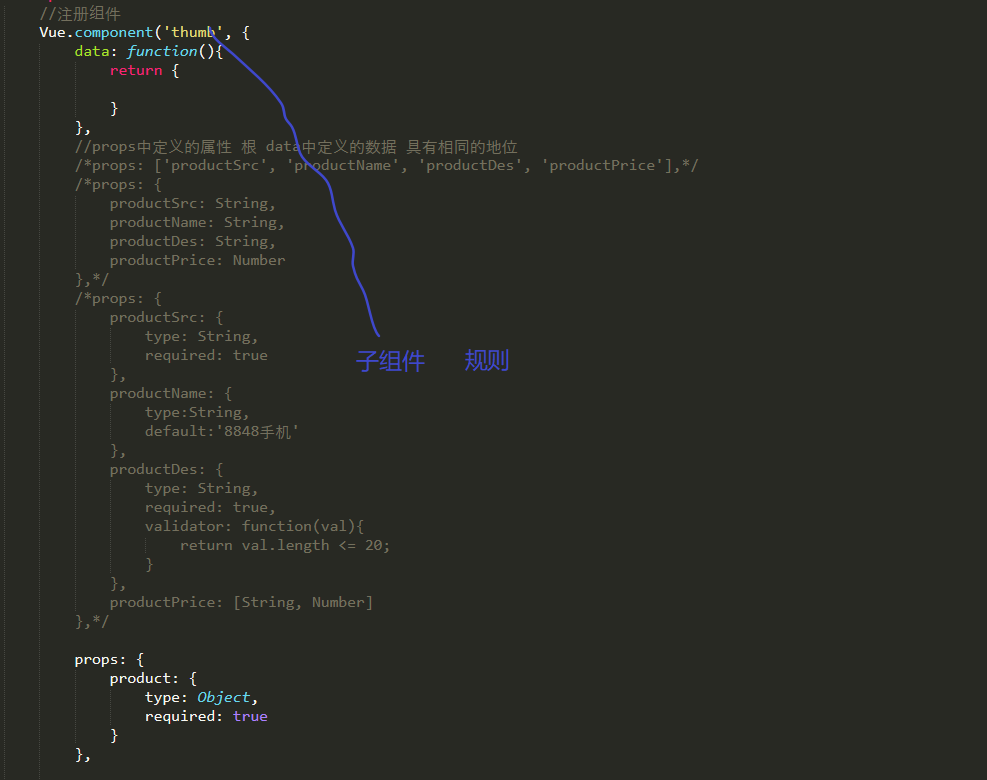
2.1 通过Prop向子组件传递规则
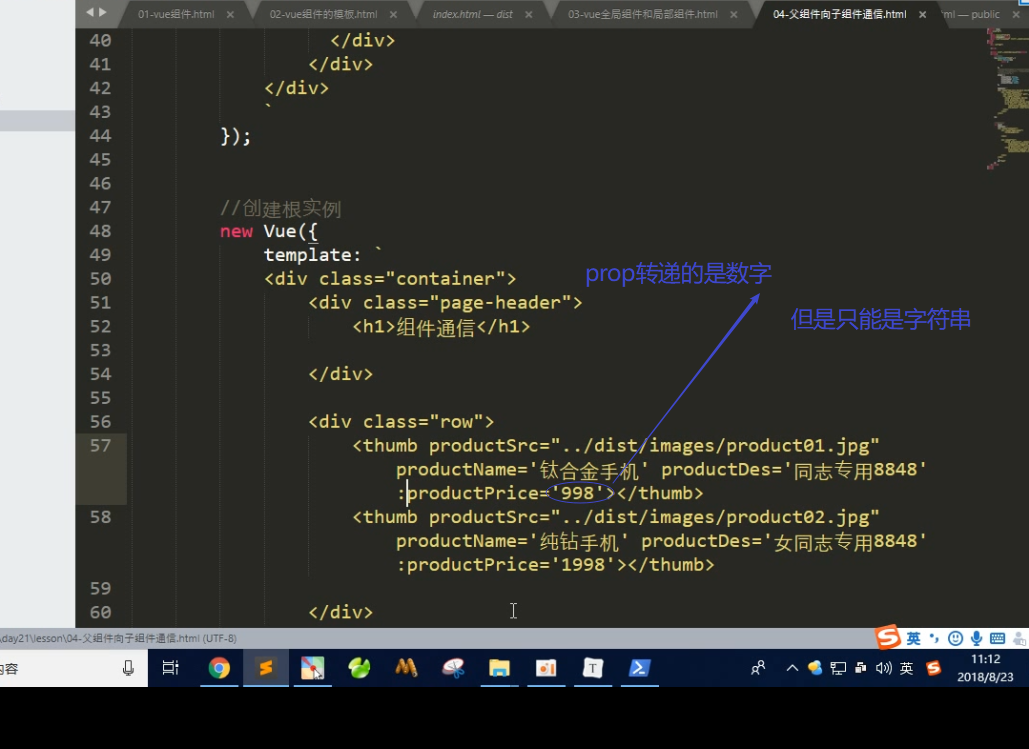
通过Prop向子组件传递过程
x-Templates
1 | <!DOCTYPE html> |
子组件传递数据给父组件
1 | <!DOCTYPE html> |
tolist
1 | <!DOCTYPE html> |
tolist2
1 | <!DOCTYPE html> |
轮播图
1 | <!DOCTYPE html> |
基本使用
在子组件中声明 prop,然后添加一个 message
1 | Vue.component('child', { |
一个组件默认可以拥有任意数量的 prop,任何值都可以传递给任何 prop。我们能够在组件实例中访问这个值,
然后直接传入值就可以在子组件中使用 message。
1 | <child message="hello!"></child> |
####
Prop 的大小写
HTML 中的特性名是大小写不敏感的,所以浏览器会把所有大写字符解释为小写字符。这意味着当你使用 DOM 中的模板时,camelCase (驼峰命名法) 的 prop 名需要使用其等价的 kebab-case (短横线分隔命名) 命名
传入一个对象的所有属性
1 | <blog-post v-bind="post"></blog-post> |
等价于
1 | <blog-post |
Prop验证
我们可以为组件的 prop 指定验证要求
1 | Vue.component('my-component', { |
类型列表:
- String
- Number
- Boolean
- Array
- Object
- Date
- Function
- Symbol
- 自定义的构造函数
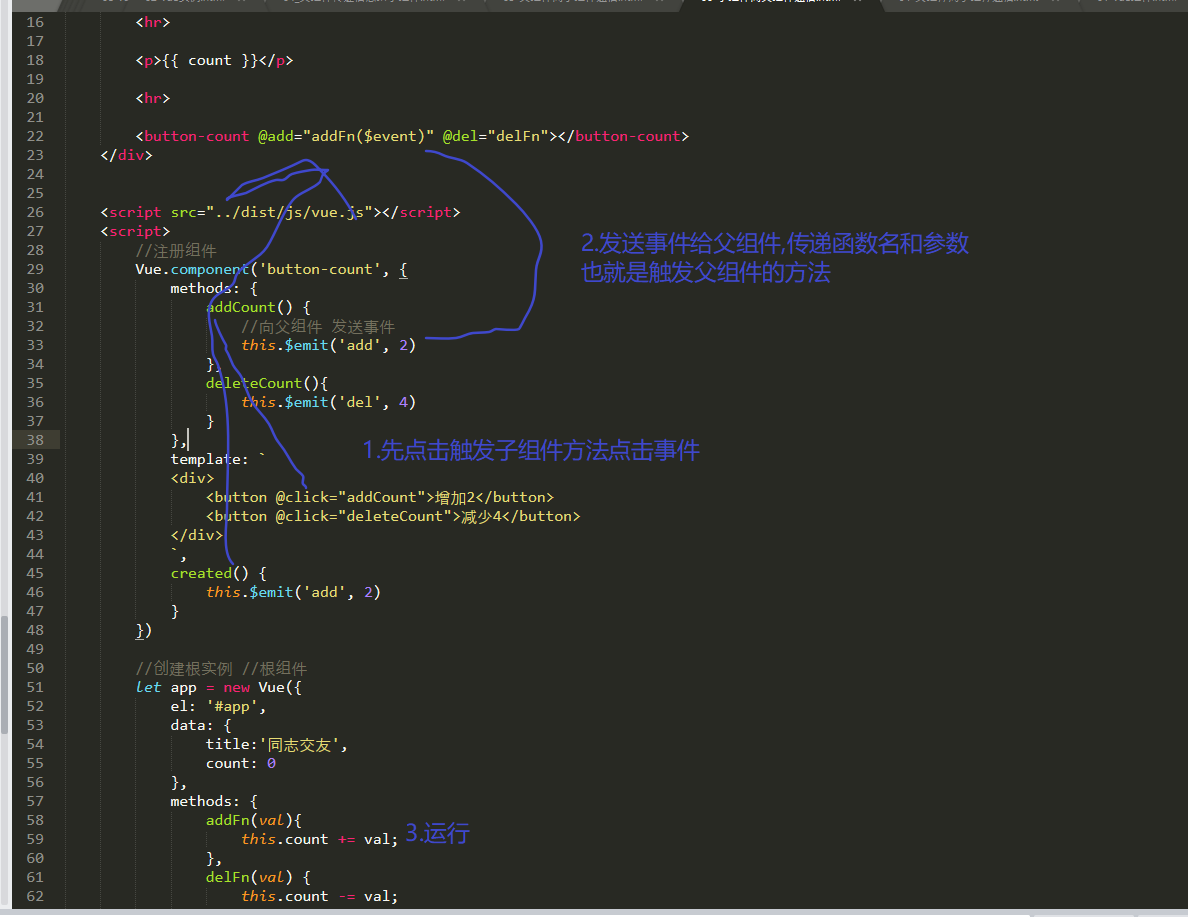
2.2 通过事件向父级组件发送消息
on(eventName)+on(eventName)+emit(eventName) 实现通讯
在父组件中使用 on(eventName)监听事件,然后在子组件中使用on(eventName)监听事件,然后在子组件中使用emit(eventName) 触发事件,这样就能实现子组件向父组件传值。
1 | Vue.component('button-counter', { |
1 | <div id="counter-event-example"> |
使用事件抛出一个值
有的时候用一个事件来抛出一个特定的值是非常有用的。这时可以使用 $emit 的第二个参数来提供这个值
1 | incrementCounter: function () { |
然后当在父级组件监听这个事件的时候,我们可以通过 $event 访问到被抛出的这个值
1 | <button-counter v-on:increment="postFontSize + $event"></button-counter> |
或者,如果这个事件处理函数是一个方法:那么这个值将会作为第一个参数传入这个方法:
1 | <button-counter v-on:increment="incrementTotal"></button-counter> |
在组件上使用 v-model
组件内input需要满足条件:
- 将其
value特性绑定到一个名叫value的 prop 上 - 在其
input事件被触发时,将新的值通过自定义的input事件抛出
1 | Vue.component('custom-input', { |
v-model 在组件上的使用
1 | <custom-input v-model="searchText"></custom-input> |
3 插槽 slot
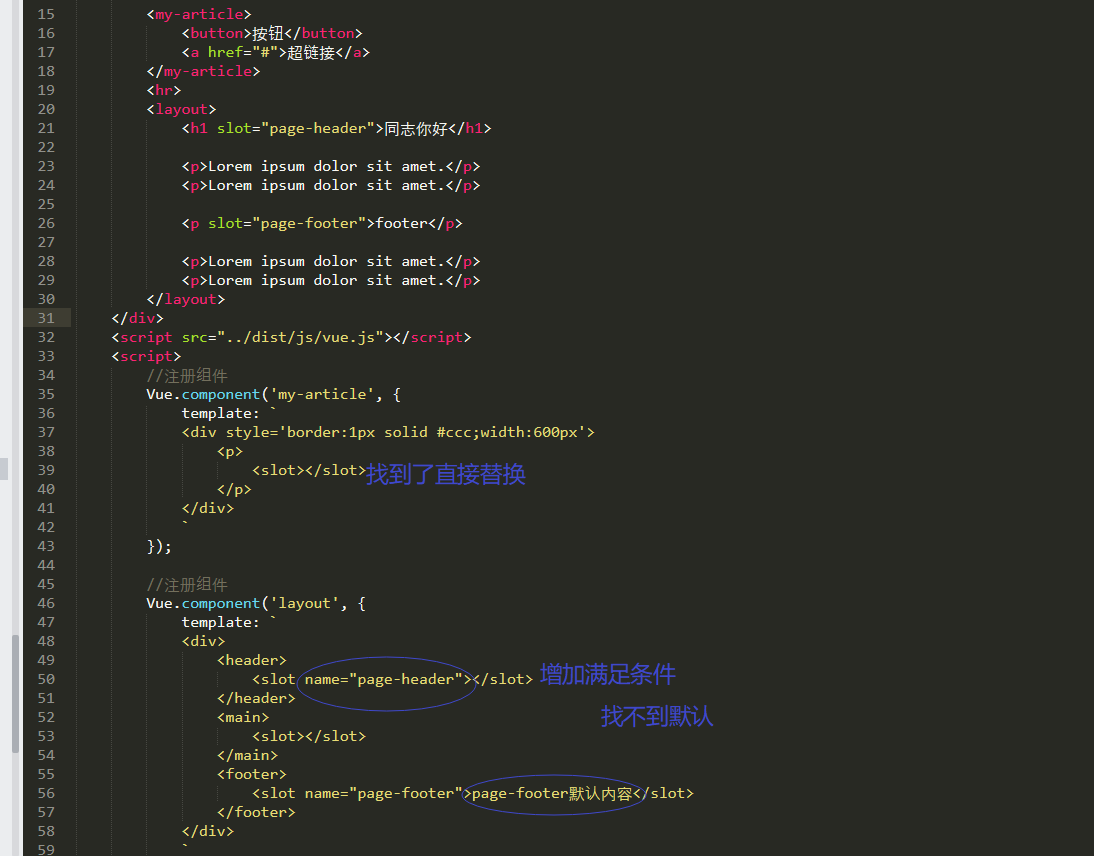
3.1 通过插槽分发内容
1 | Vue.component('alert-box', { |
1 | <alert-box> |
·Something bad happened.· 会替换掉 slot标签
3.2 模板中多个插槽
组件模板
1 | <div class="container"> |
调用组件
1 | <base-layout> |
3.3 插槽默认内容
1 | <button type="submit"> |
4. 动态组件

1 | <!DOCTYPE html> |
4.1 实现动态组件
在不同组件之间进行动态切换
1 | <component is="组件名" class="tab"></component> |
实现选项卡案例
4.2 在动态组件上使用 keep-alive
包裹动态组件时,会缓存不活动的组件实例,而不是销毁它们
主要用于保留组件状态或避免重新渲染
1 | <!-- 基本 --> |
4.3 绑定组件选项对象
动态组件可以绑定 组件选项对象(有component属性的对象),而不是已注册组件名的示例
1 | var tabs = [ |
1 | <component |
5 组件的其他特性
5.1 解析 DOM 模板时的注意事项
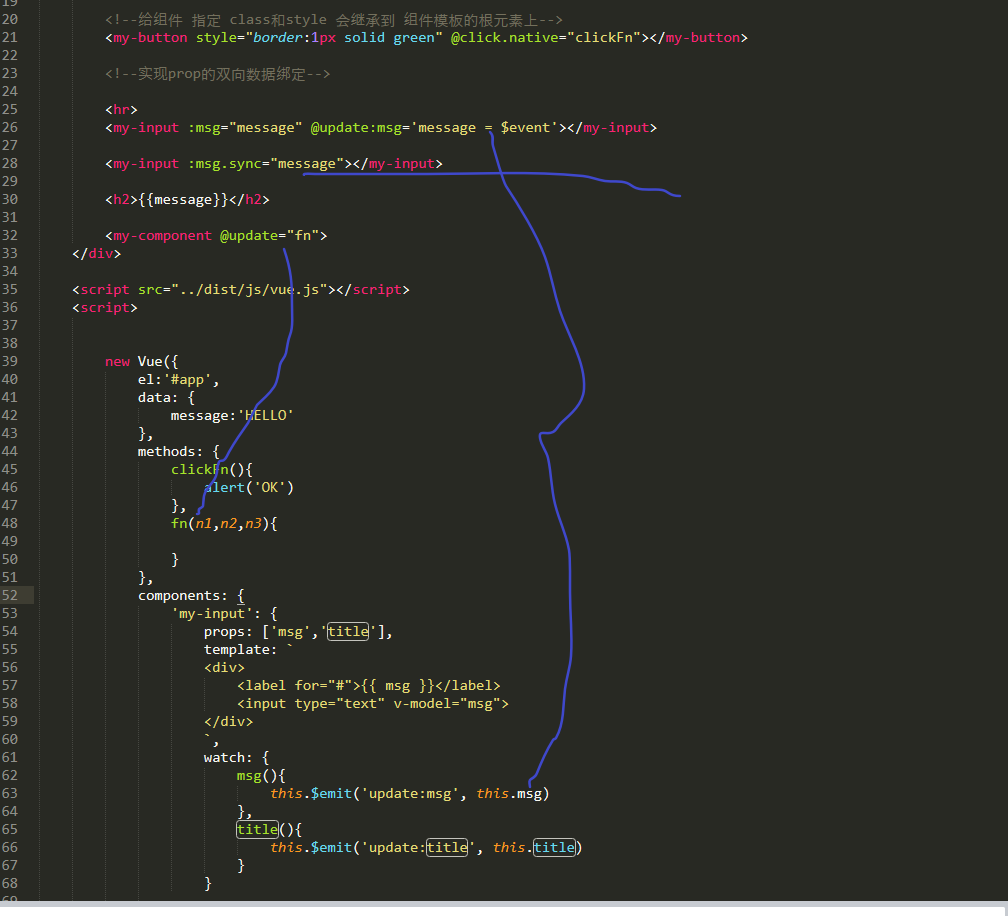
给组件 指定 class和style 会继承到 组件模板的根元素上
有些 HTML 元素,诸如 <ul>、<ol>、<table> 和 <select>,对于哪些元素可以出现在其内部是有严格限制的。而有些元素,诸如 <li>、<tr> 和 <option>,只能出现在其它某些特定的元素内部。
1 | <table> |
上面的写法,渲染效果会不甚理想,可以采用以下写法
1 | <table> |
需要注意的是如果我们从以下来源使用模板的话,这条限制是不存在的:
- 字符串 (例如:template: ‘…’)
- 单文件组件 (.vue)
<script type="text/x-template">
5.2 Prop的一些问题
Prop的属性名问题
HTML 中的特性名是大小写不敏感的,所以浏览器会把所有大写字符解释为小写字符。这意味着当你使用 DOM 中的模板时,camelCase (驼峰命名法) 的 prop 名需要使用其等价的 kebab-case (短横线分隔命名) 命名
如果你使用字符串模板,那么这个限制就不存在了。
非Prop属性
组件上定义的非Prop属性 会传递到 组件模板的根元素上
class 和 style 特性会非常智能,即两边的值会被合并起来
对prop重新赋值
子组件中,对prop重新赋值,会报警告
5.3 组件事件的相关问题
将原生事件绑定到组件
想要在一个组件的根元素上直接监听一个原生事件。这时,你可以使用 v-on 的 .native 修饰符
1 | <base-input v-on:focus.native="onFocus"></base-input> |
.sync 修饰符
在有些情况下,我们可能需要对一个 prop 进行“双向绑定”
推荐以 update:my-prop-name 的模式触发事件
1 | //子组件中 |
1 | <!-- 上级组件 模板中 --> |
以上写法可以换成下列写法
1 | <text-document v-bind:title.sync="doc.title"></text-document> |
5.4 官方文档-组件
深入了解组件
网址: https://cn.vuejs.org/v2/guide/components-registration.html
注意事项
实现prop的双向数据绑定
1 | <table> |